Slate, Hello
This tutorial assumes an intermediate understanding of C++ and event driven systems. It will give you a basic introduction to adding HUD capable of rendering Slate Widgets. In line with ancient tradition, the Slate Widget will render a text-box displaying the message "Hello, Slate!". Aside from the sources, there are a several steps involved in setting up a project that can handle Slate Widgets. Some things that may be glaringly obvious to someone with experience might be glazed over that aren't as obvious to someone just learning C.
Contents
Creating a project
If you have not done so already the first thing to do is to create a blank C++ project. For the purpose of this tutorial, it is recommended that you have "Include Starter Content" unticked . This tutorial will use the project name HelloSlate , however you can call it anything of your own choosing as long as you're comfortable with making the appropriate changes to the provided source files. For beginners I would suggest that you do not diverge from the provided example.
Creating the HUD and Widget files
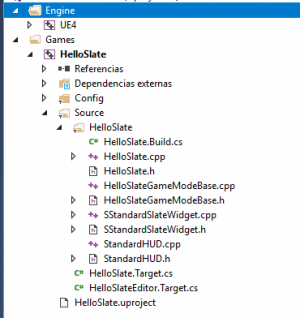
Now the open the project. We will have to create four new c++ files:
- StandardHUD.h
- StandardHUD.cpp
- StandardSlateWidget.h
- StandardSlateWidget.cpp
To create the files, we suggest you use the UE Editor as follows.
Note: You can create these manually. As you might be aware of already, when you create .cpp and .h files manually, Unreal puts the files in the intermediate folder. Make sure your files are in the source folder like they should be.
Create the HUD class
File --> New c++ Class --> On the Choose Parent Class list select "HUD" --> Click Next
Then name for this class will be : StandardHUD. Leave the path as it is (..../HelloSlate/Source/HelloSlate/). The files should look like: .../HelloSlate/Source/HelloSlate/StandardHUD.h and .cpp
Wait until the editor compiles the new files. It will open a Visual Studio instance.
Now you will see the HUD file (represents the h and cpp) in your Content Browser, under C++ Classes -> HelloSlate, next to the GameModeBase file.
Create the Slate Widget class
Repeat the process and this time choose parent class "Slate Widget". The name of the class will be "StandardSlateWidget". After creating this class, you will not see it on the Content Browser.
As for v4.18, if you have any problem when Visual Studio opens due to some bugs while creating a new class, you can close all VS instances and go to "File -> Refresh Visual Studio Project". Another good way to continue is to go to "File -> Open Project" and reopen this project again.
Now open Visual Studio by going to "File -> Open Visual Studio" or double clicking the new Standard HUD file on the content browser.
Allow C++ Access to Slate API by Modifying Build File
Open the HelloSlate.Build.cs file (typically located in $Projectfolder/$Projectname/Source/$Projectname) and modify it to allow Slate.
The contents of this file has changed since 4.8. In v4.18 you will find a commented line saying: Uncomment if you are using Slate UI
Just uncomment the following line:
PrivateDependencyModuleNames.AddRange(new string[] { "Slate", "SlateCore" });
If you already had a project and you wanted to use Slate, just make sure "Slate" and "SlateCore" modules are added to PrivateDependencyModuleNames.
Here's how the source file looks in v4.18:
// Fill out your copyright notice in the Description page of Project Settings.

using UnrealBuildTool;

public class HelloSlate : ModuleRules
{
	public HelloSlate(ReadOnlyTargetRules Target) : base(Target)
	{
		PCHUsage = PCHUsageMode.UseExplicitOrSharedPCHs;

		PublicDependencyModuleNames.AddRange(new string[] { "Core", "CoreUObject", "Engine", "InputCore" });

		// Uncomment if you are using Slate UI
                PrivateDependencyModuleNames.AddRange(new string[] { "Slate", "SlateCore" });

		// Uncomment if you are using online features
		// PrivateDependencyModuleNames.Add("OnlineSubsystem");

		// To include OnlineSubsystemSteam, add it to the plugins section in your uproject file with the Enabled attribute set to true
	}
}
Save the file and close visual studio. Next time you build your project your sources can link to the Slate API.
Adding code to our HUD
The HUD files are blank. We will fill them with a basic HUD creation
Lines commented with "// ++ " are added lines to the original file:
StandardHUD.h:
#pragma once
#include "CoreMinimal.h"
#include "GameFramework/HUD.h"
#include "StandardHUD.generated.h"

// ++ A predeclaration of SStandardSlateWidget that we need. The .h will be added to .cpp instead.
class SStandardSlateWidget;

UCLASS()
class HELLOSLATE_API AStandardHUD : public AHUD
{
	GENERATED_BODY()

public:
	// ++ Reference to an SCompoundWidget, TSharedPtr adds to the refcount of MyUIWidget
	// MyUIWidget will not self-destruct as long as refcount > 0. refcount will be (refcout-1) if HUD is destroyed.
	TSharedPtr<SStandardSlateWidget> MyUIWidget;

	// ++ Called as soon as game starts, create SCompoundWidget and give Viewport access
	void BeginPlay();
};
StandardHUD.cpp:
// Fill out your copyright notice in the Description page of Project Settings.

#include "StandardHUD.h"
#include "SStandardSlateWidget.h"

// ++ The SWeakWidget we are using
#include "Widgets/SWeakWidget.h"

// ++ To use GEngine. You can also import just "Engine.h" but some people mention this compiles slower than this header.
#include "Runtime/Engine/Classes/Engine/Engine.h"


void AStandardHUD::BeginPlay()
{
	// So far only TSharedPtr<SMyUIWidget> has been created, now create the actual object.
	// Create a SMyUIWidget on heap, our MyUIWidget shared pointer provides handle to object
	// Widget will not self-destruct unless the HUD's SharedPtr (and all other SharedPtrs) are destroyed first.
	MyUIWidget = SNew(SStandardSlateWidget).OwnerHUDArg(this);

	// Pass our viewport a weak ptr to our widget
	// Viewport's weak ptr will not give Viewport ownership of Widget
	GEngine->GameViewport->AddViewportWidgetContent(
		SNew(SWeakWidget)
		.PossiblyNullContent(MyUIWidget.ToSharedRef())
	);

	// Set widget's properties as visible (sets child widget's properties recursively)
	MyUIWidget->SetVisibility(EVisibility::Visible);

}
Additional information about adding items to the viewport from the documentation:
The game's viewport is an instance of the GameViewportClient class. A reference to the current game viewport is accessible via the GameViewport member of UEngine, which can be accessed using the GEngine global pointer to the current UEngine instance for the game.
Creating the content of our Widget
The Widget files ("What the hell's a Widget!?" -Rodney Dangerfield) aka The Slate Widget is a custom Slate GUI component. The widget is where we will display "Hello Slate!".
We want to add a new argument while creating our custom SCompoundWidget.
StandardSlateWidget.h:
#pragma once
#include "CoreMinimal.h"
#include "Widgets/SCompoundWidget.h"

class HELLOSLATE_API SStandardSlateWidget : public SCompoundWidget
{
public:
	SLATE_BEGIN_ARGS(SStandardSlateWidget)
	{}

        // ++ We add a new argument called OwnerHUDArg
	SLATE_ARGUMENT(TWeakObjectPtr<class AStandardHUD>, OwnerHUDArg);

	SLATE_END_ARGS()

	// Constructs this widget with InArgs. Needed for every widget. Builds this widget and any of it's children
	void Construct(const FArguments& InArgs);

private:

	// ++ Pointer to our parent HUD. To make sure HUD's lifetime is controlled elsewhere, use "weak" ptr.
	// ++ HUD has a "strong" pointer to Widget, circular ownership would prevent/break self-destruction of hud/widget (cause a memory leak).
	TWeakObjectPtr<class AStandardHUD> OwnerHUD;

};
Additional information taken from an answer from a staff member on the Answer Hub [ HERE ]:
SLATE_BEGIN_ARGS and SLATE_END_ARGS actually create a struct containing variables added by the SLATE_ARGUMENT, SLATE_ATTRIBUTE, and SLATE_EVENT macros. The name given to those variables is in the form of _TheNameYouGaveIt.
SLATE_ARGUMENT creates a variable of the exact type you gave it, so SLATE_ARGUMENT(int, MyThing) makes a variable of type int, with the name _MyThing.
SLATE_ATTRIBUTE creates a TAttribute for the type you gave it, so SLATE_ATTRIBUTE(int, MyThing) makes a variable of type TAttribute, with the name _MyThing.
Additionally the macros define a series of functions to allow you to set the variable they add, which are named based on TheNameYouGaveIt.
StandardSlateWidget.cpp:
#include "SStandardSlateWidget.h"
#include "SlateOptMacros.h"

BEGIN_SLATE_FUNCTION_BUILD_OPTIMIZATION

// ++ This is needed in order to use the localization macro LOCTEXT
#define LOCTEXT_NAMESPACE "SStandardSlateWidget"

void SStandardSlateWidget::Construct(const FArguments& InArgs)
{
	// ++ Asign the argument to our local variable
        // name will be _OwnerHUDArg instead of OwnerHUDArg, see comments about SLATE_ARGUMENT before
	OwnerHUD = InArgs._OwnerHUDArg;

        // ++ Add all this Slate code
	// If the code below doesn't look like C++ to you it's because it (sort-of) isn't,
	// Slate makes extensive use of the C++ Prerocessor(macros) and operator overloading,
	// Epic is trying to make our lives easier, look-up the macro/operator definitions to see why.

	ChildSlot
	.VAlign(VAlign_Fill)
	.HAlign(HAlign_Fill)
	[
		SNew(SOverlay)
		+ SOverlay::Slot()
		.VAlign(VAlign_Top)
		.HAlign(HAlign_Center)
		[
			// Inside lies a text block with these settings
			SNew(STextBlock)
			.ShadowColorAndOpacity(FLinearColor::Black)
			.ColorAndOpacity(FLinearColor::Red)
			.ShadowOffset(FIntPoint(-1, 1))
			.Font(FSlateFontInfo("Veranda", 16))
                        // localized text to be translated with a generic name HelloSlateText
			.Text(LOCTEXT("HelloSlateText", "Hello, Slate!"))
		]
	];

}

// ++ We need to undefine this namespace after we finish creating the Slate widget
#undef LOCTEXT_NAMESPACE

END_SLATE_FUNCTION_BUILD_OPTIMIZATION
Set the Game Mode's HUD
The last thing we need to do is set our GameMode's HUD class to the one we just built. Every project has a default Game Mode, and every GameMode has a default Pawn, HUD, PlayerController, and GameState. To do this in v4.18, we will modify the HelloSlateGameMode.h and cpp. This is a necessary step to tell Unreal what HUD to use by default.
Note: Versions before 4.18 (not sure when It changed) use GameMode. Now the base class is called GameModeBase, which is a light version of GameMode. So the name will contain the "Base" suffix.
HelloSlateGameModeBase.h:
#pragma once
#include "CoreMinimal.h"
#include "GameFramework/GameModeBase.h"
#include "HelloSlateGameModeBase.generated.h"

UCLASS()
class HELLOSLATE_API AHelloSlateGameModeBase : public AGameModeBase
{
	GENERATED_BODY()

public:
        // ++ Add a constructor
	AHelloSlateGameModeBase();
};
HelloSlateGameMode.cpp:
#include "HelloSlateGameModeBase.h"

// ++ Include Our HUD header
#include "StandardHUD.h"

// ++ In the constructor, call parent constructor and set the hud class to use our custom HUD by default.
AHelloSlateGameModeBase::AHelloSlateGameModeBase() : Super()
{
	HUDClass = AStandardHUD::StaticClass();
}
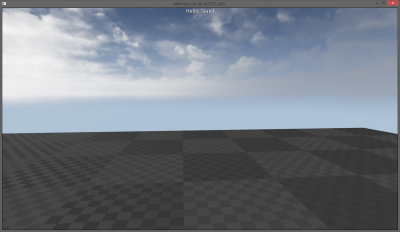
Watching the result
Now, clean/rebuild your project and launch the Editor from Visual Studio (a fast way to do this is to use Ctrl + F5, which will compile and start without debugging, which will open the Editor).
If you hit "play" and you don't see any text on top of the viewport in red color, then you have to tell your game to use your Mode Game class.
This can be modified in several ways. One of them is doing it manually to our DefaultEngine.ini file, which is writable.
A faster way, if you want to permanently modify your project to use this Game Mode class, go to Edit --> Project Settings. Under Maps & Modes on the list, go to Default Modes section on the right side of the panel, and select our class HelloSlateModeGameBase in Default GameMode. When you select it, if you open up Selected GameMOde, you will see that HUD Class is StandardHUD instad of HUD, which is our HUD class.
To use this game mode just in this scene, you can also go to Window -> World Settings. In the game mode, which is probably None, select your HelloSlateModeGameBase class. You will see that underneath this dropbox there's a list of default items. The HUD should be DefaultHUD instead of HUD, so that our HUD is used instead.
Hit "play", hopefully you CAN see the result at the top of the Viewport.
Links and Further Reading
If you run into any questions try dropping a line in the tutorial's wiki's thread . https://forums.unrealengine.com/showthread.php?822-Slate-Tutorial
For more information on more advanced uses of Slate you can see some examples of Loading Slate Styles & Resources here...
Other advanced tutorials
Change Log
Original Author (March 2014): ( ) Other Authors: [ Check History ]
Update 4.8: Thank you Unreal community for having the old tutorial here so I had a place to start. I will try to go through the further reading and also update those as well.
Update 4.8.2 ( 7/18/2015): I probably should have done this sooner but here is a link to the full project . I started to mess around a bit with the stuff in the next tutorial "How to Make Fancy Custom Buttons" so there is some commented out code related to that. I just tested the project before zipping it up and it works, let me know if you guys have any trouble, you can reach me on Skype at Katianie9 or send me a message through here.
Update 4.8 ( 6/14/2015): I am modifying this tutorial to reflect the changes in Unreal 4.8. I followed this tutorial a few hours ago and I noticed that about half the stuff that was mentioned has been changed.
Update 4.18 ( 1/12/2018): I did a whole updage of this tutorial for Unreal 4.18, added new content, titles and other stuff that may be useful. Thanks for the tutorial ! Hope this helps others.