Physical Water Surface
Contents
- 1 Overview
- 2 Video Gallery
-
3
Getting Started
- 3.1 How To Add Water To A Map
- 3.2 Lighting The Water Surface
- 3.3 Making An Object Float With The Buoyancy Component
- 3.4 Seamless Sea State Transitions
- 3.5 Setting Up A Player Controlled Boat
- 3.6 Querying The Wave Height From Blueprint
- 3.7 Hiding water inside of boats
- 3.8 Network Replication
- 3.9 Compatibility with Orbit Weather and Seasons
- 4 Blueprint Documentation
- 5 Material Documentation
- 6 Tutorials
-
7
FAQ
- 7.1 Which engine versions are compatible?
- 7.2 The water surface looks blurry when I use Temporal AA
- 7.3 The water surface is gray and is not moving in engine version 4.17
- 7.4 Can I scale the water plane to adjust the size of the waves to the scale of my game?
- 7.5 Floating objects are not lit correctly
- 7.6 I see flickering or artifacts on the water surface
- 7.7 If I place a ThirdPersonCharacter Blueprint in the map, it starts to move horizontally at very high speed
- 7.8 When the game starts, objects that have buoyancy enabled are shot upwards into the sky. This happens if the Water Plane is placed at a position with the Z coordinate not equal to zero
- 7.9 How do I enable SSR?
- 7.10 How is the performance?
- 7.11 Does it contain C++ code?
- 7.12 Can I use the Nativize Blueprint Assets option when packaging to convert all Blueprints to C++ code?
- 7.13 I get an error when packaging with the Nativize Blueprint Assets option enabled
- 7.14 How can I make the water transparent?
- 7.15 Is the water motion deterministic?
- 7.16 Can I use NavMesh to create an AI controlled boat?
- 7.17 Does Physical Water Surface work in VR?
- 8 Release Notes
Overview
Physical Water Surface is an easy to use and physically correct water shader for Unreal Engine 4 with great performance. It features a large database of wave spectra for different sea states, an automatic buoyancy system, seamless sea state transitions and extensive documentation.
Physical Water Surface is available here on the UE4 Marketplace

- Realistic water motion: A Gerstner Waves implementation using physically correct wave spectra
- Adaptive sea state: Water motion adapts to selected wind speed (1 m/s to 35 m/s) and fetch length (50 km to 1500 km)
- Seamless Stea State Transitions: Beautiful and completely smooth transitions between different sea states and wind directions
- High quality buoyancy system: Physically accurate buoyancy that sets up automatically. Floating objects can fully interact with the UE4 physics system
- Great performance: Buoyancy is implemented in Blueprint and can be automatically nativized to C++ code (verified to work with 4.14 and higher)
- Masking out water inside of boats: A method is provided to hide water inside of boats
- Infinite Ocean System: The water plane translates and scales with the camera, creating the impression of an infinite ocean
- Water Material tiles infinitely: Use the supplied water plane mesh, or apply the water material to your own mesh
- Eight example maps are included that show how all the different features work, making your first steps easy
- A player controlled boat is included to get you started
- NavMesh is supported and builds on the water plane
- Compatible with Orbit Weather and Seasons
- Complete and and extensive documentation available online before purchase (on this page)
![]() Please don't forget to rate Physical Water Surface
on the Marketplace page
, your feedback is very appreciated!
Please don't forget to rate Physical Water Surface
on the Marketplace page
, your feedback is very appreciated!
Link to support thread in the forum
Video Gallery
Watch all videos on my YouTube channel!
<youtube> https://www.youtube.com/watch?v=Wwyw_Uw26DQ <youtube> https://www.youtube.com/watch?v=wI-bdmQCFN8 <youtube> https://www.youtube.com/watch?v=80B0-GpPV2s


Getting Started

Watch this short video to get started with Physical Water Surface. The video shows:
- How to add the water surface to an empty level
- How to add a mesh from the Content Browser and make it float
- How to change wind speed and fetch length
Check out the demo maps that are included in the pack:
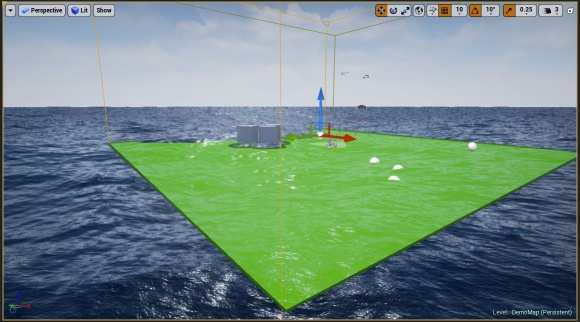
- DemoMap is the scene from this video demonstrating buoyancy for simple and complex objects
- AltArtStyle is the scene from this video featuring a different water look with SSR, a quiet ocean and a floating box
- SeaStateTransitionsDemo is the scene from this video showing seamless transitions between different sea states
- WindSpeedsDemo is the scene from this video showing different sea states depending on the selected wind speed and fetch length
- WindDirectionTransition: In this map, a wind direction transition is demonstrated.
- SteerableBoat is a map that shows how to set up a player controlled boat. The boat is controlled with the WASD keys, the space bar can be used to jump out of the water. The boat can interact with other objects that have simulate physics enabled.
- ManualPoints: This map demonstrates the use of the Buoyancy Mode "Manual Points" that allows manually defining the points for buoyancy calculation.
- MaskedWater: This map shows how to hide water inside of a boat.
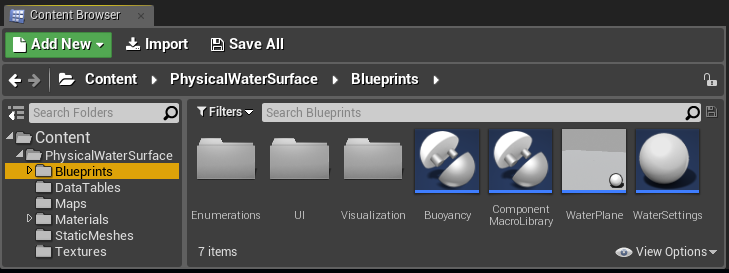
Physical Water Surface comes with a ready to use WaterPlane Blueprint and a Buoyancy Component that makes objects float. The WaterSettings Blueprint controls the look of the waves.
How To Add Water To A Map

First, add a WaterSettings Blueprint to your level. This Blueprint manages the database of wave spectra and automatically writes the material parameters to the water material. You always need exactly one WaterSettings Blueprint in your level.
Next, add one or multiple WaterPlane Blueprints. You now have a working water surface! If you started with the default empty level, you should also add a SkyLight and a PostProcessVolume with FXAA enabled and Unbound set to true. If you are using 4.14 or higher, you need to manually select FXAA under Project Settings → Rendering → Anti-Aliasing Method .
By default, the sea state is set to a Wind Speed of 10 m/s and a Fetch Length of 50 km. To change the sea state, just select different values in the Details panel of the WaterSettings Blueprint. Of course, you can also change these values from another Blueprint.

If the Follow Camera option in the WaterPlane Blueprint Details panel is set to true, the WaterPlane is automatically translated and scaled to create the impression of an infinite ocean. If you are creating a lake it's better to turn this option off and to create a custom water plane mesh with exactly the right size. If you enable this option, it's a good idea to check in Wireframe view mode if the automated scaling of the water plane works as intended.
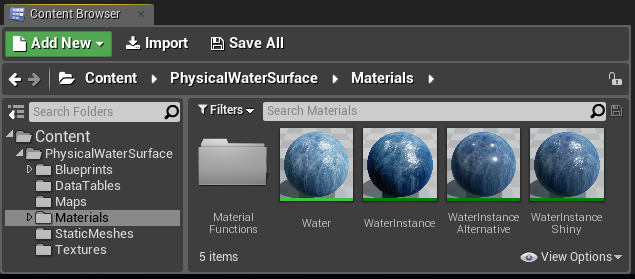
Physical Water Surface comes with three different Material Instances that derive from the Water material:
- WaterInstance
- WaterInstanceShiny
- WaterInstanceAlternative
To change the water material, select a different Material Instance in the of the WaterPlane Blueprint in your level. To tweak the look of the water surface, change the parameters of the Material Instance.
Lighting The Water Surface
The look of the water surface is heavily influenced by the surroundings, be it a sky sphere for an infinite ocean or the adjacent landscape of a lake. This is particularly true if you have a very reflective water material. In most of my demo videos there ist just a sky sphere and no other surrounding geometry, so I enabled the foam texture and the detail normal map to make the water surface look more interesting. A different approach is to make the water surface more reflective and to add Reflection Capture Actors and have the look of the water be dominated by reflections. A good example for this water look is the Vehicle Game example from Epic (see also the tutorial below).
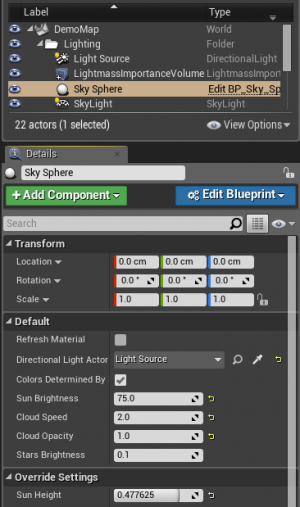
To get started with lighting, check out the demo Maps that are included. Here's the basic lighting setup that is used:
- Use the Sky Sphere and Light Source from the Default empty map.
- Change the Sun Brightness and the rotation of the directional Light Source to your liking.
- Add a Sky Light with Source Type SLS Captured Scene . This will light the water surface and the floating objects from all directions.
- Add a Lightmass Importance Volume and scale it up, for example by factor 50. In the Viewport, use the Show → Vizualize → Volume Lighting Samples option to make sure you have more than one sample in the volume. Lighting Samples usually are created in great number only above static surfaces, but the water surface is set to movable because of the Infinite Ocean System. When we make the Lightmass Importance Volume large enough, the engine will create some Lighting Samples scattered in the Volume. These are enough to light objects that are floating on the surface, even outside the bounds of the Volume.
Making An Object Float With The Buoyancy Component
Buoyancy is implemented as a Blueprint Component that can be added to any Static or Skeletal Mesh. To use it, follow these steps:
- Set the Mobility of the Mesh to Movable . Dont skip this step!
- Click the Add Component button in the Details panel of your mesh and select the Buoyancy Component . The Buoycancy Component will appear in the Details panel.
- Click the Buoyancy Component in the Details panel and choose a Buoyancy Mode : Single Points , Auto Points and Manual Points are available. If you're using Auto Points , you can use the additional settings below to tweak the buoyancy motion.
- Hit Play to view the Buoyancy in action. If you click Simulate, the floating objects and the water surface will appear to be out of sync because the time nodes in the material and in Blueprint give different values in this case.

In SinglePoint Mode , the floating object will be fixed to a single point on the water surface. The translation and rotation of the object are directly taken from the output of the Gerstner equations, so all the other settings on the Buyancy Component have no effect. As a result, the object will just move with the water surface and rotate according to the local normal vector of the point on the water surface where it is located. This buoyancy mode is relatively cheap to calculate because the Gerstner equations need only to be evaluated at one point for each tick. However, the motion of the object will only be realistic for small objects, for example leaves or rubber ducks floating on the surface. For large objects like boats, you should use AutoPoints mode.
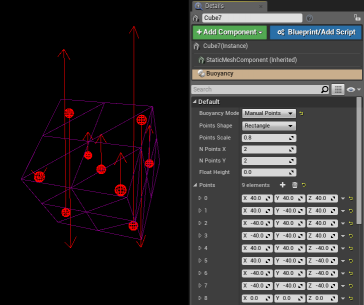
In AutoPoints mode, a Physics Simulation is performed. The buyant force on a number of points on the object is calculated and applied. The magnitude of the buoyant force depends on the depth of immersion of each point. The counteracting force is gravity that is automatically applied by the engine. The Buoyancy Component will automatically generate the coordinates for the points in rectangular or elliptical shape, taking into account the dimensions of the object. With the N Points X and N Points Y you can control the number of points that are generated. In elliptical mode, N Points X is the number of points in radial direction and N Points Y is the number of points in tangential direction. The buoyant force is scaled so that at a certain depth of immersion, an equilibrium exists. You can change how deep an object is submerged with the Float Factor parameter.
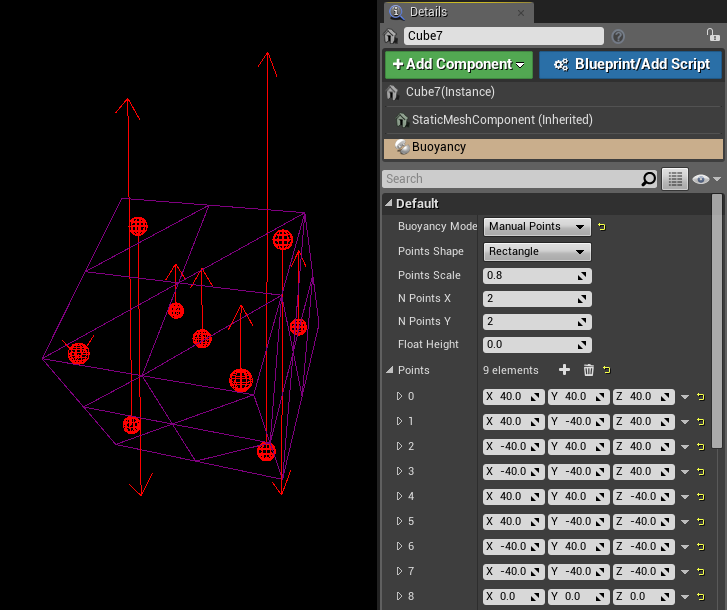
In the image on the right you can see the Buoyancy settings used for the large floating cubes in the DemoMap that is included in the Physical Water Surface package. Rectangular Buoyancy Mode is obviously a good choice for cubes. Setting the number of points in X and Y direction to two will generate four points at the corners of the box.
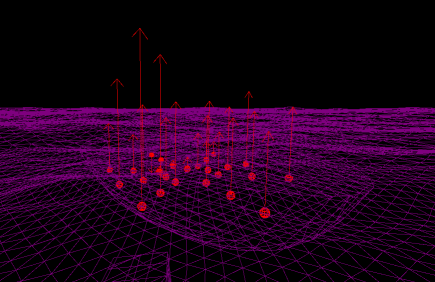
To check the location of the calculated points, you can enable the Draw Debug option. In this mode, a small sphere is drawn at the coordinates of each points, and the length of the vertical arrows is proportional to the buoyant force. Use this mode to make sure that the number and shape of the generated points is as intended.
If you set up Buoyancy for large objects that need to move in a certain way, you will probably need to tweak the parameters a bit to get the desired result. As an example, have a look at the parameters used for the boat in the DemoMap. With the PointsScale parameter (by default set to 0.8) you can scale the coordinates of the generated points inwards so that no points are located directly at the bounds of the object. This is usually desirable.
For the cubes, we have generated only four points. With PointsScale set to 1, these four points would be located exactly at the corners of the cube. This way, the buoyant force that exists at the center of the cube would be neglected completely. By scaling the points inwards a bit, we move them closer to the center. The hull of boats is usually bent, and with PointsScale set to 1 the outmost generated points would end up outside of the hull, where no buoyant force exists. It may also be necessary to adjust the Linear Damping and Angular Damping parameters, especially of you're dealing with very large or very small objects.
![]() Make sure to enable the
Nativize Blueprint Assets
option that converts all Blueprints to C++. If you get an error while packaging,
please read this answer
Make sure to enable the
Nativize Blueprint Assets
option that converts all Blueprints to C++. If you get an error while packaging,
please read this answer
The Buoyancy calculations are done in Blueprint on the CPU, so it is important to keep an eye on CPU performance . You can use the N Points Per Frame and N Frames Pause parameters on the Buoyancy Component to improve performance. With the N Points Per Frame parameter you can limit the number of points that are updated each tick with the Gerstner equations. For the remaining points, the depth is updated with linear extrapolation from the last known values, which is much cheaper to calculate. To update all points each Tick with Gerstner equations, set N Points Per Frame to (N Points X) * (N Points Y). With N Frames Pause set to 1, Gerstner calculations will only be performed every other Tick, if you set it to 2 only every third Tick and so on. To disable the pausing, set N Frames Pause to 0.
Manual Points mode allows to manually define the points used for buoyancy calculation. The automatically created points in Auto Points Mode are always generated in a plane. This prevents the floating object from flipping upside down in most cases. However, sometimes you want an object to rotate freely, for example a floating box that is smashed around by the waves.
In Manual Points Buoyancy mode you can define the coordinates of the points that are used for the buoyancy calculation yourself. You can set the values in the Details panel, or from another Blueprint. Enter the coordinates in local object space. For an example, have a look at the demo map ManualPoints that is included with Physical Water Surface.
Seamless Sea State Transitions
Physical Water Surface can do seamless sea state changes . This means that while the game is running, the wave parameters are manipulated in such a way that a seamless transition to a new sea state (defined by a new wind speed, new fetch length and new wind direction) is achieved in a given time. Watch this video to get an impression how the transitions look like:
The map that was used to create this video is included with Physical Water Surface, it is named SeaStateTransitionsDemo . Have a look in the Blueprint BP_TransitionsDemo in this map to see how the sea state transitions are triggered. The map WindDirectionTransition shows how to trigger a wind direction transition (See the BP_WindDirectionDemo Blueprint for details).
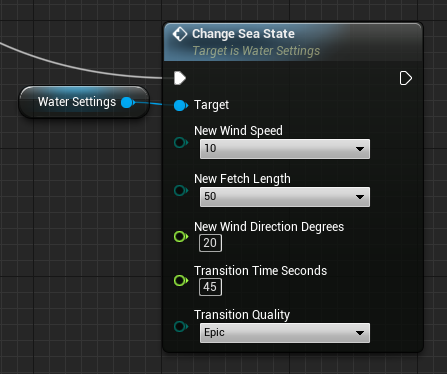
To trigger a sea state transition, call the ChangeSeaState function of the WaterSettings Blueprint. The input arguments are:
- New Wind Speed (in m/s)
- New Fetch Length (in km)
- New Wind Direction (in degrees)
- Transition Time (in seconds)
- Transition Quality
If the new values for wind speed and fetch length are very different, it is advisable to to get there with multiple small steps, meaning multiple consecutive calls to the ChangeSeaState function that each change the sea state just a bit. This way the transition will look more natural because the algorithm only needs to figure out a good transition for values that are not too different.
The minimum TransitionTime that should be used depends on how much wind speed and fetch length are changing. As you can see in the video above, in some cases 10 seconds are enough to get a nice-looking transition. However if you can, you should use higher values to make the transition look more natural. If you change the Wind Direction by a large amount, make sure that the Transition Time is long enough.
With Update 4 of Physical Water Surface, the performance of sea state transitions was improved. If you need to improve the performance further, you can select a lower Transition Quality . If you use a lower quality setting, the transition calculation will run at a lower frame rate than the game. When using a lower quality, you might see a judder in the water motion during the transition.
If you want to delay execution of the subsequent code until the transition has finished, add a delay node after the Change Sea State node.
Setting Up A Player Controlled Boat
The SteerableBoat map that is included with Physical Water Surface shows how to set up a player controlled boat. The boat is controlled with the WASD keys, the space bar can be used to jump out of the water. The boat can interact with other objects that have simulate physics and collision enabled. Everything is set up in the PawnBoat Blueprint. You can use this Blueprint as a starting point for your player controlled boat. Never try to set the location or rotation of the boat directly. Instead, use the Add Force/Torque/Impulse at Location Blueprint nodes.
Querying The Wave Height From Blueprint
If you turn to the right in the DemoMap, you will discover three small Blueprints floating in the water. These are example Blueprints that show you how to query the height and speed of the water surface.
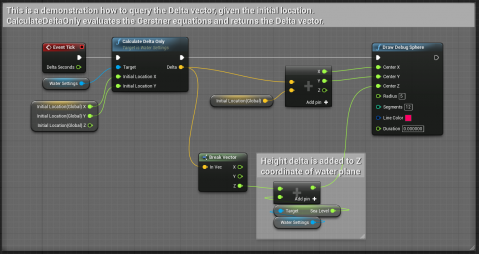
The WaterLocation Blueprint shows how to query the location of a point on the water surface, given the coordinates (X,Y) of the initial position. Just call the function Calculate Delta Only of the WaterSettings Blueprint with (X,Y) as input, and the 3D delta vector with the shift is returned. If you also need the normal vector calculated, call the function Calculate Delta Normal instead.
The WaterHeight blueprint calculates the wave height at a fixed point (X,Y). In this case, it is necessary to store the Delta value from the last tick in a variable.
The WaterSpeed Blueprint calculates the vertical speed of the water surface at a point (X,Y) and displays an arrow proportional to the speed.
Hiding water inside of boats

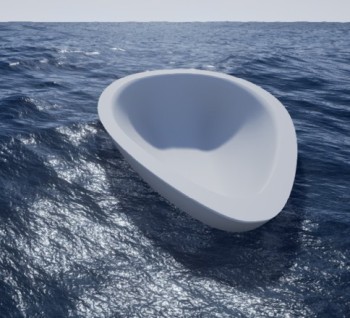
If no special measures are taken, water will also appear inside of boats. The water material of Physical Water Surface is set to Blend Mode Masked , and is already prepared in such a way that water can be easily masked inside of floating objects .
This method makes use of Mesh Distance Fields . Specifically, we use the the fact that the DistanceToNearestSurface material node returns a negative distance inside of a mesh. The water material detects this and masks the water accordingly. To see this effect in action, have a look at the Map MaskedWater that comes with Physical Water Surface. After enabling Mesh Distance Fields, you should see that the water inside the boat disappears. The image on the left shows how the effect looks like.
To make use of Mesh Distance Fields, you need to enable the option "Generate Mesh Distance Fields" the Project Settings first. See here for a guide how to do this.
Here is a step by step guide how to mask out water inside of boats:
1. Enable Generate Mesh Distance Fields in the Project Settings, then restart the Editor.
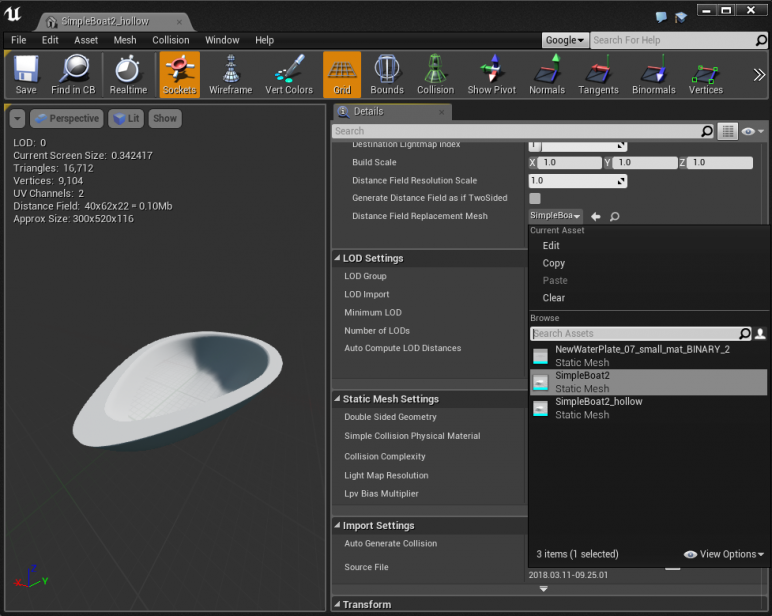
2. You need to create another mesh that has the same size as the boat, but that is not hollow. This mesh will be used to generate the Mesh Distance Fields. The image below shows the example meshes that come with Physical Water Surface. The boat on the left is not hollow, all water inside this mesh will be masked . The mesh on the right is the one that will be visible.

3. In the Details Panel of the original boat mesh, choose the boat mesh that is
not
hollow as
Distance Field Replacement Mesh
. The image below shows the setup.
4. Make sure that
Affect Distance Field Lighting
is enabled on the boat. You can disable this option on all other StaticMeshes to improve performance.
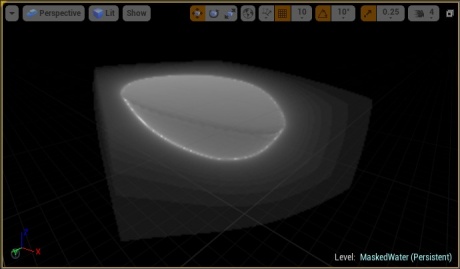
5. Use the Show → Visualize → Mesh Distance Fields option in the Viewport to check that the boat does not appear to be hollow. The image on the right shows how the Mesh Distance Fields should look like.
After completing these steps, the water inside of the boat will be masked out automatically by the water material.
In some cases it is possible that some water is still visible inside the boat, especially if the hull of the boat is very thin. This happens when the resolution of the Global Distance Field is not fine enough to capture the hull of the ship accurately. If you have this problem, you can try to use the console command r.AOGlobalDFResolution to increase the Global Distance Field Resolution ( see here ).
Network Replication
This section provides a guideline how to implement Network Replication with Physical Water Surface. The water material already comes with a Material Parameter TimeOffset which is needed for Network Replication of the water motion. Several users of Physical Water Surface have successfully used Network Replication in their projects.
Wave Parameters are material parameters that are written to a Material Parameter Collection, and are read by the water material. These parameters are constant (unless a sea state transition is going on), so normally they are just written once to the Material Parameter Collection On Begin Play.
The state of the water motion (World Position Offset of the water material) depends on the Wave Parameters and on the time. To be precise, on the time output of the Time node in the GerstnerWaveCum Material Function. For buoyancy, the Gerstner equations are evaluated also in Blueprint, using the time from the Get Game Time in Seconds Blueprint node. When the game is running, this node outputs the same time as the Time material node, so water motion and buoyancy are synchronized.
To replicate the water motion, we need to make sure that all clients use the same Time value in the GerstnerWaveCum Material Function. To make this happen, the GerstnerWaveCum Material function contains a Material Parameter TimeOffset (that defaults to 0) which is added to the output of the Time node. When the game starts, you need to calculate the offset between server time and client time and write the difference to the Material Parameter TimeOffset (in the Material Parameter Collection WaveParameters ). From time to time you should recalculate the time offset and update the TimeOffset parameter, to make sure that there is no time drift.
If you use Buoyancy, a good strategy is to calculate the motion of floating objects on the server, this way it is ensured that the motion is identical on all clients.
Compatibility with Orbit Weather and Seasons
I've collaborated with the developer of Orbit Weather and Seasons to make his weather system and Physical Water Surface compatible. With this compatibility, changing the cloud density will automatically also trigger a sea state transition if you use both systems together.
Blueprint Documentation
![]() Make sure to enable the
Nativize Blueprint Assets
option that converts all Blueprints to C++. If you get an error while packaging,
please read this answer
Make sure to enable the
Nativize Blueprint Assets
option that converts all Blueprints to C++. If you get an error while packaging,
please read this answer
WaterSettings Blueprint

The WaterSettings Blueprint manages the database of wave spectra and automatically writes the material parameters to the water material instances. You always need exactly one WaterSettings Blueprint in your level.
Wind Speed: Select the wind speed you want (in m/s) and the corresponding wave spectrum will be applied automatically. Possible values are 1, 2, 3, 4, 5, 6, 7, 10, 15, 20, 25, 30 and 35 m/s.
Fetch Length: Select the fetch length you want (in km) and the corresponding wave spectrum will be applied automatically. Possible values are 50, 100, 300, 500, 750, 1000 and 1500 km.
Random Phase Seed: Random Seed for the water motion. Change this value to get a different random water motion when the game starts.
Watch this video to see some of the different sea states that are possible.
Debug: Draw debug messages on screen.
Wind Direction: Wind direction in degrees. To change the wind direction while the game is running don't set this parameter. Instead, use the
WaterPlane Blueprint
You can add one or multiple WaterPlane Blueprints to your level. The WaterSettings Blueprint will find them automatically and write the Gerstner Wave Material Parameters to the Dynamic Material Instances of the WaterPlanes.
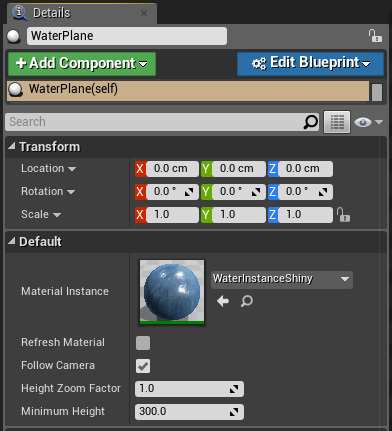
Material Instance: Here you can change the Water Material Instance that is used. By default it is set to WaterInstanceShiny.
RefreshMaterial: Clicking this checkbox just causes the Construction Script of the Blueprint to be executed again. This sometimes helps if the water material does not update for some reason.
Follow Camera: Enables or disables the Infinite Ocean System. If set to true, the water plane is translated and scaled to create the impression of an infinite ocean. For lakes or other small water surfaces, it is better to set this to false and to create a water plane mesh that matches the shape of the lake.
Height Zoom Factor: If the Infinite Ocean System is enabled, the water plane is scaled up when the camera moves upwards. This factor influences how fast the plane is scaled up.
MinimumHeight: Minimum height of the camera above water plane assumed in the calculations of the Infinite Ocean System. Prevents scaling down the water plane too much when the camera is very close to the water surface.
Buoyancy Component Blueprint

Add this Component to any Static Mesh or Skeletal Mesh to make it float in a WaterPlane Blueprint. Don't forget to set the Mobility of the Mesh to Movable!
Buoyancy Mode: In Single Point mode the floating object is fixed to a single point on the water surface. Location and Rotation are taken directly from the coordinates and normal calculated with the Gerstner equations. This mode only looks good for small objects, but is relatively cheap to calculate. In Auto Points mode a Physics Simulation is performed. The buoyant force on a number of automatically generated points on the object is calculated and applied. The magnitude of the buoyant force depends on the depth of immersion of each point. The counteracting gravity force is automatically applied by the engine. In Manual Points mode, you can define the Points array yourself. Enter the coordinates either manually in the Details panel, or set the values from another Blueprint.
Note: the following settings only have an effect in Auto Points and Manual Points mode:
Points Shape: Defines the shape of the automatically generated points to be rectangular or elliptical . The point generation automatically takes into account the size of the mesh.
Points Scale: With this parameter (by default set to 0.8) you can scale the coordinates of the generated points inwards so that no points are located directly at the bounds of the object. For boats with a curved hull this parameters usually needs to be smaller than one to prevent points outside of the hull.
N Points X and N Points Y: Number of points that will be generated in X (or radial) and Y (or tangential) direction.
Float Height: Applies an offset to the Z coordinate of the generated points.
Points: In Auto Points mode, the coordinates of the points are set automatically. In Manual Points mode, you need to set them manually. Enter coordinates of the points in local object space, either manually in the Details panel or set the values from another Blueprint.
Draw Debug: Enables the debug visualization. The generated points visualized as points, and arrows are drawn proportional to the buoyant force.
N Points Per Frame: With this parameter you can limit the number of points that are updated each tick with the Gerstner equations. For the remaining points, the depth is updated with linear extrapolation from the last known values, which is much cheaper to calculate. To update all points each Tick with Gerstner equations, set N Points Per Frame to (N Points X) * (N Points Y) if you're using PointsShape Rectangle and to (N Points X) * (N Points Y) + 1 if you're using PointsShape Ellipse.
N Frames Pause: If this parameter is set to 1, the Gerstner calculations to update the points will only be performed every other Tick, if you set it to 2 only every third Tick and so on. To disable the pausing, set N Frames Pause to 0.
Float Factor: This parameter changes how how deep the floating object is submerged in the water.
Linear Damping and Angular Damping: The damping usually needs to be adjusted a bit for very large or very small objects.
Drag Multiplier: Floating objects also perform a subtle horizontal motion depending on the local horizontal water speed. Use this parameter to influence the horizontal drag force.
Enable Buoyancy: Enable and disable the buoyancy completely. To save CPU performance, it is a good idea to disable the buoyancy of objects that are not visible or far away. If you don't want to disable buoyancy completely, switching these objects to Single Point mode will also save some CPU performance.
Points Offset: Use this Vector2D to apply a horizontal offset to the automatically generated points.
Material Documentation
BlendOutNormals: If enabled, the normals are gradually lerped to be vertical at large distance. This reduces flickering that otherwise would be visible in the distance on the water surface.
FoamNoise: If enabled, the foam texture is modulated randomly so that it is not repeating any more. Enable this only if you need it, as it costs some performance.
GerstnerWaves: Here you can disable the Gerstner waves. Useful for debugging.
NoiseInvert: Inverts the noise that is used for the foam modulation. Can be useful for debugging.
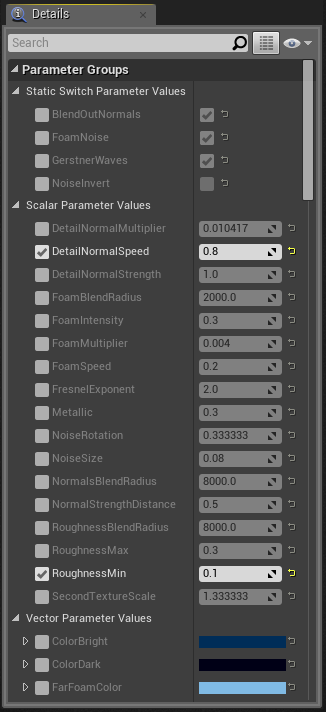
DetaiNormalMapMultiplier: Scales the UVs of the detail normal map.
DetailNormalSpeed: Changes the speed of the detail normal map animation.
DetailNormalStrength: Modifies the intensity of the detail normal map. Set to 0.0 to disable the detail normal map and to get get a smooth water surface.
FoamBlendRadius: Distance at which the foam is blended out.
FoamIntensity: Influences how much foam is visible. Set to 0.0 to disable foam.
FoamMultiplier: Scales the UVs of the foam texture.
FoamSpeed: Changes the speed of the foam animation.
FresnelExponent: Exponent of the Fresnel node that is used for Base Color.
Metallic: Metallic Material Input
NoiseRotation: For foam modulation, two foam textures are scaled, rotated, and blended together. This paremeter sets the rotation angle (0-1).
NoiseSize: Influences the size of the noise that is used for modulation of the foam texture.
NormalsBlendRadius: Distance at which the normals are blended out.
NormalsStrengthDistance: This is the alpha value for blending out the value. 0.5 means that the strength of the normals is reduced by factor 0.5
RoughnessBlendRadius: Distance at which the change in Roughness occurs.
RoughnessMax and RoughnessMin: Foam has a higher roughness than water. Use these parameters to set the maximum and minimal roughness values.
SecondTextureScale: For foam modulation, two foam textures are scaled, rotated, and blended together. This parameter defines the scale of the second texture.
ColorBright and ColorDark: Changes the base color of the water surface.
FarFoamColor: When the foam is blended out, it is replaced with this color.
Tutorials
Improving an existing water material with Physical Water Surface
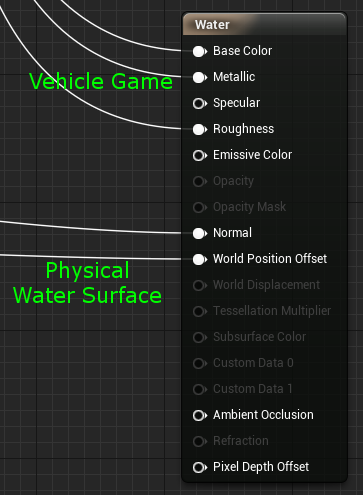
In this tutorial, we take the existing water material in the Vehicle Game example (available for free in the Launcher) and modify it so that the water motion is calculated with Physical Water Surface. Adding Physical Water Surface to your own project would follow a similar approach.
-

Original Water Material in Vehicle Game
-

Enhanced with Physical Water Surface
- Create a new Vehicle Game project and add Physical Water Surface .
- Go to Project Settings → Maps & Modes → Default Modes and set Default Pawn Class and HUD Class both to None .
- Create a new Camera somewhere above the water surface and set Auto Activate for Player to Player 0 in the Camera settings.
- Hit Play to make sure that the Camera activates and you can see the water surface.
- Click on the Lake Static Mesh and write down the Z Location (18110.822266 cm), then delete it from the level.
- Add the WaterSettings Blueprint from the Physical Water Surface folder to the level.
- Add the WaterPlane Blueprint from the Physical Water Surface folder to the level. In the Details panel, set the Z Location to 18110.822266 cm and set Follow Camera to false.
- Enable Wireframe view mode and move WaterPlane in X and Y direction until the high resolution center area of the plane is close to the camera.
- In the Details panel of the WaterSettings Blueprint, set Wind Speed to 1 (m/s) and Fetch Length to 50 (km).
- Open the M_Water_01 material that comes with Vehicle Game. Select all material nodes that are connected to the Base Color , Metallic and Roughness inputs and copy them to the clipboard (Ctrl+C).
- Open the Water material that comes with Physical Water Surface. Paste the nodes from the clipboard (Ctrl+V). Connect the pasted nodes to the Base Color , Metallic and Roughness inputs of the Water material, replacing the original inputs. Leave the Normal and World Position Offset connected. Save the modified Water material.
- Open the WaterInstanceShiny Material Instance in the Physical Water Surface folder and set DetailNormalStrength to 0.0 to get a smooth water surface.
- Since we have pasted the Vertex Coloer material node, you can paint foam on the water surface.
- You're done! You now have a water surface with the original look, but with the water motion of Physical Water Surface.
FAQ
Which engine versions are compatible?
Currently Physical Water Surface is developed in 4.10 and has been tested successfully with versions 4.10 to 4.19. If you are using 4.14 or higher, please make sure to read the information about Temporal AA below. If your water plane is gray after updating to 4.17 you can read below how to fix it.
The water surface looks blurry when I use Temporal AA
If you have fine detail on the water surface, for example a fine normal map or a foam texture, FXAA tends to look better than Temporal AA. For this reason, most of my demo videos were created using FXAA. If you want to use Temporal AA, you should set Project Settings → Engine → Rendering → Accurate velocities from Vertex Deformation to true. This way, the water surface displacement will be properly taken into account for Temporal AA. If you are using an engine version between 4.10 and 4.13, you will find that FXAA is enabled in the PostProcessVolume that comes with the demo maps. If you are using 4.14 or higher, you need to manually select FXAA under Project Settings → Rendering → Anti-Aliasing Method . Beginning in 4.14, the Anti-Aliasing Method setting is no longer part of the PostProcessVolume settings, so it will be Temporal AA by default. Also, keep in mind that the Anti-Aliasing Method can change to Temporal AA when you update your project to 4.14.
The water surface is gray and is not moving in engine version 4.17
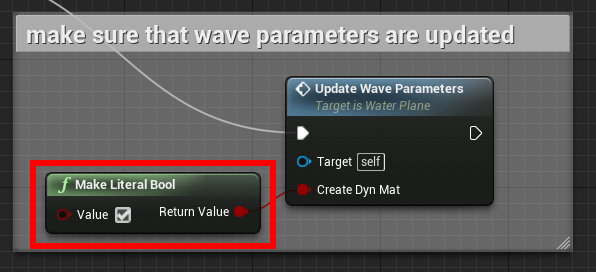
If you encounter this behavior after updating your project to 4.17, here is how to easily fix it. Open the Construction Script of the WaterPlane Blueprint and add a Make Literal Bool node that is set to True and connect it to the Update Wave Parameters node. After compiling and saving this Blueprint, the water will be visible again. It seems that there is a bug in 4.17 that changes the default value from True to False, and adding the Make Literal Bool node fixes that.
Please note: With this function was removed from the construction script and the problem should not occur any more.
Can I scale the water plane to adjust the size of the waves to the scale of my game?
The water equations are implemented under the assumption that one Unreal Unit (UU) is equal to one centimeter. If the objects in your game have a different scale, the size and speed of the waves will not be correct. You can't just scale the water plane because the shape of the waves is determined by equations, independent of the object scaling. In fact, the Infinite Ocean System (if enabled) is constantly scaling the water plane up and down depending on the camera height.
Floating objects are not lit correctly
Since floating objects are moving, they can only be lit by dynamic lighting. Make sure you have a Lightmass Importance Volume that is large enough so that multiple Volume Lighting Samples are created inside the volume. It's a good idea to use the Show → Vizualize → Volume Lighting Samples option in the Viewport to make sure you have more than one sample in the volume.
In my tests, one Volume Lighting Sample inside a small Lightmass Importance Volume caused incorrect lighting. When I increased the size of the volume so that multiple samples appeared the lighting was correct. You don't need the Lightmass Importance Volume to cover the whole ocean because it will extrapolate the lighting outside of the volume.
I see flickering or artifacts on the water surface
This is known to happen when World Position Offset is used to move the vertices of an object outside of the object bounds. The problem is that for a flat water plane mesh, the engine assumes that the bounds have close to zero vertical thickness. When World Position Offset is used to create waves, the vertices are moved far outside the bounds, leading to visual artifacts in some cases.
The solution is to increase the Rendering → Bounds Scale value in the options of the water plane Static Mesh until the artifacts disappear as described here . For a completely flat plane, you will need to put in a very high value. For this reason, the water plane Static Mesh that is included has a single out of plane face so that the engine calculates a higher thickness for the Static Mesh. With this Static Mesh, setting the Bounds Scale value to 10 is sufficient to prevent any artifacts.
In the demo maps that are included, this is all set up correctly and no visual artifacts should appear. If you create your own water plane Static Mesh, take care to set the Bounds Scale option to a high enough value. Enable the Show → Advanced → Bounds option to make sure the bounds are large enough to contain the waves.
If I place a ThirdPersonCharacter Blueprint in the map, it starts to move horizontally at very high speed
To prevent this from happening, edit the WaterPlane Blueprint. Click on the WaterPlane StaticMeshComponent in the Blueprint Editor, and set the CollisionPreset to NoCollision.
When the game starts, objects that have buoyancy enabled are shot upwards into the sky. This happens if the Water Plane is placed at a position with the Z coordinate not equal to zero
This bug was fixed in . Please update the Buoyancy Blueprint to the newest version.
How do I enable SSR?
Actually, SSR are enabled by default, but Depending on the settings in the Water Material Instance and the lighting conditions, the SSR might not be visible. Check out the AltArtStyle demo map where the SSR are clearly visible.
How is the performance?
I did performance tests on an AMD HD 6870 graphics card with the DemoMap as Standalone Game with Smooth Frame Rate disabled, in fullscreen (Full HD) and Epic Scalability Settings. Here are the results:
- DemoMap with 9 floating objects: 180 fps
- DemoMap without floating objects: >300 fps
For this test, the Buoyancy Blueprints were not converted to C++ code (which would increase CPU performance).
The material stats are:
- Info Base pass shader with static lighting: 1624 instructions
- Info Base pass shader with only dynamic lighting: 1592 instructions
- Info Vertex shader: 1237 instructions
- Info Texture samplers: 10/16
Does it contain C++ code?
No, everything is done in Blueprint.
Can I use the Nativize Blueprint Assets option when packaging to convert all Blueprints to C++ code?
Yes, this is supported and has been verified to work with engine version 4.14 and higher. You should enable this option when packaging your project for a significant increase in buoyancy performance. If you get an error when packaging with this option enabled, please see the next question.
I get an error when packaging with the Nativize Blueprint Assets option enabled
fixed a small bug that prevented successful packaging with Blueprint Nativization enabled. If you need to apply this bugfix to your project, here is how:
Open the WaterPlane Blueprint and search for the "Clamp (float)" Node. Change the Max value from 1e100000 to 1e10.
How can I make the water transparent?
Currently, the water material is not transparent. This is planned for a future update of Physical Water Surface.
Is the water motion deterministic?
By default, the water motion is identical every time the game starts. To get a different water motion every time the game starts, set the Random Phase Seed variable of the WaterSettings Blueprint to a random value when the game starts.
Yes, the WaterPlane Blueprint that comes with Physical Water Surface supports NavMesh. If you place a Nav Mesh Bounds Volume in the map, NavMesh will build on the water surface. Implementing AI for a boat is very similar to AI for a car, so this tutorial can be helpful.

Does Physical Water Surface work in VR?
I've tested Physical Water Surface in VR using an Oculus Rift. Everything worked fine, the water motion looks great in VR. I suggest you try out the DemoMap using the VR Preview in the editor.
Release Notes
Initial Release: May 11, 2016
Update 1: June 21, 2016
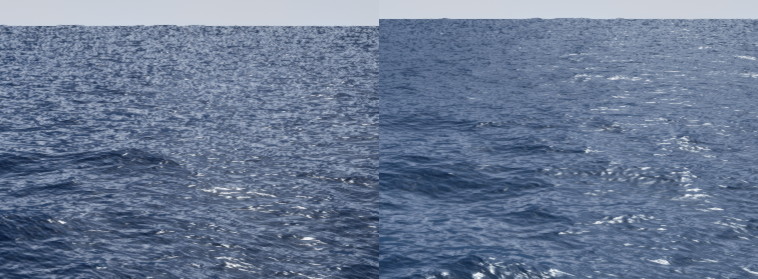
Fixed Problem: Water Surface looks noisy/shimmering far away
The left picture shows the old look, the right picture shows the updated version:
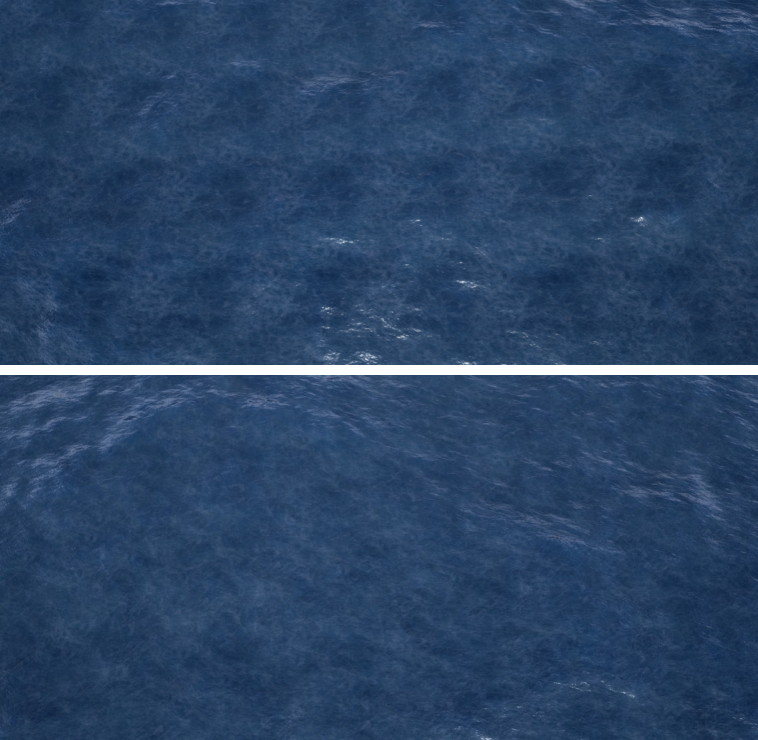
Fixed Problem: Repeating foam texture visible when camera is far away
The foam texture is now modulated randomly so that it is not repeating any more. Also, the foam can be faded out at a certain distance. The left picture shows the old look, the right picture shows the updated version:
New example map is included that shows how to set up a player controlled boat
The boat is controlled witht the WASD keys, the space bar can be used to jump out of the water. The boat can interact with other objects that have simulate physics enabled.
New Buoyancy Mode "Manual Points" that allows manually defining the points for buoyancy calculation
The automatically created points in Auto Points Mode are always generated in a plane. This prevents the floating object from flipping upside down in most cases. However, sometimes you want an object to rotate freely, for example a floating box that is smashed around by the waves. In the new Manual Points Buoyancy mode you can define the coordinates of the points that are used for the buoyancy calculation yourself. You can set the values in the Details panel, or from another Blueprint. A new example map ManualPoints is included with a box that has manually defined buoyancy points:
Update 2: February 7, 2017
Seamless Sea State Transitions
It took some time to implement, but I think the results speak for themselves. With the new ChangeSeaState function of the WaterSettings Blueprint you can trigger completely smooth transitions between different sea states within a given transition time. Check out this video to see what the transitions look like:
All that is needed to trigger a sea state transition is this Blueprint code:

Support for Blueprint Nativization to C++
This update fixes a bug that prevented successful packaging with Nativize Blueprint Assets enabled. I've verified that Blueprint Nativization works now with engine versions 4.14 and 4.15. .
Support for NavMesh
The WaterPlane Blueprint that comes with Physical Water Surface now supports NavMesh. If you place a Nav Mesh Bounds Volume in the map, NavMesh will build on the water surface.
Bugfixes
- Buoyancy Blueprint: PointsOffset was only applied for PointsShape Ellipse, not for PointsShape Rectangular
- Buoyancy Blueprint: Debug visualization doesn't show an arrow pointing down any more when a point is above the water surface
- Buoyancy Blueprint: Fixed a bug that caused an error message in the output log each frame
Improvements
- Performance improvements of Buoyancy Component Blueprint
- Improved steering when going backwards with the player controlled boat in the example map SteerableBoat
- Normals of the water material can be faded out in the distance, reducing flickering on the water surface far away. This can be controlled with the new Material Parameters NormalsBlendRadius and NormalsStrengthDistance
- Increased default movement speed of detail normals to make the water look more fluid
- Wave parameters have been updated to be more random, resulting in a more natural water motion
Update 3: February 9, 2018
Bugfix for the Buoyancy Blueprint
This update fixes the following bug: When the water plane was placed at a height different from Z=0, it could occur that the floating objects wrongly received a large vertical acceleration during the first tick of the game and were sent flying upwards into the sky. Now, the Buoyancy Blueprint performs a special check to make sure this does not happen any more.
Update 4: April 5, 2018
Performance Improvements
The DemoMap with 9 floating objects now runs at a frame rate of 180 FPS. Without any floating objects, the water surface runs at over 300 FPS.
Hiding Water inside of Boats
A method is provided to mask out water inside of boats, making use of Mesh Distance Fields (Blend Mode Masked). A new Map MaskedWater is included that demonstrates the setup.
Sea State Transitions Performance Improvements
The code for sea state transitions has been optimized. The impact on performance while a Sea State Transition is running has been reduced a lot. Additionally, the ChangeSeaState function now has a new input TransitionQuality, where a lower transition quality can be selected to improve the performance even more. A lower transition quality means that the transition calculation (not the game) runs at a lower frame rate.
Wind Direction Transitions
The wind direction can now be changed while the game is running. Use the the input NewWindDirectionDegrees of the ChangeSeaState function to trigger a wind direction transition. To set the initial wind direction use the Wind Direction variable of the WaterSettings Blueprint. The new map WindDirectionTransition demonstrates how a wind direction transition is performed.

Material Parameter Collection is used for Wave Parameters
The architecture of Physical Water Surface has been updated to make use of a Material Parameter Collection to store the wave parameters that drive the WaterMotion material function. This change simplifies a lot of things, for example it is now easier to use the WaterMotion material function in other materials.

Network Replication: New Wiki Chapter and TimeOffset Material Parameter
This new material parameter is needed when Physical Water Surface is used with Networking and the water motion needs to be replicated.
explains how to use this parameter.
Events when entering and leaving the Water
Two events HasEnteredWater and HasLeftWater are provided in the Buoyancy Blueprint that are triggered when a a floating objects enters or leave the water.
Improvement of WaterHeight, WaterLocation and WaterSpeed Blueprints
The three Blueprints WaterHeight, WaterLocation and WaterSpeed (that demonstrate how to query the position and speed of the water surface) have been improved. Now, these Blueprints also detect the Z coordinate of the water surface and are always displayed correctly on the water surface.
Water Plane Collision Settings
The collision settings of the WaterPlane Blueprint have been adjusted. Collision responses are now disabled for everything except Vehicle (otherwise Nav Mesh doesn't build on the water surface). This prevents problems in some cases, for example when a ThirdPersonCharacter was placed in the map the old collision setting caused problems.