Visual Effects: Lesson 07A: Using GPU Particle Simulations
Contents
Overview of GPU particles
GPU Particles are spawned on the CPU and simulated in a separate pass on the GPU. GPU particles are a very fast alternative to CPU particles, but come with some limitations because the GPU simulation requiring per particle attributes is very optimized.
There are specific limitations GPU particles have which CPU particles do not. These will be described in further detail later in this document. In short, it is best to default to GPU particles for best performance considerations, unless there are specific features of CPU particles necessary for your FX.
Spawning Particles
In order to make best use of some of the features in Cascade, as well as add the ability to spawn in randomized positions, GPU particles are spawned on the CPU from Cascade. This allows GPU particles to take advantage of existing Cascade functionality such as Particle Parameters for color, and Particle Events.
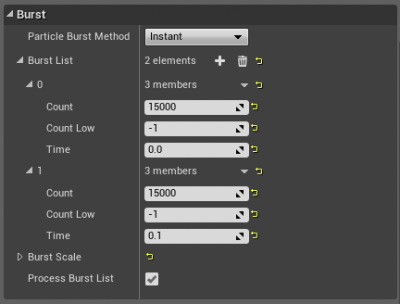
When using GPU particles it is important to consider they are spawned on the CPU, especially for burst spawning, as performance slow-down can be a side effect of burst spawning too many particles in a given frame. It is recommended that you do not spawn more than ~15k particles in a burst event. One trick to use is to separate burst events by .05-.1 seconds when spawning large volumes of sprites.
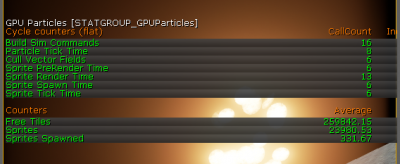
You still want to take your overall scene particle counts into consideration, and make use of LODs to control these counts, as large volumes of particles spawning in tandem during gameplay events can have a negative impact on CPU performance. You can use stat gpuparticles to see counts, which can be turned on via the Show/Stat/Advanced/GPUParticle dropdown menu in the editor viewport, or in-game with the console and stat gpuparticle.
Overdraw Considerations
Now you can spawn thousands of particles at a time and see lots of crazy organic movement in your scene! With great power, comes great responsibility. It is important to make certain you are checking your shader complexity of these FX. With lit materials it can be easy to create high overdraw costs in these types of scenarios.
There comes a point where you can have so many particles active that you are negatively impacting performance, even though the viewer’s eye may not distinguish between particle counts. For instance, look at these two particle systems side by side.
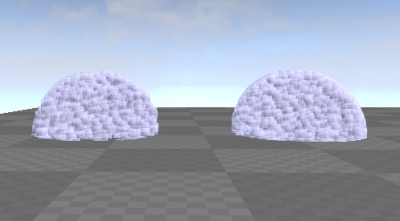
To the untrained eye, these two systems would look nearly identical when viewed separately. Of course, your trained eye can see there is some breakup of the profile where it intersects the ground plane, but overall the effect is very similar. If we look at them in shader complexity mode, we can see the FX are vastly different to compute.
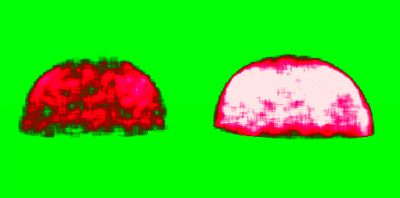
White = Expensive. Most FX are typically shaded red, because translucency is more costly to render than opaque surfaces.
It is important to find the sweet spot in terms of visuals and cost, and it can be beneficial to verify your shader cost when spawning large amounts of GPU particles in a burst list.
Vector Fields
Spawning particles into a vector field can be a very powerful way to create unique looking behaviors impossible with standard Cascade module setups.
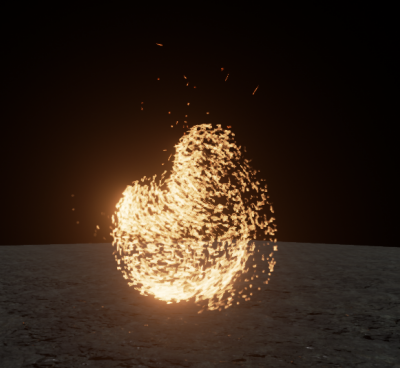
For instance, this shape is created by using a vector field which spins particles down the length of the interior of a cylindrical object, like a vortex pushing in a direction. This vector field is then rotated around an axis at a slow rate with a relatively low intensity and a tightness of 1.
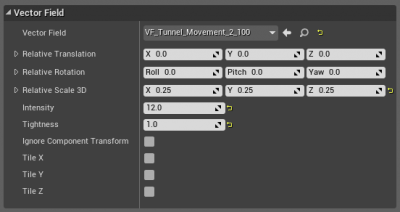
This effect can be found on the Marketplace in the Effects Cave sample content for free. I have disabled the flames and smoke to make it easy to visualize the GPU elements. Vector fields are unique in that many of their controls can be manipulated directly in the Cascade viewport using the handles. For instance, I can click and drag on the X-axis of the vector field to move the field around in the Cascade viewport. The same applies for Rotation and Scale.
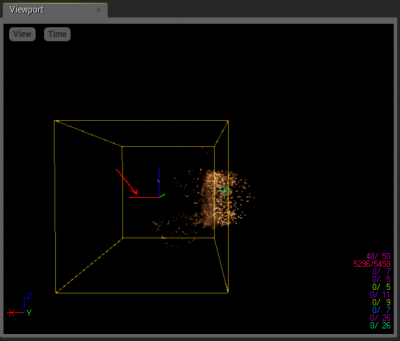
Unfortunately, the standard W, E, R, keys are not supported at this time, but you can toggle through the handles in Cascade using the old space bar method.
Inexpensive Collisions Based on Scene Depth
GPU Particles can make use of the Depth Buffer to drive collisions on a large scale. I will go into this feature in more depth in Lesson 08.
Unique Usage Cases for GPU Particles
Some usage cases have limitations on them due to memory restrictions. When implementing the GPU Particle system, VFX artists worked closely with programmers to determine where the limits needed to be placed. There are fixed costs, so we worked hard to limit features only where necessary so we can maintain high visual fidelity, with low evaluation cost. These cost reductions are what allow us to have millions of GPU particles in a scene.
These are some of the old features that have largely been made obsolete, although some are still available with limited functionality:
Single Vector for Acceleration – Currently, GPU particles only use a single vector for world acceleration. If you want an additional vector you can add a Vector field for variation.
Random SubUV Interpolation Method – This is currently not supported for GPU particles.
SubUVMovie Module – This module is currently unsupported for use with GPU particles. If you would like your particles to playback @ ~30 fps, you can average out a looping flipbook and set your uniform curve from 0-36 for a 1 second lifespan particle, double the value for a 2 second particle etc. or control SubUV playback speed in your material with the SubUV Texture function.
Initial Color edge case – Does not support a uniform distribution with Use Extremes checked (will only return a single color value that never changes).
Orbit Module – This has limited functionality and is not recommended for use. It is included for those who do not wish to use Vector Fields (the preferred method) to create random orbit-style movement.
Dynamic Parameter – Dynamic parameters are not supported with GPU particles. If you combine Material Instance Constant controls, using Materials you can hijack the ParticleColor module to act as a Dynamic Parameter and drive material attributes this way. There are several water FX in the Effects Cave demo which are setup in this manner.
Fixed Bounding Box – you will notice an error message on screen if you do not set fixed bounds in your particle system. It is recommended you use fixed bounds as often as possible for particle systems, as calculating bounds is an expensive process.
Particle Parameters – These are supported in a limited fashion - look for grayed-out text in the distribution list drop-down. Generally speaking if you are modifying a spawn module, or color features it has been implemented to work. In general Particle Parameters for GPU emitters are limited.
LODs – Distance Based Levels of Detail have a limited feature set. Currently they only support spawn rates and emitter disabling per LOD distance.
When to Use GPU vs CPU Particles
As a rule of thumb, you should use GPU particles whenever possible. GPU particles are much faster to evaluate than CPU particles, and will generally lower your overall game evaluation costs.
Even so, CPU and GPU particle features work well in tandem. For example you can spawn a single CPU particle and set it to use CPU world collision settings. If you tie this together with an event module and an EventReceiverSpawn module you can burst spawn hundreds of small GPU particles on the collision event.
Keep in mind SceneDepthCollision will not generate an event. Only the CPU collision module does this.
GPU particles are also an excellent way to add variation to distant vistas, flocks of birds, columns of smoke rising, etc. All of these elements can evaluate quickly when done with GPU particles.
Vector Fields are not limited to small local VFX either. Try experimenting with larger global vector fields. You might be surprised with the results.
For example, here is a rough scene in Maya with some world geo exported from UE4.
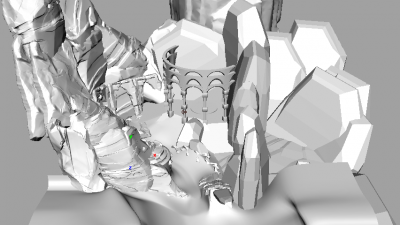
I created some rough collision hulls to wrap around some of the interior faces where I felt the predominant boundaries of play space defined by the world geometry may lay.
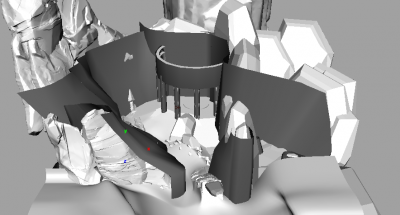
I then set up the fluid container in Maya to collide with these boundaries and the ground terrain so my vectors align to the surfaces and applied a uniform field to the volume to define a global wind direction.
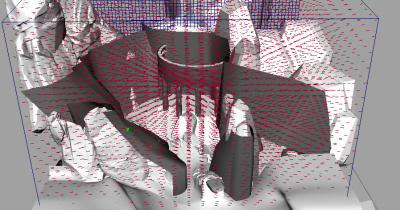
If we fly in closer you can see the larger, more coarse grid can be used to define the wind vector for a given space in the game world, so larger sprites can move through the space in a natural manner.
The grid scale in this case is relative to the world, the grid space can be smaller relative to a character, for example, for finer layers of detail.
Here is another view to illustrate the flow.
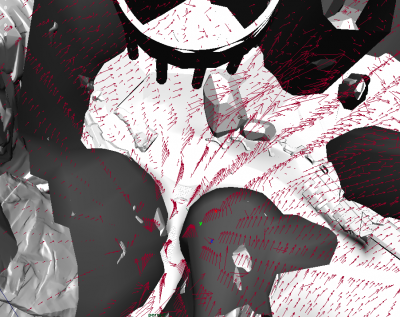
This type of world flow can be used for all types of global FX. Add a global vector field to all of your combat effects with some influence settings and manipulate their behavior after spawning. Perhaps your grenade smoke, for example, can drift in a general direction which matches your environmental FX.
GPU particles have tons of useful functionality. In many ways, there are limitations which are greater than traditional CPU particles, but the idea is to leverage the strengths of two systems together. GPU particles also do not need to be relegated to hundreds or thousands of little flakes of debris flying through your scene. They can be used for larger FX as well, as illustrated above.