Projectile Visual Effects
Contents
Overview
Projectiles are used in a lot of games, but the work that goes into creating a believable effect often takes several different smaller effects working with the logic of the Projectile Blueprint to yield a realistic result. The document provides an overview of how to begin to setup these effects.
I would highly recommend taking a look at the following Visual Effects Lesson Series before beginning to have an understanding of certain elements of which I will not be going into great detail:
Initial Setup
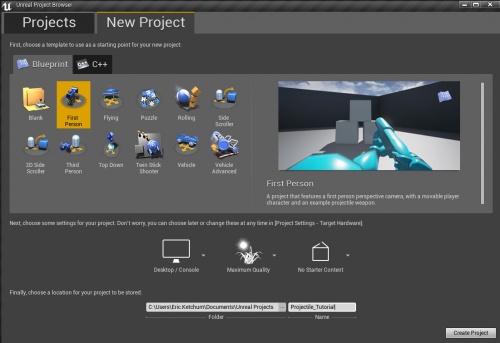
We will begin by creating a new First Person Project with NO starter content.
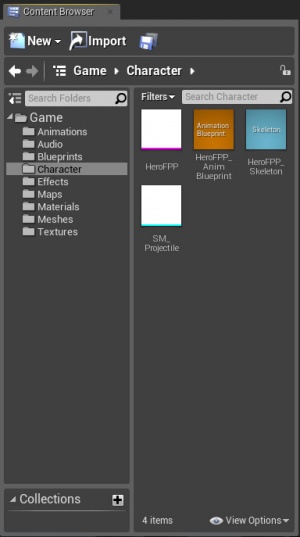
Next you will want to download, unzip and import the following texture assets to your newly created project and to keep things organized lets put them into the Textures subfolder; and while we are at it, let’s go ahead and create a Materials subfolder and an Effects subfolder. These subfolders will help us stay organized as we move forward.
ProjectileTutorial_Textures.zip
Effect Reference
It never hurts to look at reference of what we are trying to emulate in the game engine, though we may ultimately take some liberties as to how the effect looks, it still must be believable to an audience who has experience with the real reference (even if only through movies and television).
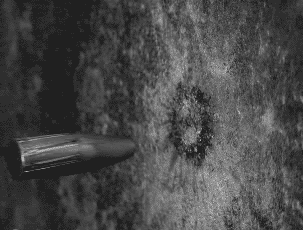
Now for our purposes in a game, this real life example of a bullet hitting a wall may not be “flashy” enough, but lets still break it down while we talk about what we expect to see as well.
In looking and analyzing any effect, it is important to remember that “the underlying substance of every effect is pure energy,” and “...what happens when that energy collides with an object, or an opposing energy force” (Gilland, Elemental Magic vol.1, 27) .
So in our example we see the energy generated by the bullet hitting the wall and immediately radiating outward very quickly and then slowing and moving away from the wall. In physical terms this is caused by air friction and the wall itself, but in broad strokes it also gives us a path to duplicate.
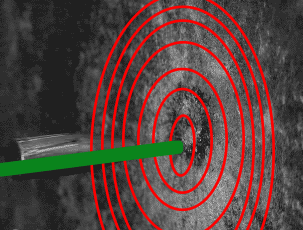
Now let’s talk about what we expect to see. One of the most important elements that everyone associates with any sort of bullet or grenade hit effect is some flash associated with that initial hit and is often referred to as the Hit. In the real world, this rarely happens upon impact. (Muzzle Flash is a totally different effect and happens at the bullet’s spawning, but more on that later.) Often we expect something like this with a gun hit:
Which we take for granted in movies, but is about as logical as this:
So in addition to the radial energy path we followed, we know can add the expected “explosive” Hit effect. If we look back at the Bullet Effect we can also see (thanks to repeated hits by different bullets) the aftermath of the explosive action of the Hit. More often than not this is actual shown in games (and movies in most cases) as an actual large divot in the wall. The actual aftermath of the bullet hit would depended on numerous factors including what type of bullet was fired from what type of gun from what distance and hitting what type of wall. For our purposes, we will do a mild divot to function in a broad style.
So our effect needs to satisfy the following criteria:
- Have a Radial Energy Path from the point of impact which slows and then comes back toward the bullet’s travel path
- Has an initial Hit effect to give the player some expected Feedback on the projectile’s hit
- Creates an aftermath which shows the effect of the impact on the world.
Now that we have our goals in place, let’s start off by making that initial Hit.
Effect Breakdown
Hit Material and Particle
The Hit Material is a simple one using the T_Hit.tga setup. We want to make sure that our HIT effect always renders on top of everything so to do this we will go into the
Material Attributes
under
Translucency
and Check
Disable Depth Test
to
True
.
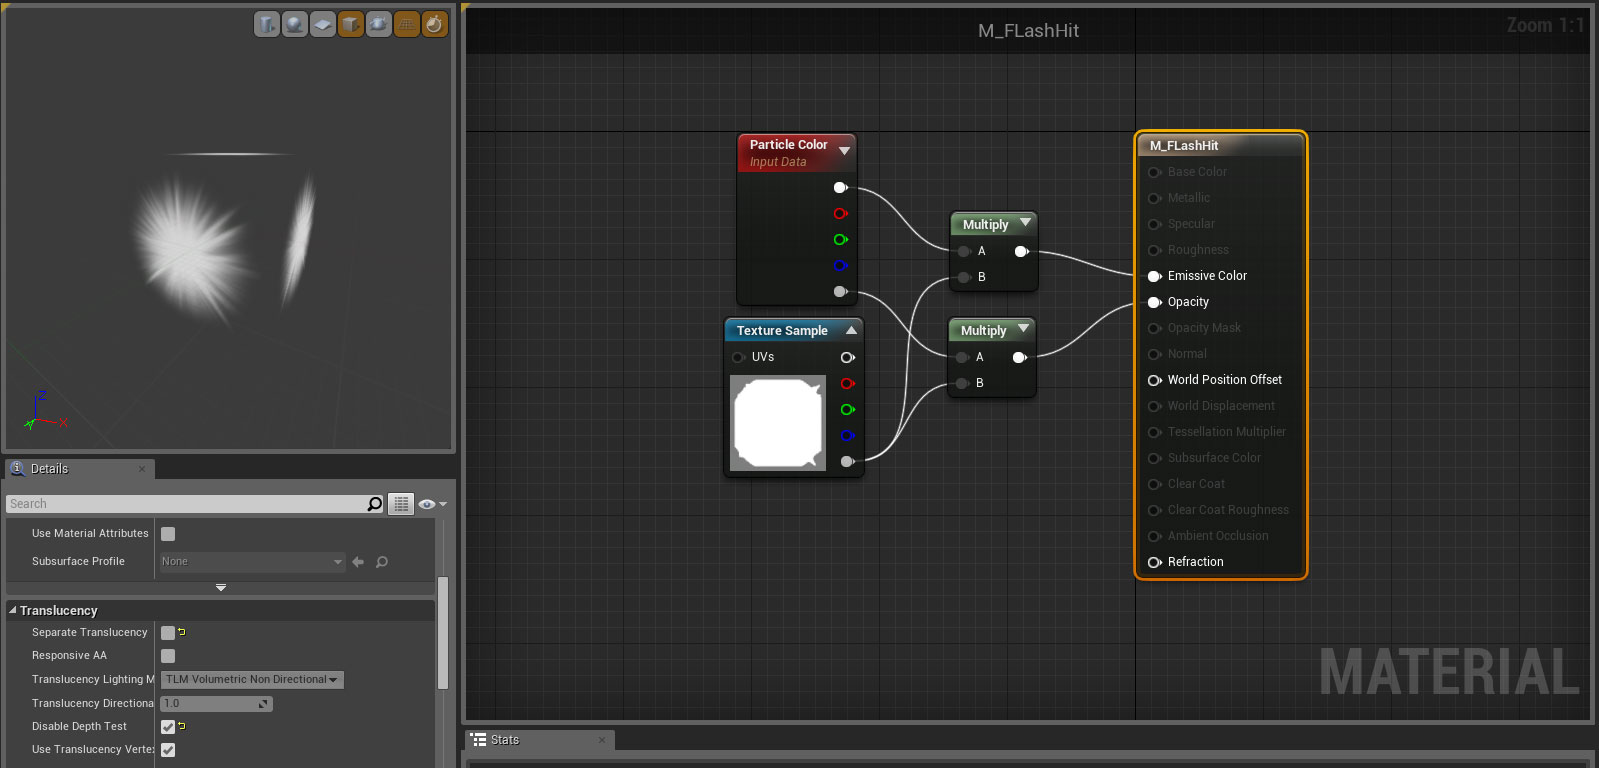
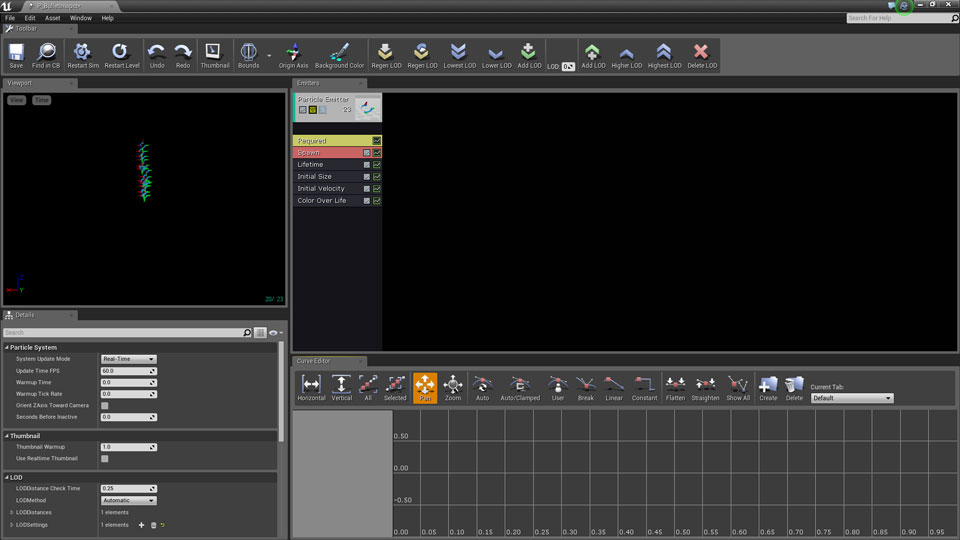
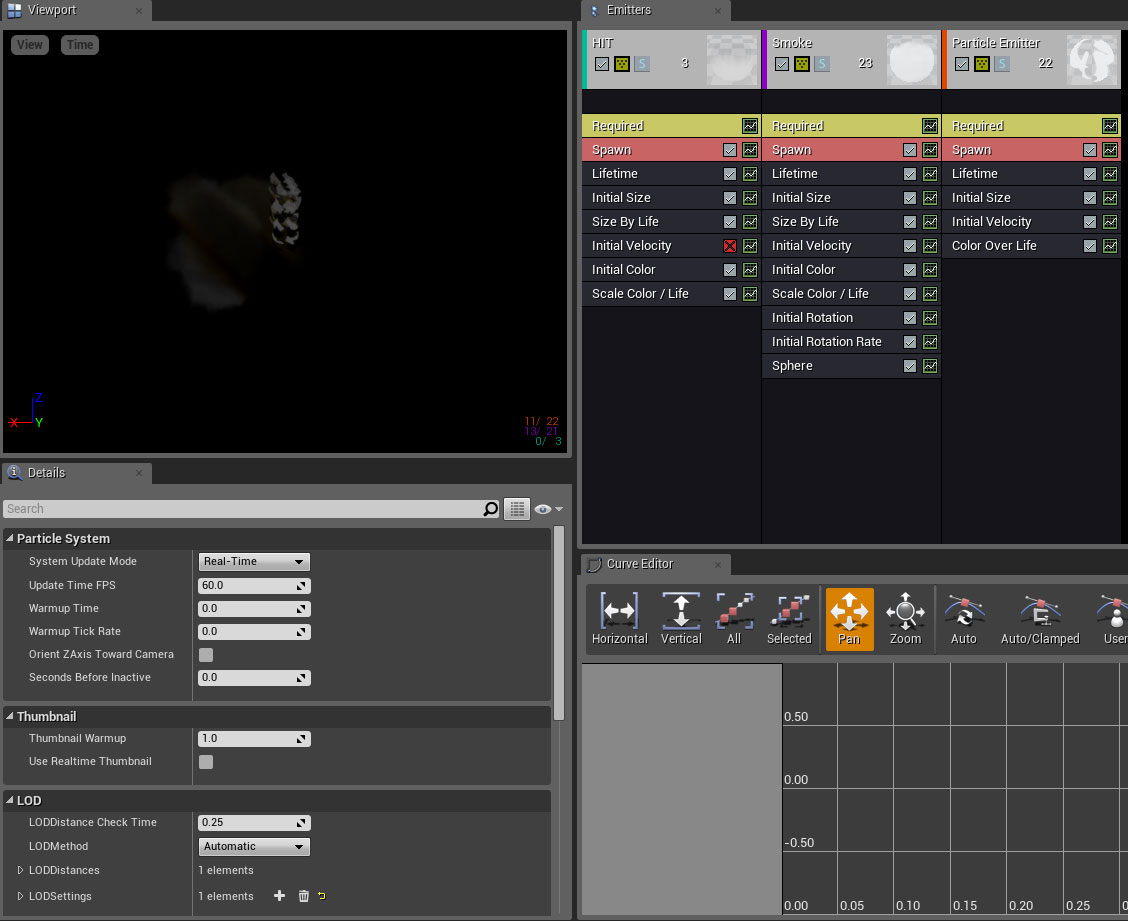
After creating this material we are going to begin working on our effect with the first emitter, so we will need to create a new Particle System, I called mine P_BulletImpact but you may name it as you wish just remember it as we will be coming back to it.
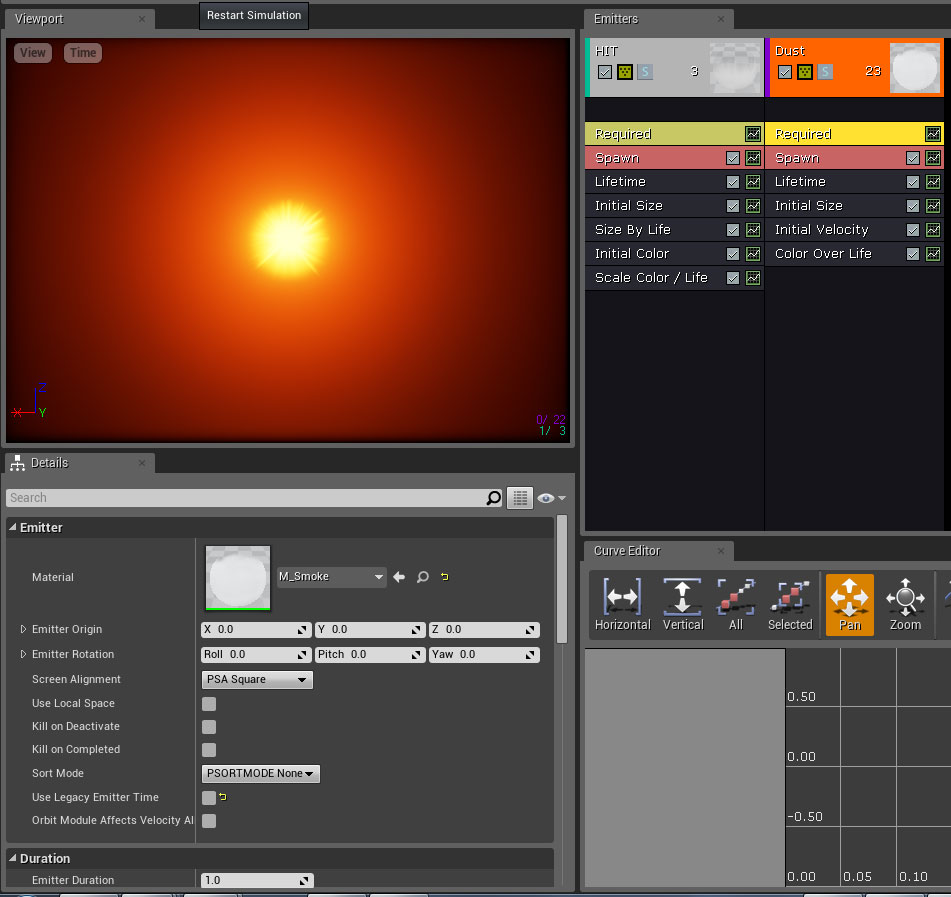
With the new effect opened in Cascade you should see this setup:
Now we want our particle system to use our new M_FlashHit Material so while Cascade is open select the material in your content browser and assign it to the Material slot in the Required Module. Also as a matter of housekeeping and for clarity later, let us name this emitter HIT. You can do this by selecting the Main Module header (the one that currently reads Particle Emitter) and changing the Emitter Name in the Details Panel.
Also at this time, let us setup the Initial Color and Scale Color / Life Modules instead of the default Color Over Life Module. For the many reason why please see the tutorials mentioned earlier. Your Cascade Window should now appear similar to this one:
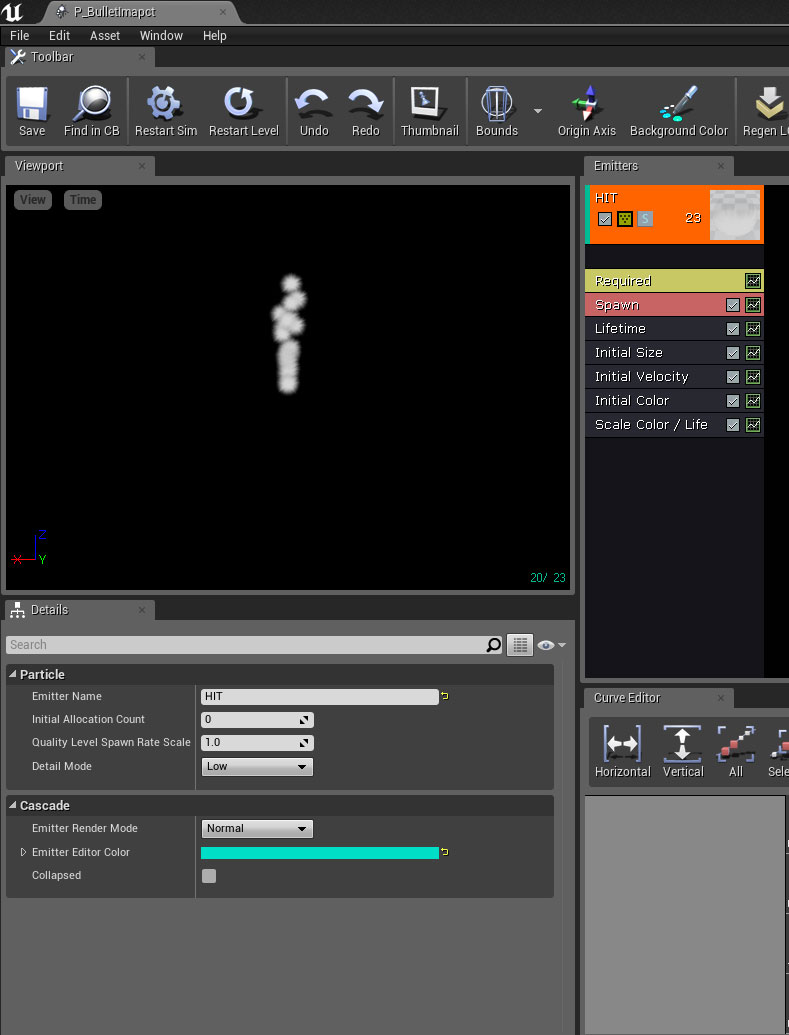
From here let’s set the following information:
In Required , we want to set the Emitter Loops to just 1 (We only want to have one Hit event per bullet impact, we don’t want it to loop indefinitely.)
In Spawn , we want to use a Burst Emission Count of 1 as we want this particle to appear and disappear very quickly, not loop and we only want one. So set the Rate Constant to 0 and a new Burst List element by clicking the plus sign and set the Count to 1 .
In Lifetime , we want to set a Uniform Min of 0.075 and a Max of 0.125 . This is to allow some variation from bullet hit to bullet hit but also keep the total impact of this effect element to that initial brief POW.
In Initial Size , we want to again set a Uniform Min of 75,75,75 and a Max of 125,125,125 . This is to give it the same variation mentioned under Lifetime.
For Initial Color , I have used for Start Color 20,2,1 and for Start Alpha 1 . This produces a nice orange-y color.
And for Scale Color / Life , I have set the Color Scale Over Life to a Distribution of Constant Curve with point 0 at In Val 0 and Out Val of 25,15,1 and point 1 at In Val of 1 and Out Val of 1,1,1 . This creates a great gradient from a very bright yellow-white to our orange color. In this example I left the Alpha Scale Over Life to a Distribution of Constant Curve with a point 0 at In Val of 0 and Out Val of 1 and a point 1 at In Val of 1 and Out Val of 0 . This allows our HIT to fade out over its short life.
Your HIT Emitter in Cascade should now look something like this:
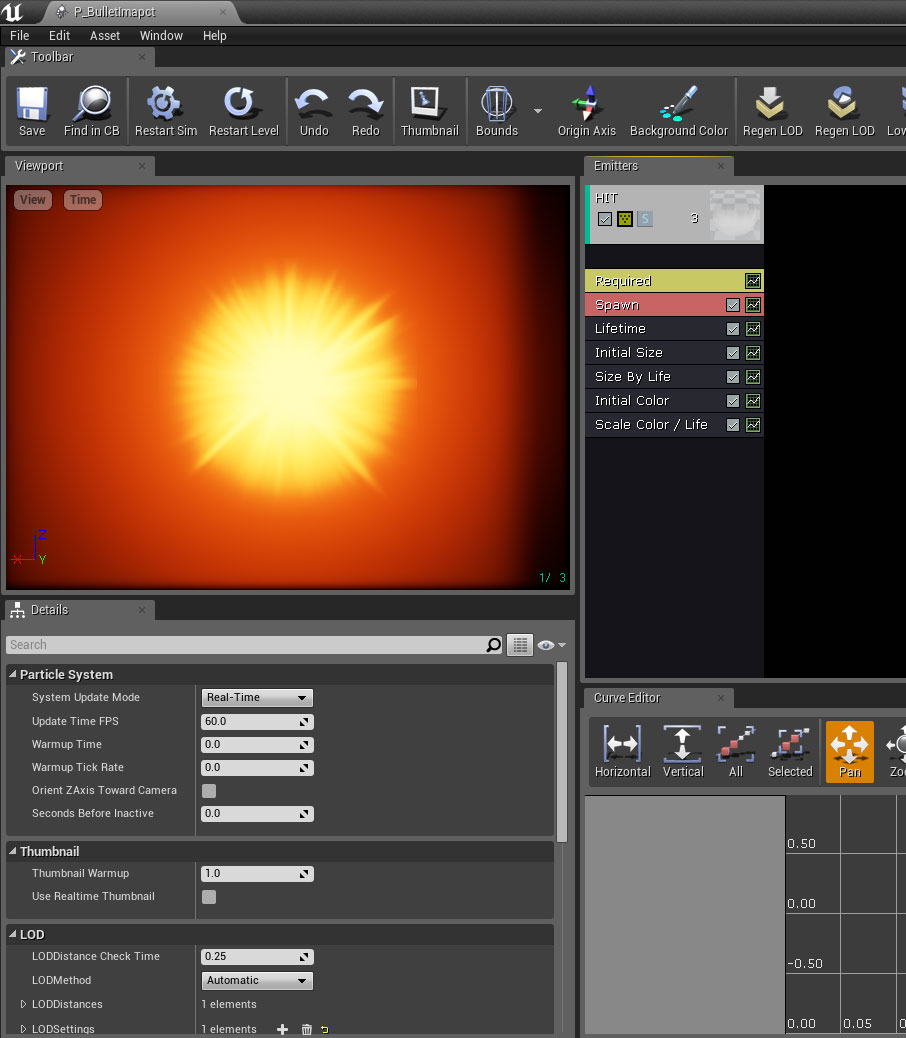
Now we have a problem. That little dot is not helping us much. That is not a grand and great Impact moment that our bullet is calling for. The first Gut reaction is that I chose to small an initial Size, but we need to take a moment and think about our energy again. Remember the bullet hits at a very small point and then grows outward from that point pushing radially. We want to grow this effect in the same fashion and in order to do that we will need a Size By Life module. The Initial Size and the Size by Life Module work similarly to the Initial Color and Scale Color / Life.
So we want to grow from that point of impact so in the Size By Life module point 0 In Val of 0 and Out Val of 0,0,0 . and point 1 In Val of 1 Out Val of 5,5,5 . Essentially allowing the point to grow from a spec to 5 times its original size and because we are dealing with a radial texture it will give us that energy path we are looking for.
There is still one last problem which may not be as obvious at first glance because of the small lifetime. but the velocity shouldn’t be there we want to have the Impact only at that Impact location point. So removing that module, our final effect looks like this:
Dust Material and Particle
Next up is what I am going to call smoke but in actuality it is more like the dust generated from the impact of the bullet to wall. I am presenting a fairly simple smoke/dust and you can exaggerate this material as you wish with UV distortion through Flowmaps or more complex cloud structures through flipbooks, but the general particle setup should be very similar.
If you need help understanding the Depth Fade or Near Camera Fade please see the tutorials mentioned earlier.
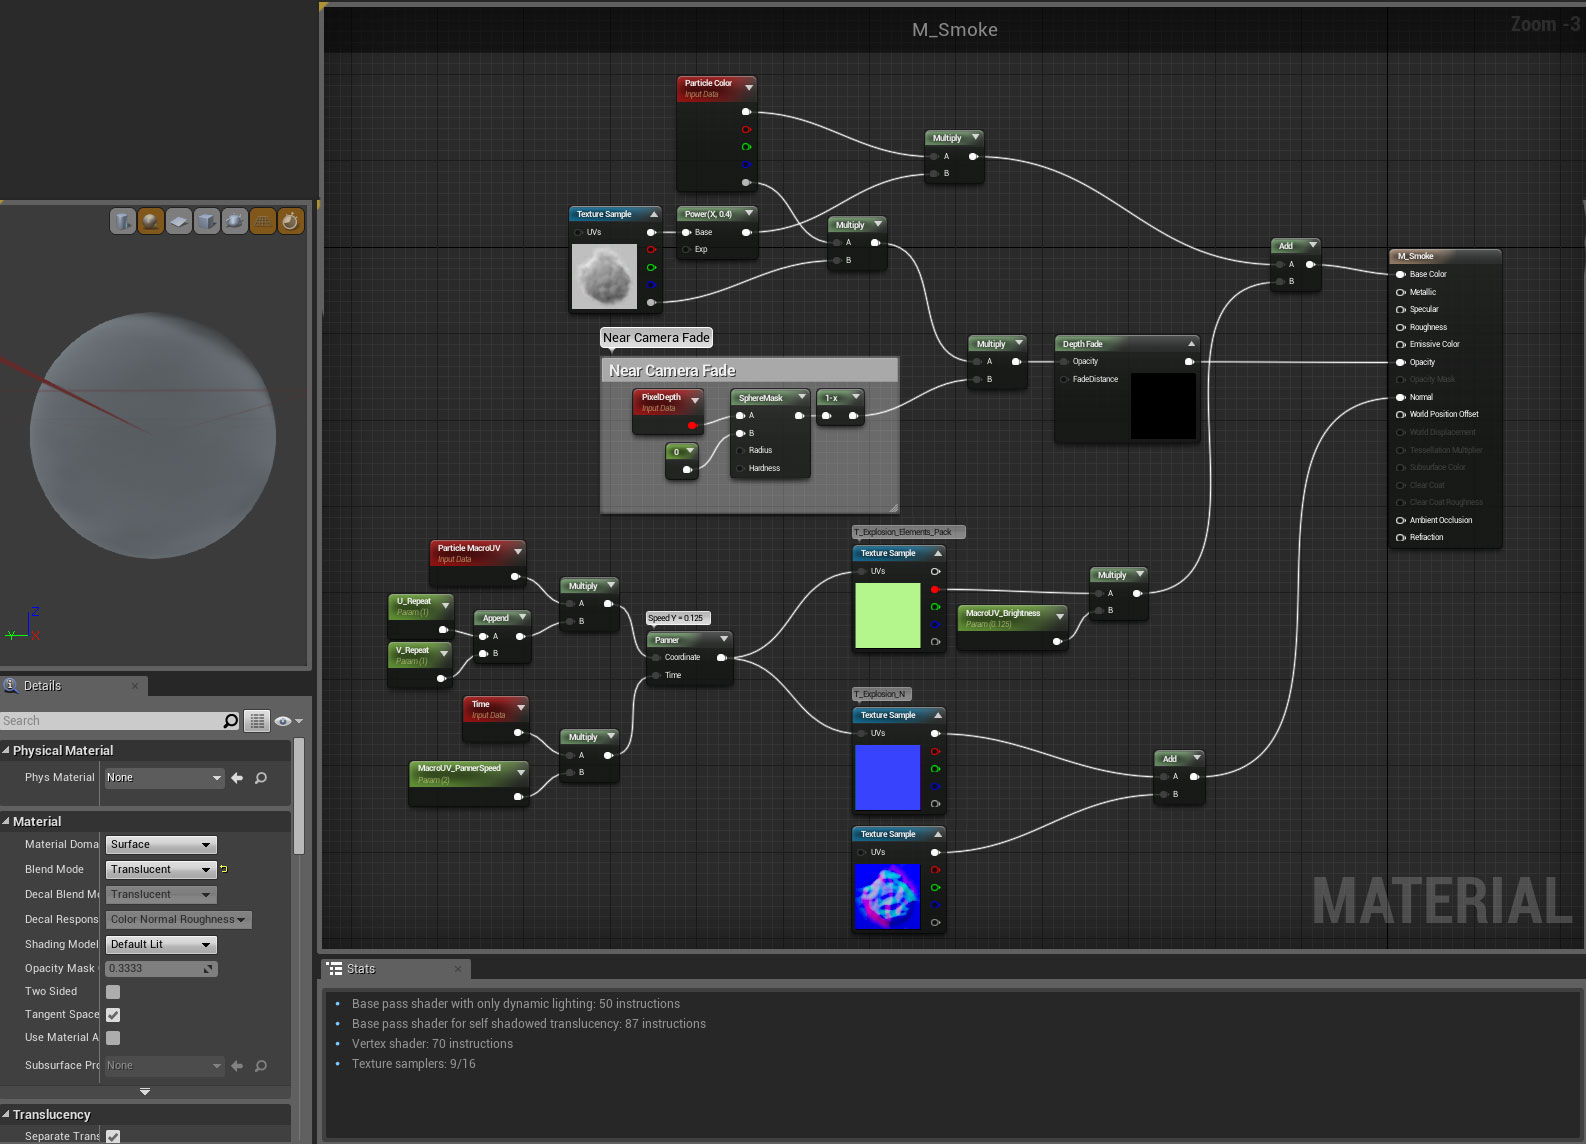
Notice that I’ve added the ParticleMacroUV Node which causes some strange flashing on two of the texture samplers, this is normal and we will explain the MacroUV function when we get to the particle System.
Let’s reopen our P_BulletImpact effect and add a new emitter next to our HIT emitter. Again, as a matter of housekeeping, let’s name our Emitter, Dust and assign our new material M_Smoke material to the emitter. You should now have something like this:
One thing you should notice right off the bat is that the emitter is now back to looping but don’t worry this is default behavior and we will be fixing it as we set the various module properties which should be as follows:
In Required , we want to set the Emitter Loops to just 1 (We only want to have one Dust event per bullet impact, we don’t want it to loop indefinitely.)
In Spawn , we want to use a Burst Emission Count of 20 and a Count Low of 10 as we want to have a range of cloud density to each individual bullet hit, which keeps your player from realizing its the same bullet hit over and over again by introducing some variation. So set the Rate Constant to 0 and a new Burst List element by clicking the plus sign and set the Count to 20 and the Count Low to 10 .
In Lifetime , we want to set a Uniform Min of 0.125 and a Max of 0.25 . This is to allow some variation from bullet hit to bullet hit but also keep the total impact of this effect element to a reasonably brief amount of time, remember performance in shooters is a key consideration.
In Initial Size , we want to again set a Uniform Min of 5,5,5 and a Max of 20,20,20 . This is to give it the same variation mentioned under Lifetime. I also want to take a moment and mention the Locked Axes dropdown. If you select XYZ in the drop down you can enter a value in just the X coordinate box and it will automatically be considered for all 3 values in the vector. This is true of any modules that have this option.
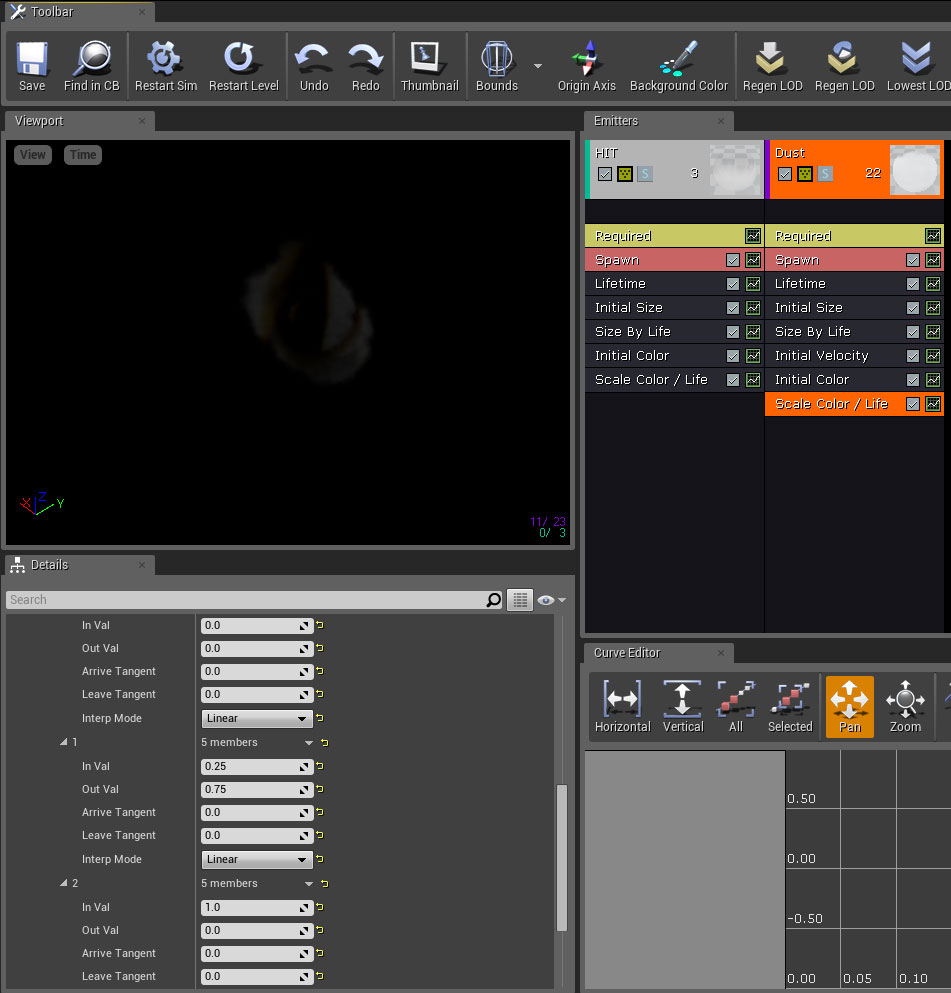
Let’s go ahead and add in our Size By Life module to give us control of our dust’s size over time. For housekeeping, I usually click and drag the module so that it sets directly underneath the Initial Size module. Let’s change the Distribution Method to Constant Curve and add two points. At point 0 , the In Val is 0 and the Out Val should be 1,1,1 . At point 1 , the In Val should be 1 and the Out Val should be 10,10,10 .
We are starting to get something that is looking a little better, but we always must be thinking how is the effect going to be used. To that end, we know we want this effect to fire in a specific radial fashion upon bullet impact. Since the HIT itself has no motion merely a quick flash, we did not have to consider it in relation to the impact point, the dust we do.
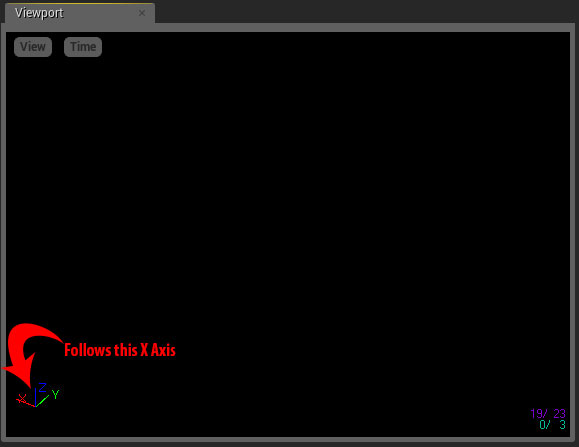
In the engine, if you have ever dragged an emitter into the level, you will notice that an emitter has a large arrow pointing out of it. This arrow always faces the Positive X Axis of the Cascade Emitter itself.
For this we want to use the velocity to make sure our clouds are moving along that axis so we can control it more easily in blueprints when we add it to our projectile. So in Initial Velocity , lets set the Distribution to Uniform and set the Max Value to 100, 20, 20 and the Min Value to 50,-20,-20 .
As mentioned in the earlier section, lets delete the Color Over Life Module and add the Initial Color and Scale Color / Life modules.
For Initial Color , I have used for Start Color 1,1,1 and for Start Alpha 1 . This leaves the original texture as drawn.
And for Scale Color / Life , I have set the Color Scale Over Life to a Distribution of Constant Curve with point 0 at In Val 0 and Out Val of 1,1,1 and point 1 at In Val of 1 and Out Val of 0.25,0.25,0.25 . This creates a fade to black in the texture math and helps sell the age and decay of the particles over its lifetime. In this example I left the Alpha Scale Over Life to a Distribution of Constant Curve with a point 0 at In Val of 0 and Out Val of 0 and a point 1 at In Val of 0.25 and Out Val of 0.75 and a point 2 at In Val of 1 and Out Val of 0 . This allows the dust to quickly fade in and then fade out over most of their life but also keeps some transparency in the clouds (by not going up to a full value of 1).
So we should now be at a system that looks like this:
Not bad, but if we watch our dust closely it look a little static and remember we have a lot of energy to account for on that bullet hit. Let’s give each of the particles a litle motion. To do this, we will add an Initial Rotation and Initial Rotation Rate module.
In the Initial Rotation module, make sure your Distribution is set to Uniform and the Min is set to 0 and the Max is set to 1 .
In the Initial Rotation Rate module, let’s also make sure that our Distribution is set to Uniform and the Min is set to -0.125 and the Max is set to 0.125 .
Now we have a little bit more of the energy represented in the effect, but there is one more thing to consider. The smoke is still pushing outward primarily in one axis only and is not giving us as much of that spherical push out that we saw in the original bullet hit. You can see this most directly by rotating your camera around and look down the X Axis at your clouds. There happens to be a module that can help us with this issue, the Sphere module.
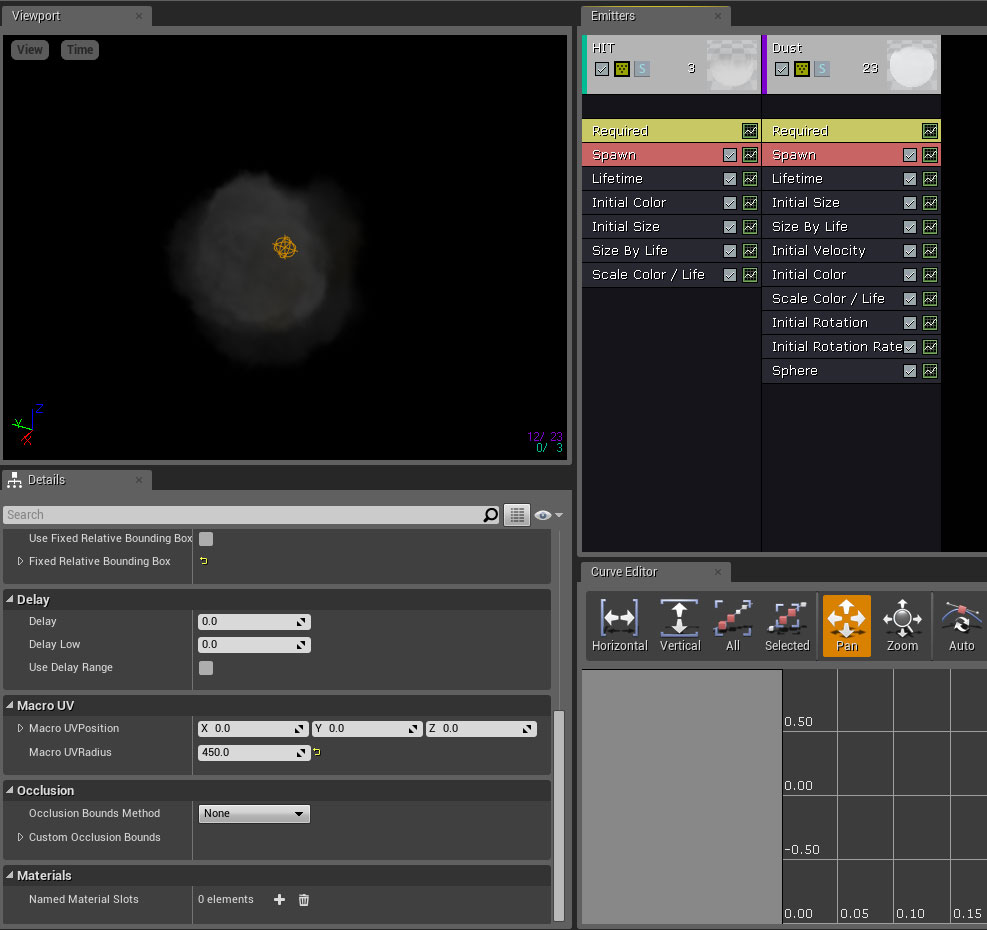
The Sphere module, located under the Location selection, allows us to not only place the dust in a sphere in space but control the direction in which that spawned sprite will travel by applying a velocity setting. So, let’s begin by adding the Sphere Module. It often helps with the location modules to visualize them in Cascade, you can do that by going into the modules’ details panel and setting B 3DDraw Mode to True . (It should be noted that this visualize does not translate to the Level Viewport and is limited to Cascade’s viewport only, so if you forget to turn it off, that’s ok.)
With the Bullet hitting the wall we can see that the initial bullet hit is not a point in space but a slightly varying circle, we can achieve this by setting the Start Radius’ Distribution to Uniform and the Min to 5 and the Max to 15 . In the module you will notice a long list of Positive and Negative XYZ values, these control the quadrants of the sphere which will allow the sprites to spawn. For our purposes we want to limit the spawning on X at all. Remember we have the initial thrust forward from the bullet which will keep the Positive X from spawning and the wall will keep Negative X from spawning. So, unc-check those to set their values to false .
We also want to check Velocity to true and in the Velocity Scale, we want to set the Distribution to Uniform and the Min to 1 and the Max to 6. These settings will give us a nice thrust outward from the spawn quadrants and variation which will help us with repetition of the same effect.
Finally let’s talk about the MacroUV. If you remember we set that up in the Material, and as of yet, have not touched it. MacroUVs allow us to place a texture over all of our sprites as if they were one plane. This has been used to allow the entire cloud effect to have a normal placed on top of the effect giving a more volumetric effect to the effect instead of each sprite. For our purposes I want to use the panning MacroUV setup in our material to help sell the rising smoke of our effect. There are two places where you can adjust the MacroUV settings. The primary one can be accessed from the details panel in Cascade if you click in the empty black space next to our emitters. If you scroll down you can find a MacroUV section with two sections MacroUVPosition and MacroUVRadius . For our purposes since we are panning a tileable texture, we want to set the MacroUVRadius to 450 . Since we only are using one MacroUV setup in our effect we can use this main input. If you needed different MacroUV value in the same effect you can go under the Required module to the MacroUV section and check the Override System MacroUV to true and the emitter will use the values here instead.
After this final setting, you effect should look similar to this in Cascade:
Debris Material and Particle
For our debris, I have added a sample texture I used previously in an exploding barrel effect, hence the texture, but our purposes we are truly only concerned with the alpha channel.
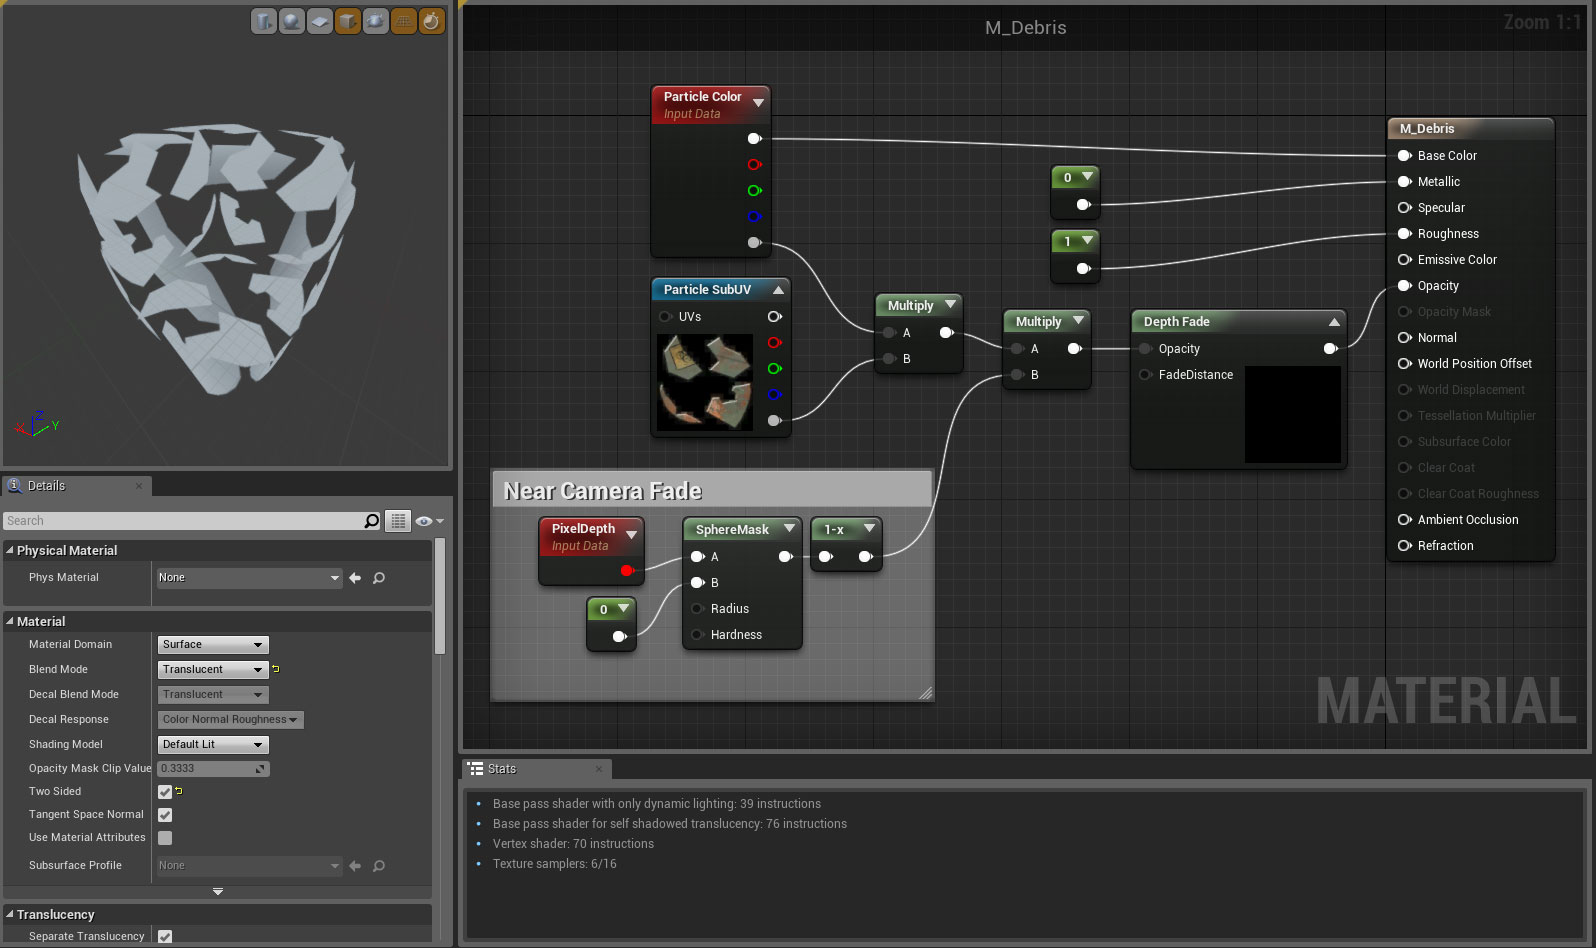
You may notice that my texture is setup to use SubUVs, 4 smaller images making up the 1 texture. Keep that in mind as we setup the Particle System. Let’s reopen our P_BulletImpact effect and add a new emitter next to our DUST emitter. Again, as a matter of housekeeping, let’s name our Emitter, Debris and assign our new material M_Debris material to the emitter. You should now have something like this:
Let’s begin with some general housekeeping and getting our SubUVs to work as expected. In Required , you want to adjust Screen Alignment to PSA Velocity , which will allow our pieces to face the direction in which they are shot toward. Also in Required under Sub UV change the Interpolation Method to Random , as we want the system to randomly pick one of the 4 images each time it produces the particle, Sub Images Horizontal and Sub Images Vertical should both be set to 2 .
You will notice right away that we are down to 1 image but it is not random. To produce the random effect we will need to add a SubUV >> SubImage Index module. In the SubImage Index , you will need to set the Distribution to Uniform and set the Min to 0 and the Max to 3 .
Let’s make this more apart of our impact effect again but returning to the Required module and setting Emitter Loops to 1 . Next, go into Spawn , set the Rate Distribution to a Constant 0 . In Spawn and under Burst add 1 element to the Burst List with a Count of 20 and a Count Low of 10 .
In Lifetime , let’s set our Distribution to Uniform with a Min of 1 and a Max of 2 . Because we are going to allow Collision for these particles, I have given them a little bit of a longer lifetime compared to our other systems.
In Initial Size , make sure our Distribution to Uniform with a Max of 10,10,10 and a Min of 5,5,5 . This size is based on a semi-standard bullet impact size from our reference earlier.
Skipping Initial Velocity for a moment, let us do the general housekeeping by Removing the Color Over Life Module and replacing it with the Initial Color and Scale Color / Life modules. For these modules, I am going to leave the default settings and for that matter you could have left the Color Over Life module, but in your level you may want to adjust the debris Emitter’s Initial Color to match the level’s general color.
Going back and thinking of how these particles are supposed to behave, they need to spawn from the same general impact point as our Smoke and since we already have this setup in the Sphere module, let’s
SHIFT + Click-Hold and Drag
the
Sphere
module into our Debris emitter. You should notice the System looks like this now:
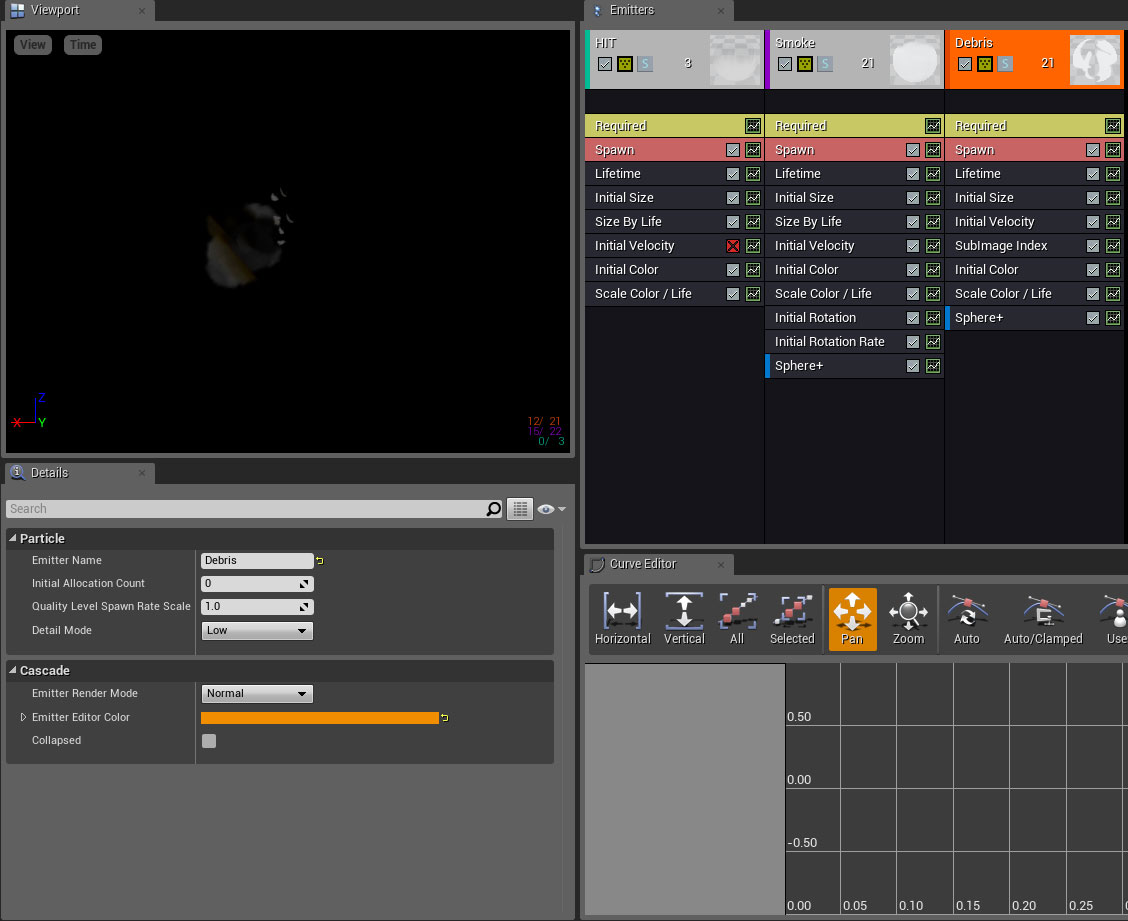
That + symbol means that the two emitters are sharing the same computation input data and changing one will change both. Whenever possible it is always processor friendly to try to share modules.
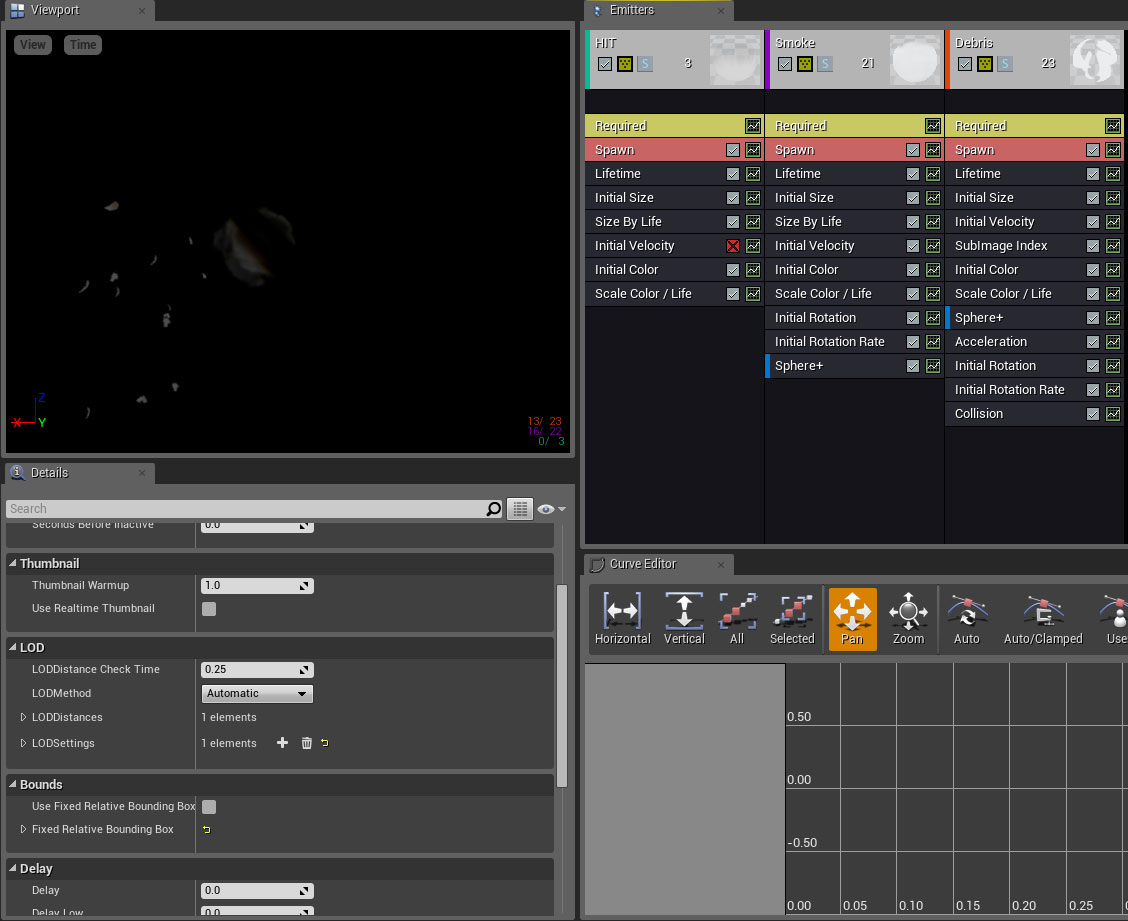
So, our particles are spawning correctly but by no means are moving like they should. Let’s go back to Initial Velocity and like our smoke adjust the particles along the X-Axis.
In Initial Velocity , make sure that the Distribution is set to Uniform and that the Max is 500, 300,300 and the Min is 250,-300,-300 . Immediately you should see a marked improvement on the particle’s behavior. They are following the energy of the effect and providing a nice spread of that energy, but there is one problem. They only half follow what the debris would actually do in the real world. We have successfully mimicked the thrust from the explosion but have not taken into account the gravity in the world acting on these pieces.
On Earth the gravity can be said to be the acceleration of an object toward earth at a rate of 9.80 meters per second squared. In Unreal terms, since the engine uses centimeters as the primary measurement, you could clarify that gravity is 980 cm/s^2. In Cascade we have an Acceleration module which will allow us to simulate this force’s effects on our debris.
So, add an Acceleration module and make sure that the Distribution is set to Uniform and the Max is set to 0,0,-900 and the Min is set to 0,0,-1200 . We use a variation here to provided some visual interest as well as simulate the fact that air friction and shape of object do play a roll in how items fall to the ground.
Our movement looks correct now, but if you watch the particles themselves they seem a bit stuff. In order to provide a more fluid motion let’s use the rotation settings similar to what we did for the smoke.
Add an Initial Rotation and make sure that the Distribution is set to Uniform with a Min of 0 and a Max of 1 . Next add an Initial Rotation Rate module and make sure the Distribution is set to Uniform with a Min of -0.125 and a Max of 0.125 .
Finally we want to add a Collision module setting the Damping Factor Distribution to Uniform with a Max of 0.2,0.2,0.2 and a Min of 0.1,0.1,0.1 . Leaving the Damping Factor Rotation to their default settings, set the Max Collisions Distribution to Uniform with a Min of 1 and a Max of 2 . The Collision Completion Option should be Freeze and insure that the Collision Types includes World Static , World Dynamic and Physics Body .
Your Particle System should finally look like this:
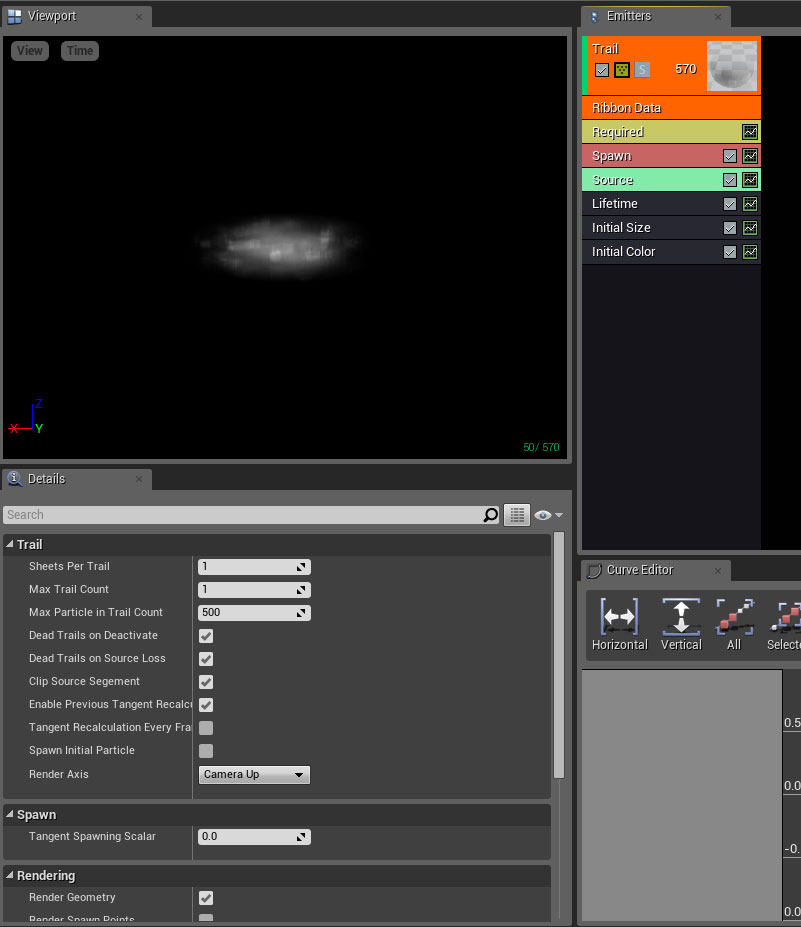
Bullet Trail Material and Particle
To add little visual flair to our effect, I want to go over how to create a ribbon particle system which will attach to our bullet and give the illusion of a bullet trail flying through the air after the bullet. This is absolutely not necessary to the overall effect, and you can skip this section.
For the material I am using a series of panning clouds and breakup textures to generate a generic cloudy breakup with some movement built into it as well as a soft circular gradient to act as opacity.
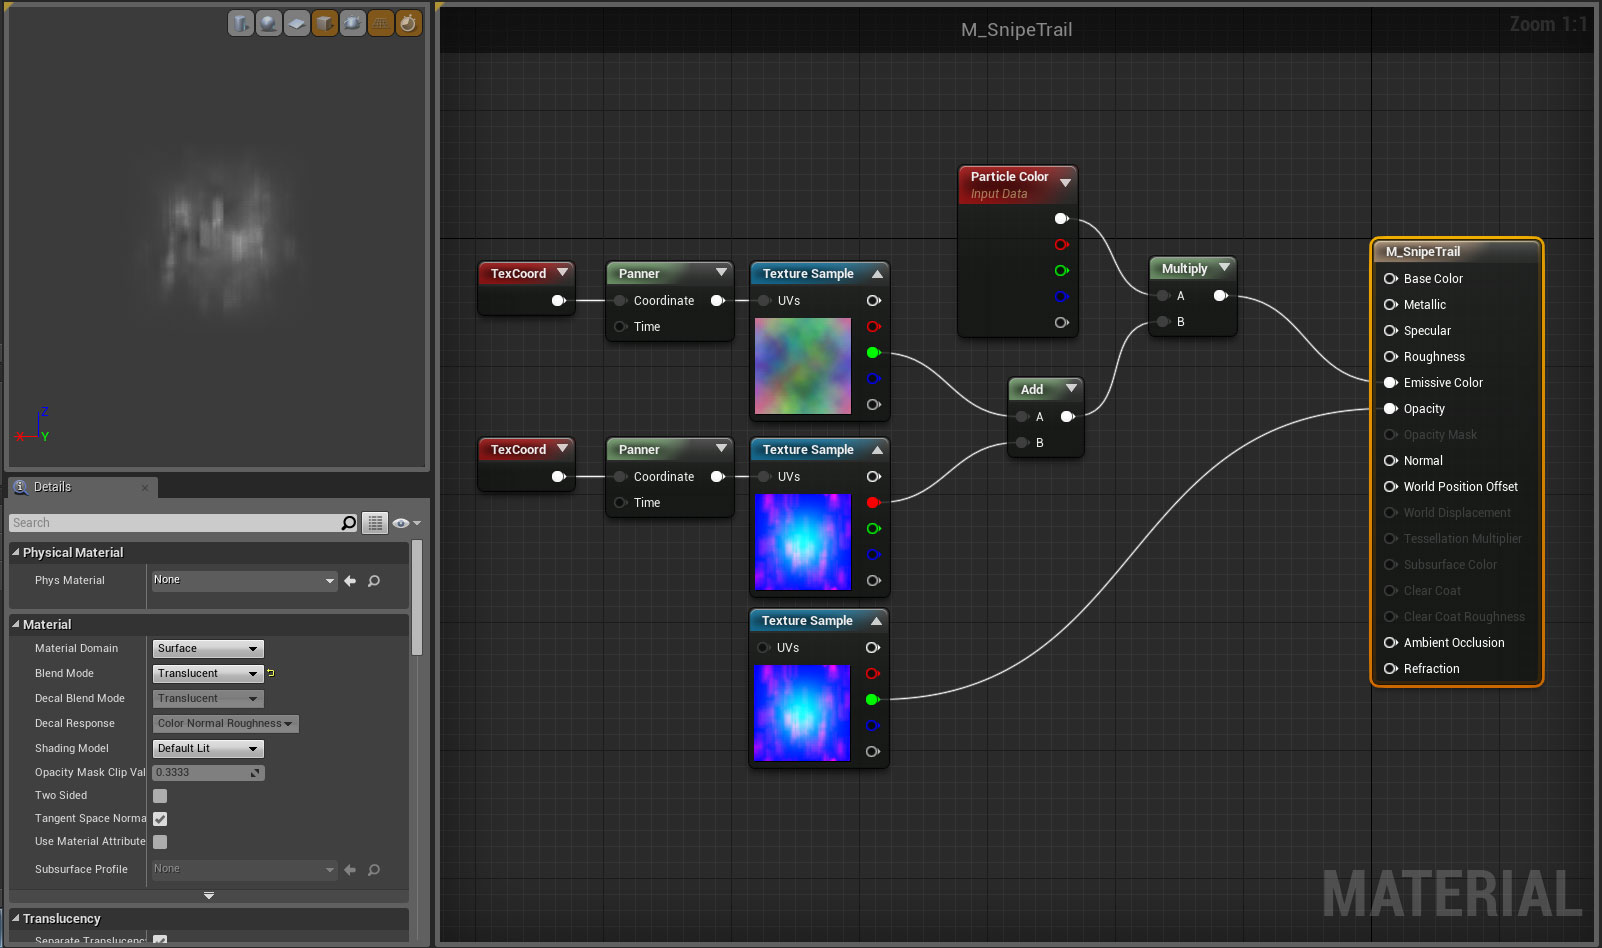
Because of the speed and nature of this effect, we are going to create a very simple ribbon which can be attached to the Bullet in the Projectile Blueprint.
Create a New Particle System and assign the M_SnipeTrail material created above to it and as before let’s name the emitter Trail. With this particle system we want to first add new TypeData of Ribbon to the system. In the new Ribbon Data Module, we are going to leave all values at default .
In Required toggle the Use Local Space to True which will allow us to control the movement of the effect more easily from a blueprint later. In Spawn set the Rate Distribution to a Constant 50 . In Lifetime set the Distribution to a Constant 1 . InitialSize , we will leave at the default Uniform Distribution with a Min and Max of 25,25,25 . We will replace the Color Over Life module with a default set Initial Color module.
Finally we need to add and set the Trail >> Source module. We want the Source Method to be PET2SRCM Actor and using the Source Name Bullet . The Source Strength should be a Constant 100 and insure that the Inherit Rotation is toggled True .
At this point you may be wondering why the particle system cannot be seen in the Preview Window. This is because a ribbon module requires movement to be seen. You can simulate the motion in Cascade by toggling Motion to true under the Viewport’s View dropdown menu.
With
Motion
on, your system should look like this:
Bullet Hit Decal Material
In order to simulate the divot made in the environment caused by the bullet’s impact we are going to use a Decal which we can spawn via the Projectile blueprint at the point of impact, but more on that later. For this material, I really only want to generate a normal which can be overlayed onto the environment at impact. This will allow the level’s actual colors to shine through but allow the level’s lighting give me a believable impact effect. To that end we are going to create a Material M_Decal_BulletMark which has a
Deferred Decal Material Domain
and a
Decal Blend Mode
of
Normal
.
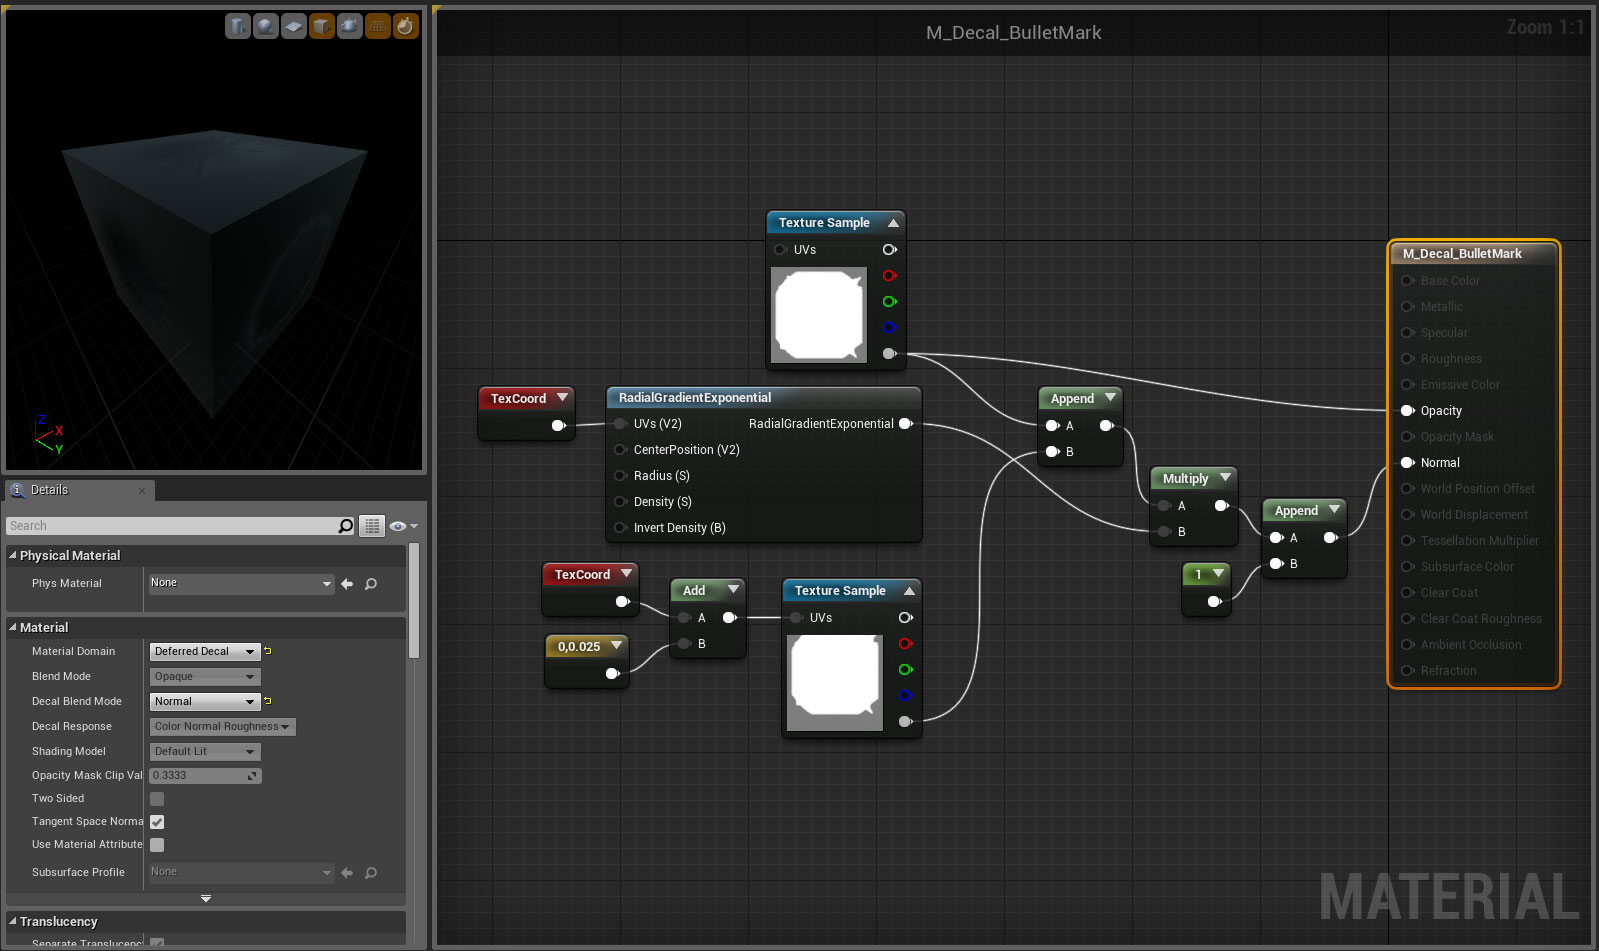
I am using a little trick to generate a “faux” normal using only the existing texture. All I do is adjust the UVs on the texture very slighting in one direction. In this example I am using the Alpha Channel as it has the more precise texture breakup. I append the original to the new which will give me a Red and Green 2 Vector and Append a 1 in the Blue Channel and I have a generated Tangent Space Normal. It may not make it to a final game but for quick testing it can give you a pretty good idea of how something will look without trying to generate a normal in another program.
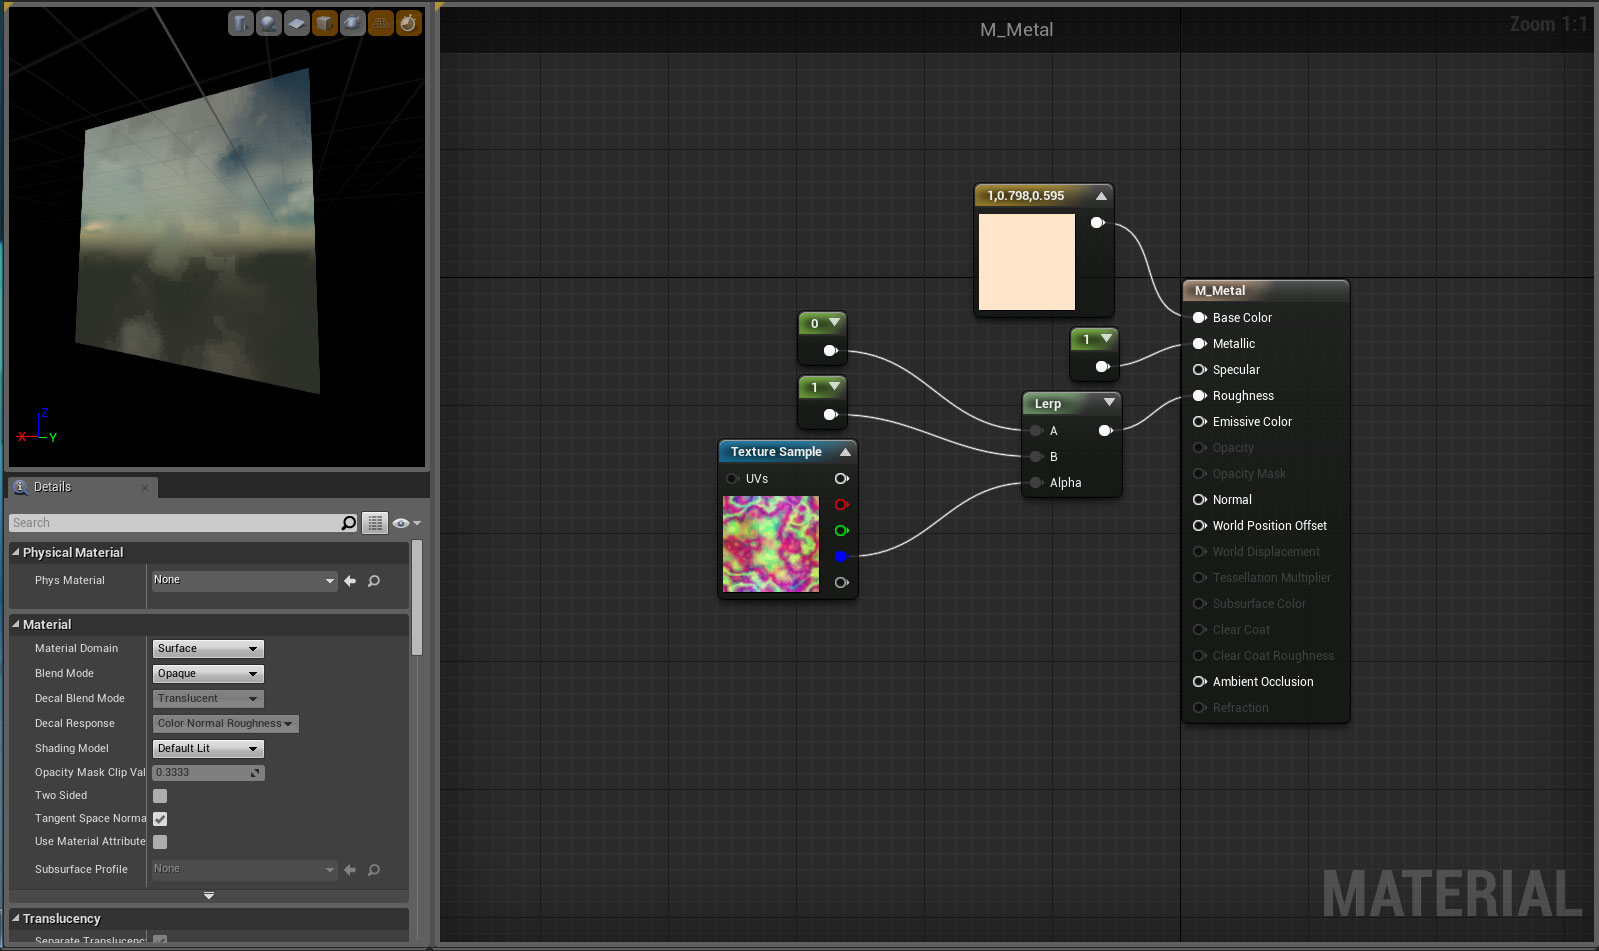
Bullet & Bullet Material
In the final project, I have included a bullet mesh and a material shown below. These are not needed but help to sell the effect more than the default yellow ball.
Projectile Blueprint
I am using the First Person Template’s Projectile Blueprint as our base and I will explain as we go through what we are adding, changing or deleting.
Components
To start in the Components, we first want to change out the Sphere Mesh with the Bullet mesh which can be done simply by placing the Bullet SM into the Static Mesh Slot. Please take note that I am not changing the Collision Component so while the bullet is a smaller cyclindrical object the collision component is still based on the yellow ball. Feel free to adjust as you require, but the difference in this sample is miniscule. To keep things straight for those who chose not to use the bullet mesh, I have kept the name of the Variable Sphere .
In the Projectile Details panel, set the Initial Speed and Max Speed to 3000 and the Projectile Gravity Scale to 0 which will ensure a straight flying bullet. Insure that the Projectile does not Bounce and that Constrain to Plane is toggled True .
Next we want to add the Ribbon Particle System under our ROOT Collision Capsule. For clarity, let’s name this component’s variable to
Ribbon
.
Event Graph
To begin let’s delete everything but the Event Hit node in the Event Graph. If you would like to work the extra components into the event graph ok, but our initial reference has a bullet with enough energy behind it to hit and destroy itself on that first hit with no bouncing components.
Next let’s set up the following node structure:
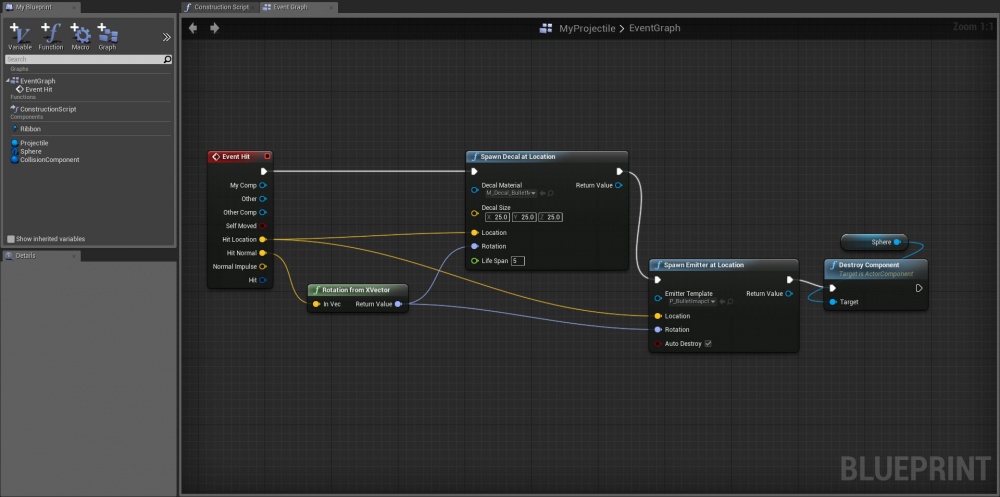
We went through a lot of trouble in Cascade to insure that our particles were behaving along the X Axis and if you note the Rotation from XVector node in the Blueprint is the reason why. We can take the normal from the point of impact and the node will generate a rotation value which will ensure that the X Axis is facing the same direction as the Normal of the impact surface.
Conclusion
This project is meant as an introduction to setting up a complete projectile visual effect. Feel free to experiment and explore different settings and effects in the attached project.
[ The Final Project can be obtained here. ]
KNOWN ISSUES
As of 4.5.1, there is a known issue with collision's when particles are spawned or attached via a Blueprint. This does mean that the debris will not collide in the project currently.
As of 4.6.0, there is a known issue with Cascade's Color Settings not allowing values greater than 1.0 begin entered which will conflict with settings I have listed above in the documentation. This has been fixed in 4.7.0 Preview 1 and should be corrected in future engine releases.
NOTE: While the Project is uploaded as a 4.6.1 project, you can create the entire effect starting in version 4.2.1 onward.