Matinee Basics: Creating Your First Matinee Sequence
Contents
The goal in this tutorial is to teach you some basics about Matinee and its interface. You’ll learn how to connect and manipulate objects, animate camera paths, and make the sequence visible in-game when you’re finished. You’ll also learn some specific functions, windows, and keyboard shortcuts along the way.
Creating a Matinee Actor and Interface Basics
Create and open a Blank Project in UE4:
Click on the Matinee Icon at the top and select “Add Matinee”.
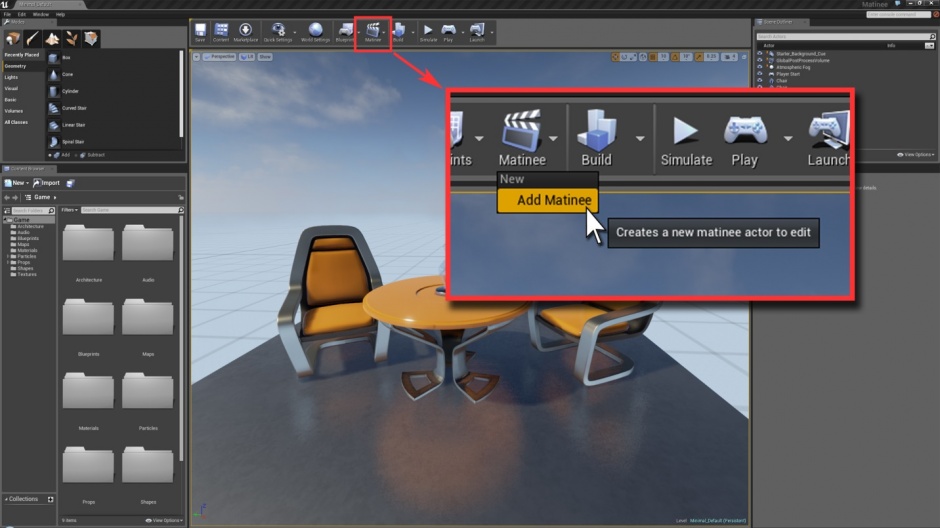
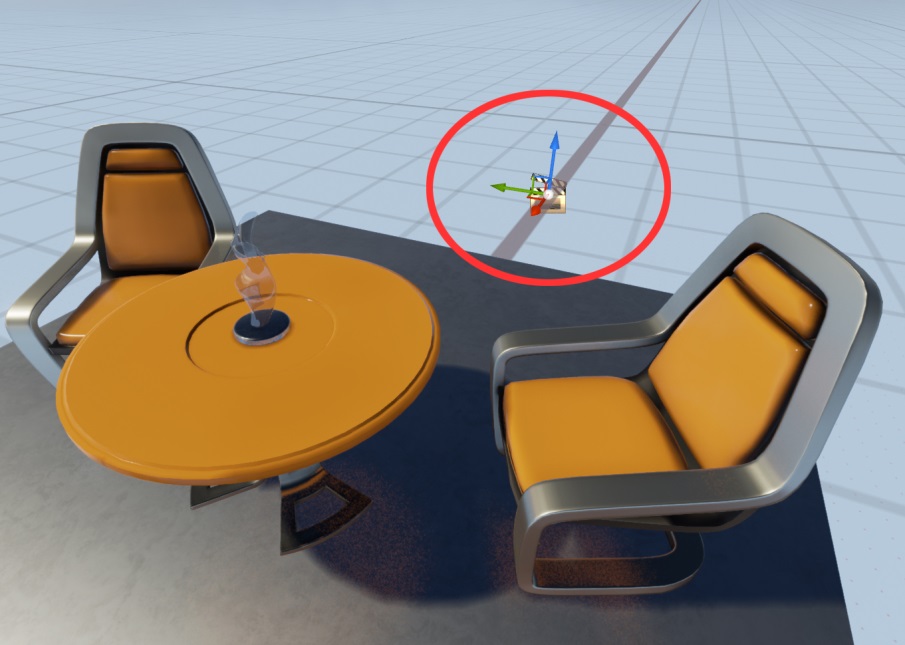
A warning box will appear letting you know that Undo/Redo data will reset when opening Matinee. Go ahead and click the “continue” option in the box to close it out. A Matinee window should open and you’ll see a new Matinee Actor has been added in the level. Here is the Matinee object in the viewport:
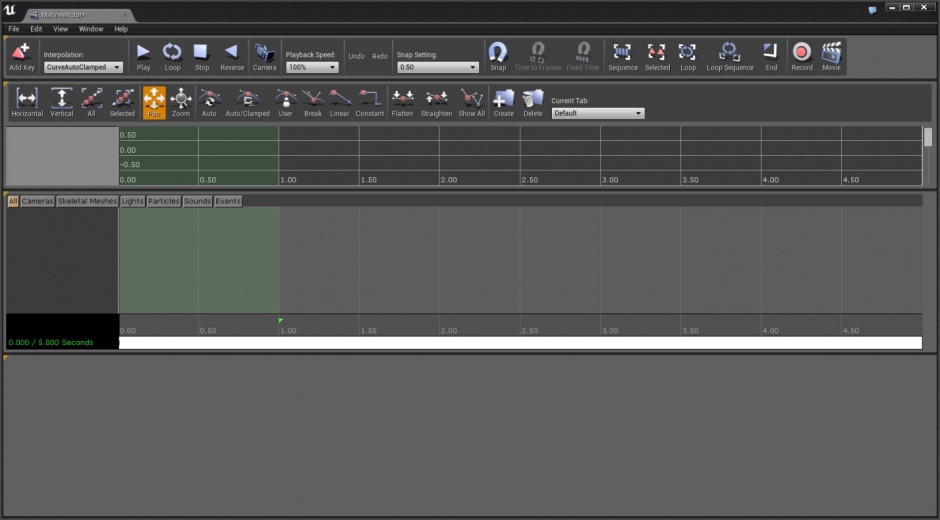
Here is the open Matinee window:
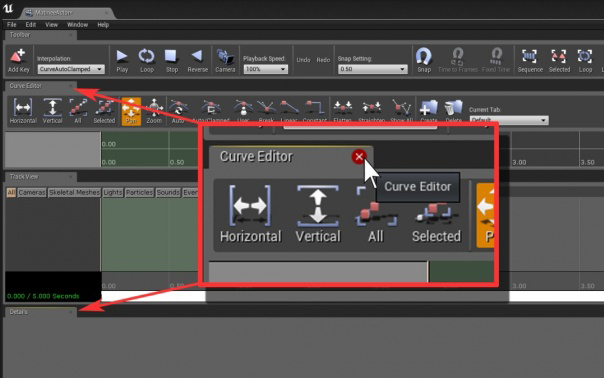
There’s a lot to see in Matinee. It might seem a little intimidating at first, but we can close out a few windows in order to give us a better view. Click on yellow tabs in the upper left corner of the panes to expose the name of each window. You’ll find them next to the red arrows below.

In the interface you’ll notice four open windows: Toolbar , Curve Editor , Track View , and Details . Just like any other part of our slate interface, these windows can be moved and resized within the Matinee window. Let’s close out the Curve Editor and the Details windows as we won’t need these for now. Hover over the X in each tab and click it to close the window.
You should now have a clean view that looks like this:
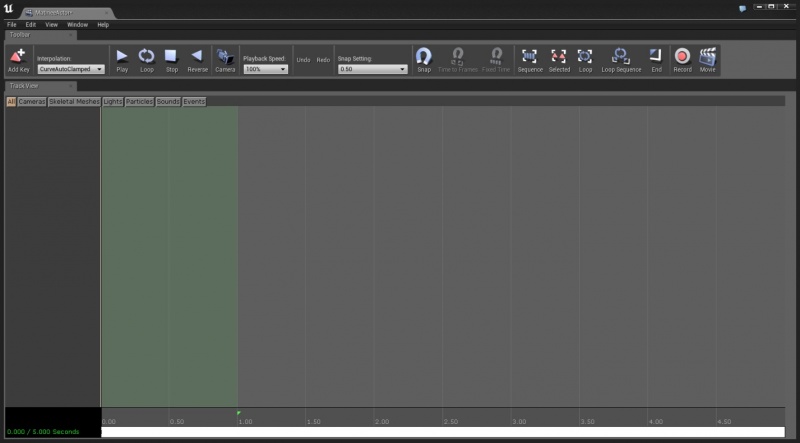
Take a close look at the top window called the Toolbar .

You’ll see several icons here for specific functions, but the only ones you’ll need for this tutorial are the following:
' Add Key , Play , Stop , and Camera .

So if you look at the Tracks View , you’ll see that it looks similar to a non-linear video editor with time intervals at the bottom. This is our main timeline for manipulating objects, animating camera motion, triggering effects, etc. across the span of time represented in the Matinee. Left click in the time intervals area at the bottom. You’ll see what we call the Time Bar jump from 0.00 time to where you’ve clicked. The Time Bar represents the current position in time to where you’re previewing your Matinee data.
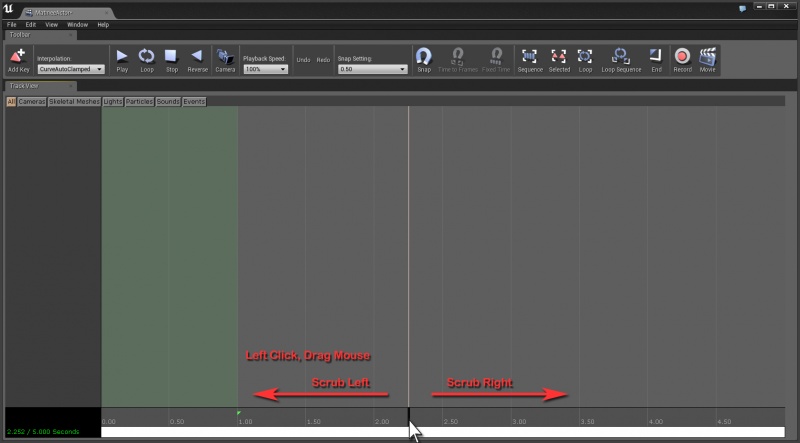
If you continue holding the left click and drag the mouse left and right, the time bar will scrub along with your mouse. Scrubbing allows you to quickly preview a matinee in motion (forward or back) at the speed with which you drag the time bar. If you click the ‘Play’ button in the toolbar at the top, it will play the sequence at normal speed (usually 30fps) from where the time bar is positioned to the end of the sequence, or until you click ‘Stop’. Clicking Stop twice will rewind the sequence and place the time bar at the start of the Matinee.
We also have keyboard shortcuts set up for these commands. Just like in a non-linear editor, the keys “ J – K – L ” will allow you to play through the timeline forward, backward, and stop or pause. “ J ” plays the sequence backward at normal speed, “ K ” will stop / pause the sequence where the time bar currently is in the timeline, and “ L ” will play the sequence forward at normal speed.
Now, let’s zoom out to see the time range of this matinee. You can do that by either scrolling backward on your mouse wheel, or clicking the Minus “-“ key on the keyboard. Plus (+) and Minus (-) are the keyboard shortcuts to zoom in and out, showing more or less of the Matinee length. After zooming, you’ll notice two red tabs in the lower part of the timeline.
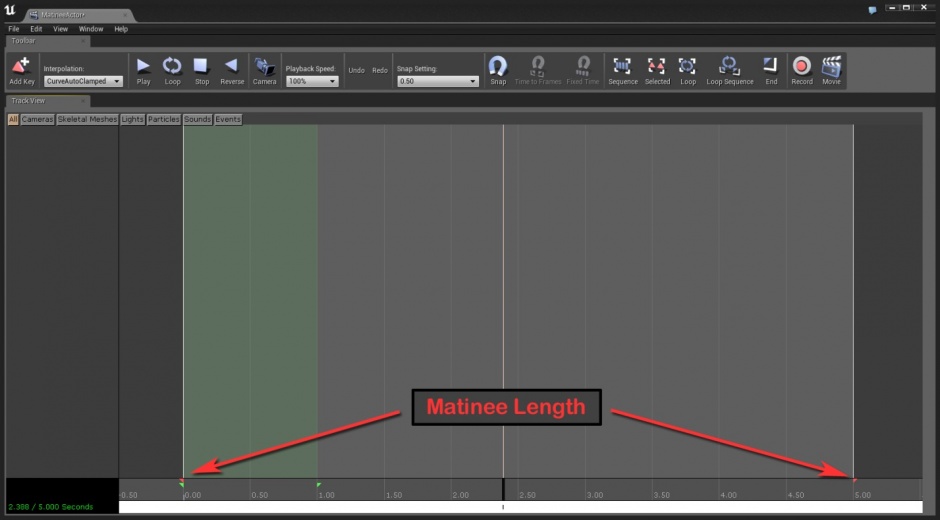
These represent the length of the Matinee sequence. At the moment, they are positioned at 0.00 and 5.00 so this Matinee is 5 seconds long. You can change the length by grabbing the red tab on the far right and dragging it to the length you want your Matinee to be. For now, let’s keep this at 5 seconds.
Connecting and Manipulating Objects
Let’s start adding and hooking up objects in Matinee to animate and manipulate over time. We will animate the chair objects in this level so you can see how to key frame movement over time.
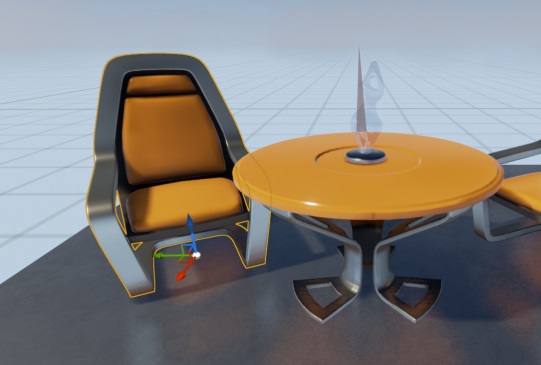
First click on one of the chair objects and go to the details window. Just under the Transform values, you’ll see a pull down box called “Mobility”. Change the setting here from ‘Static’ to ‘Movable’. This will allow the object to be controlled by the Matinee. Change this setting for both chairs.
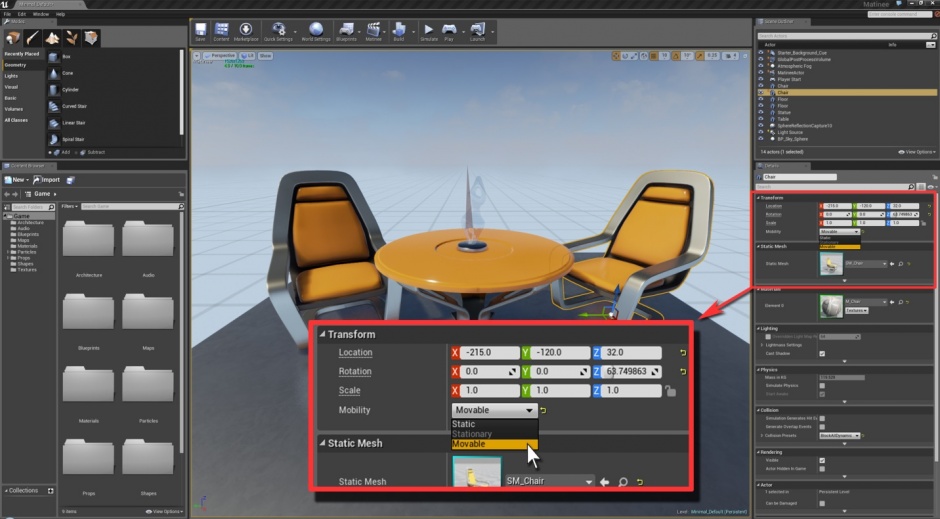
Now we’ll connect the chairs to Matinee. First, click on the Chair object in the editor to make it active.
Next, go to the Matinee and right click in the dark area just under the Track View tab. A drop down menu should pop up. You have a selection of Groups to choose from. Select “Add new Empty Group”.
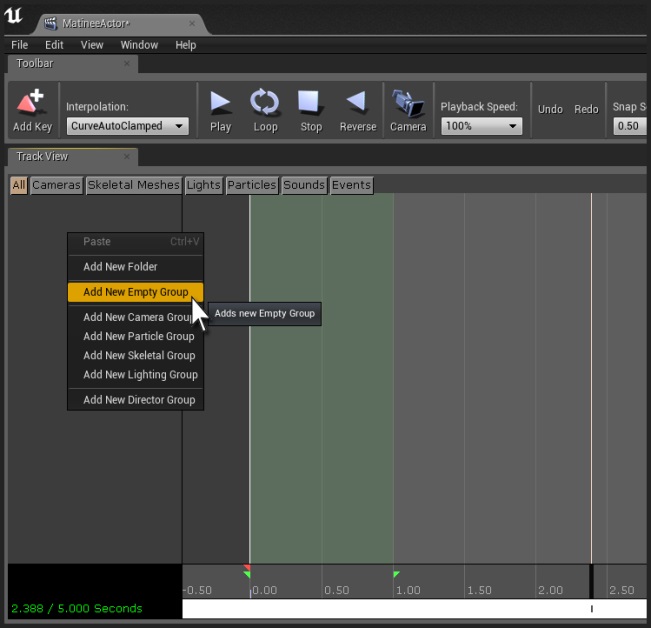
You will then be asked to name the Group. Call it Chair_1. A new Group Track is then created in the Matinee called “Chair_1”. This group is connected to the selected chair in the map. Anytime you click on this Group in Matinee, it will select the associated object in Matinee, thus showing you they are connected.

To manipulate this object in the level, you will need to add specific tracks to the group. Let’s add a Movement track to Chair_1. Right click on the Group in the timeline and a drop down menu will appear with many track types listed. Select “Add New Movement Track” from the list and you’ll see a Movement Track appear below the group track.
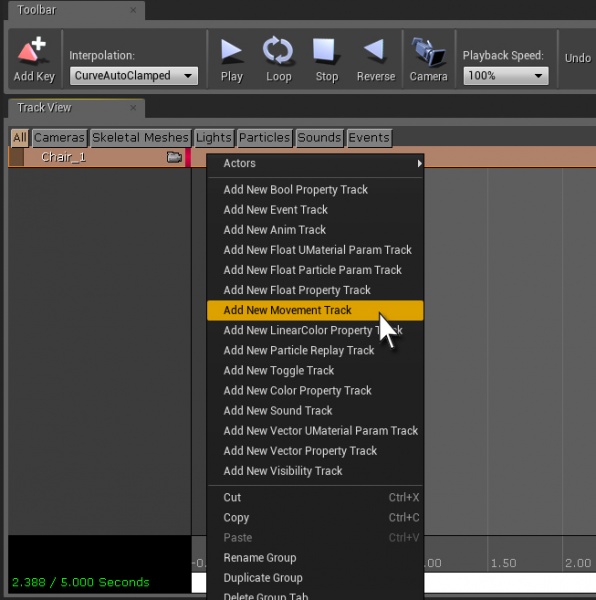
This is where you will place key frames to animate the movement of the chair object over time in the Matinee. As you can see, there already is a key frame at 0.00 for this track. We will use this key frame in a moment, but let’s add one at another time point in the movement track.

Move the time bar to about the 3.5 time mark in the timeline, and then make sure the Movement track is active by left clicking on the name “Movement” at the head of the track. Now, place a key frame in the movement track at the position of the time bar by left clicking the “ Add Key ” icon in the toolbar. You can also do this by pressing “ Enter ” on the keyboard. A key frame will appear at the current position of the time bar.
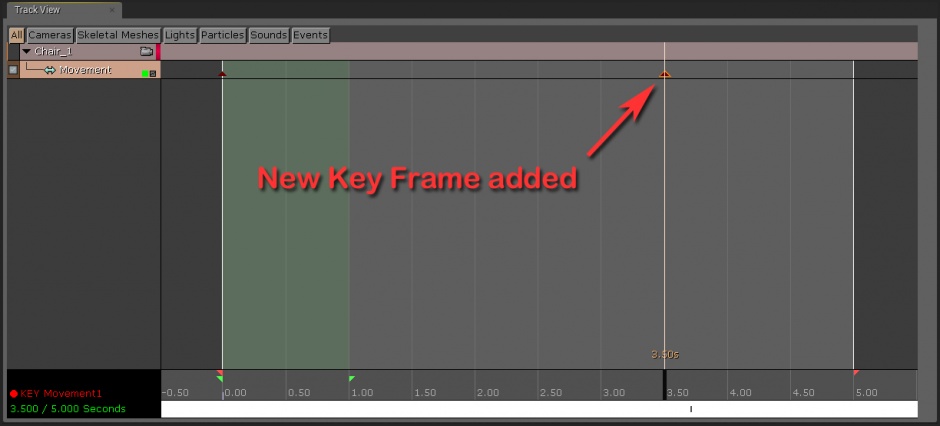
This key frame contains the positional data of the chair (translation and rotation) where it currently sits in the level. Now, let’s go back and manipulate the data of the first key frame in the movement track. Click on the first key frame in that track at 0.00. You should notice two things: 1) The key frame will become highlighted, and 2) The time bar should now jump to the position of the selected key frame. Keep this in mind as anytime you click on a key frame in matinee to make it active, the time bar will always jump to it. Also take note of the message that has come up in the timeline below. In red you will see “KEY Movement0”.
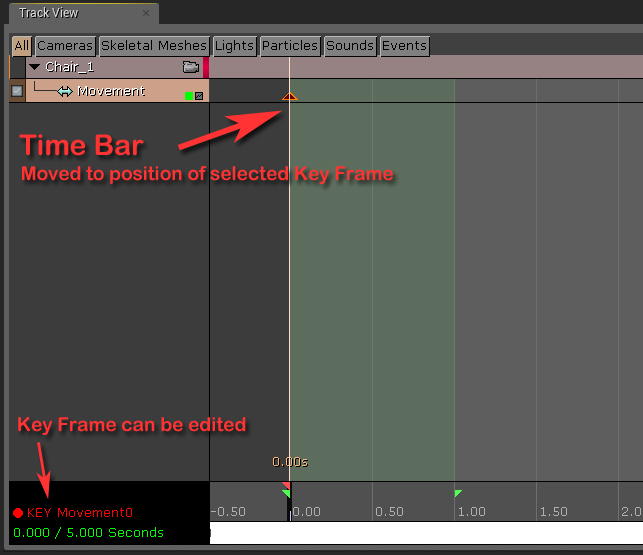
This means that the key frame is selected and its values are editable. So when a key frame is selected, the time bar is positioned over the key, and “KEY Movement” is showing, you can change the values of that key by manipulating the associated object in the world. Go to the viewport and change the position of the chair. Let’s move it out on the Y Axis by making sure the translation widget is active and then dragging it some distance away from the table like this:
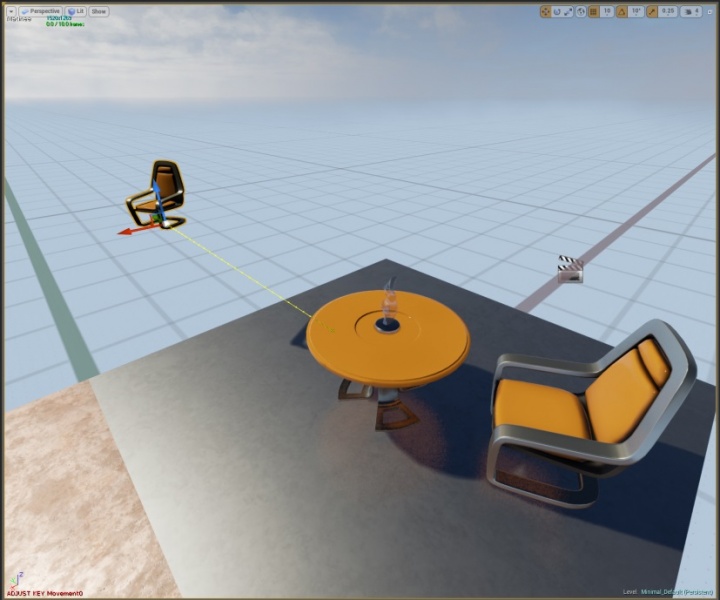
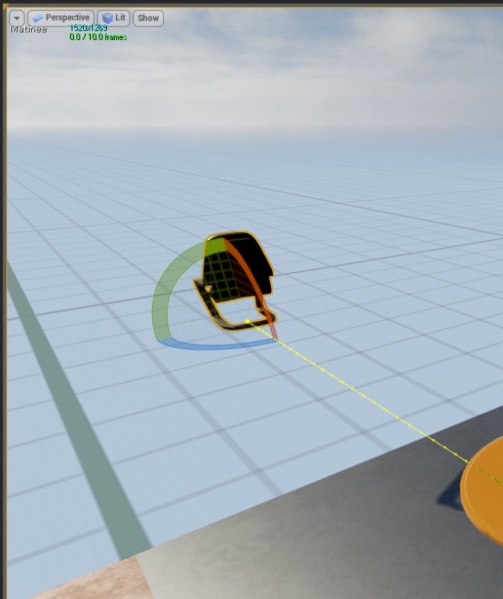
You’ll notice a yellow dotted track has appeared. This is showing its 3D trajectory from the first key frame to the last one. It’s the path in which the chair is traveling between the two positions. Now, add a little rotation to the chair. Make sure the rotation widget is active and turn the chair on its Z axis. Again, make sure that the key frame is selected and active:
Alright, now that you have the two key frames set, click in the Matinee window to make it active and press “ Play ” in the toolbar (or K on the keyboard). You’ll see the chair now slide from the position in the first key frame to the position of the last key frame in the Matinee. This is the most basic function in Matinee - manipulating the position of an object in the world over time. Matinee is coordinating this object and whatever else you have added to it over the timeframe set within it. It’s what makes Matinee a powerful tool not just for cinematics, but gameplay functions including doors, platforms, environment/atmosphere items, etc. Now that you’ve done this with the first chair, do the exact same for the second chair in the level. Add a Group Track for the chair named Chair_2 and animate it, translating from a point away from the table to a final position at the table, where the chair was located prior to moving it. You should then see your viewport and matinee looking similar to this below:
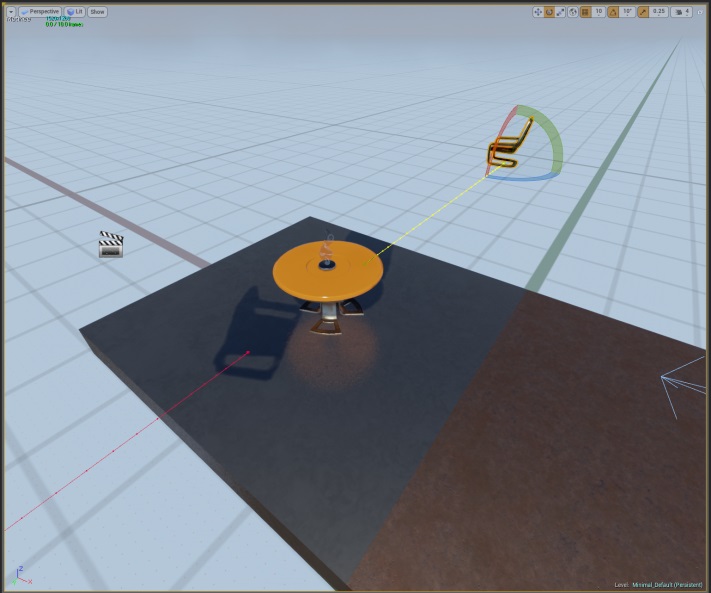
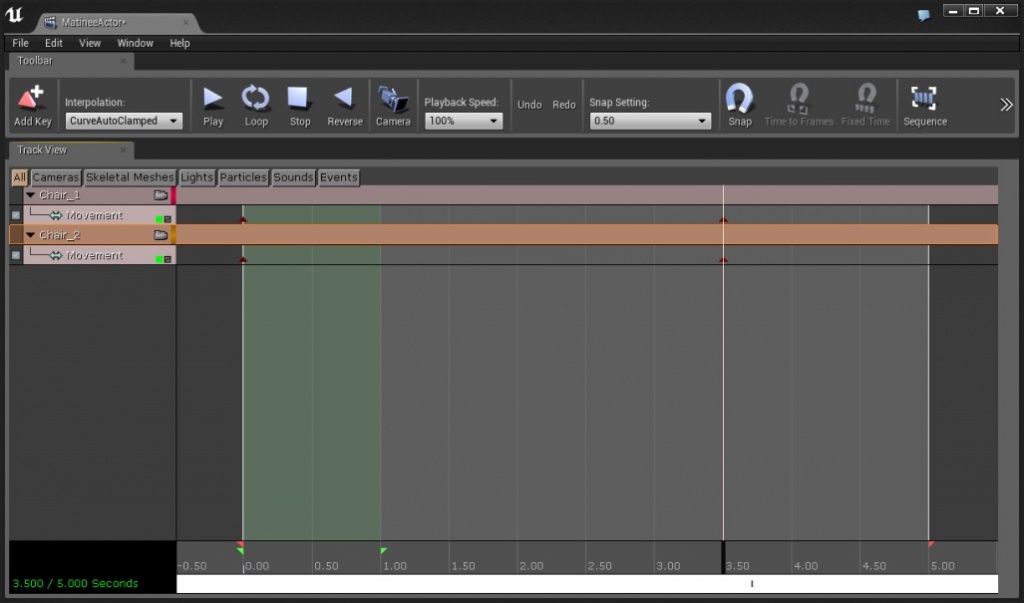
When you scrub to the end of the Matinee, it should look like this:
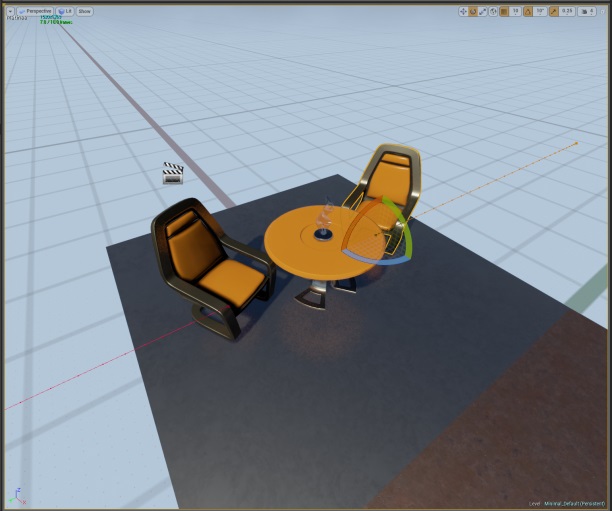
Adding Camera Actors to Matinee
Let’s add a camera to the scene. Click on the Camera Icon in the Toolbar at the top of the Matinee. A requester will appear asking you to name the Group. Call it “Camera_1”.

A new Camera Group will appear called “Camera_1” and will already contain a Movement and FOV Track for the camera (we won’t use the FOV track for now). A Camera Actor will also appear in the level along with a preview screen for the camera’s POV in the viewport.
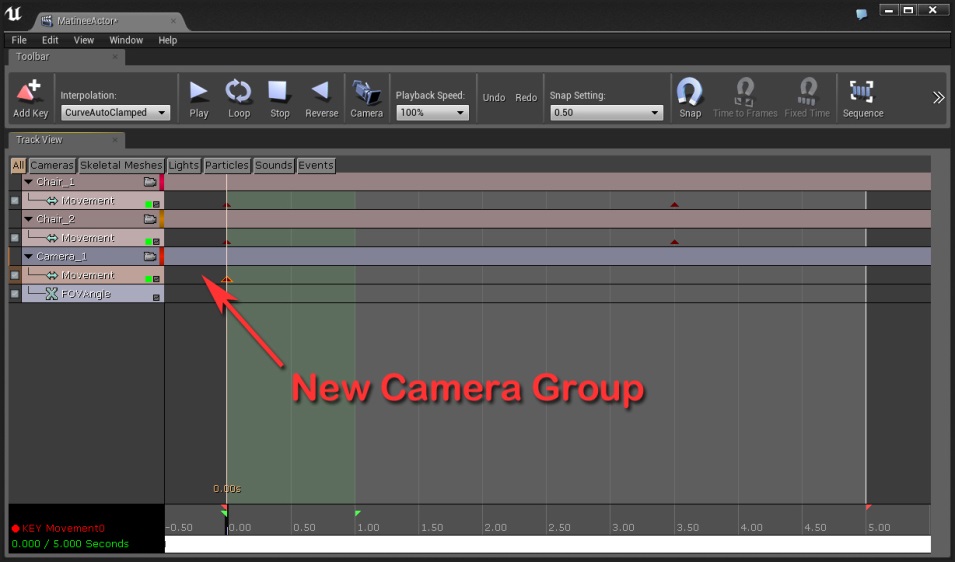
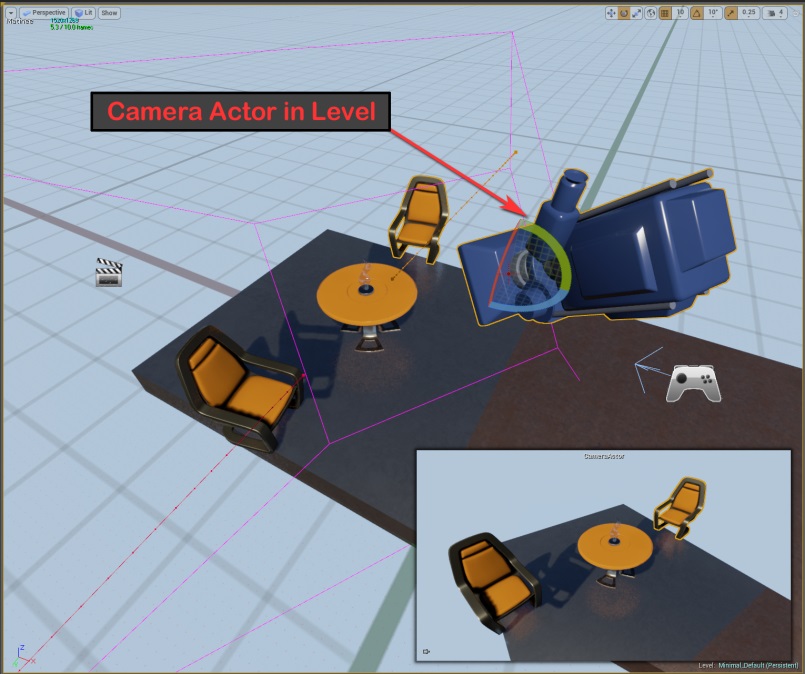
The new camera group works the same way as the Chair groups you created. The best part is that you can manipulate the camera position through the view of the camera lens. To do that, click on the small camera shaped icon next to the “Camera_1” label in its Group title bar. This is the “ Lock View ” icon and will turn yellow when it’s enabled.
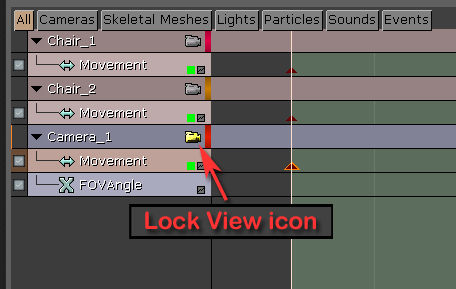
Now you are viewing the Matinee through the lens of that camera. You can actually do this with any group, but the camera makes best use of this. Let’s position the camera on the first key frame of its movement track. Select the key frame at 0.00 to make it editable. Now go to the viewport and manipulate the view to frame up the table similar to what you see below. Remember that you are actually moving and positioning the camera through the lens and won’t see it in the viewport. You ARE the camera at this point.
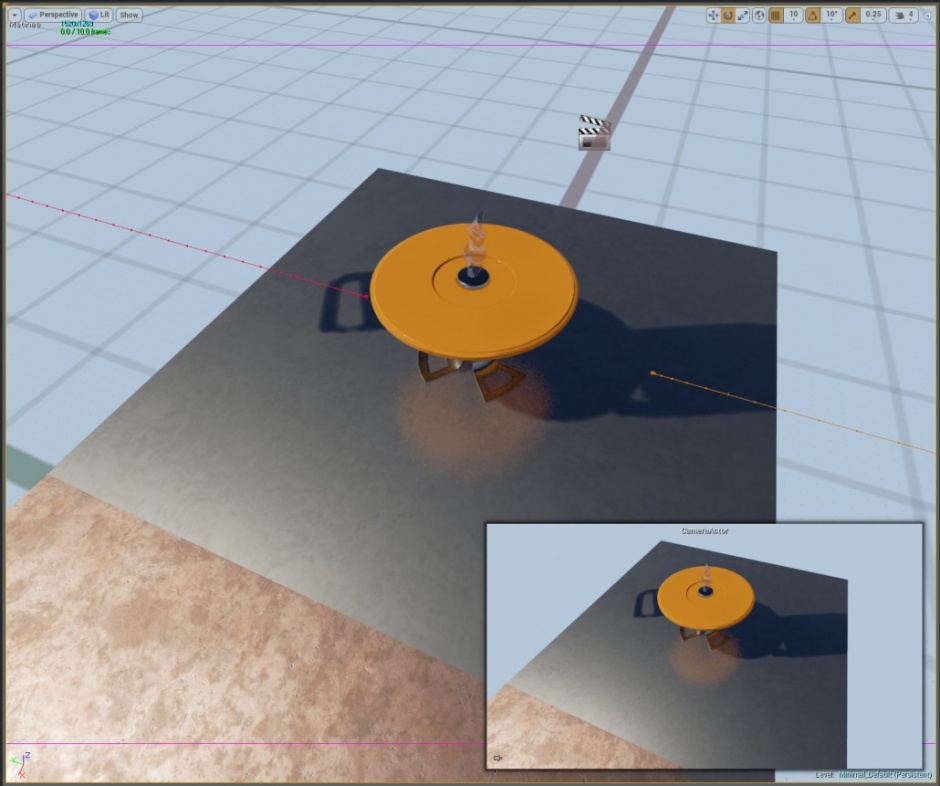
Now let’s add an ending key frame and position for the camera. Let’s try something a little different. First, move the time bar to 4.50 seconds on the timeline. Then, click on the Movement Track in the “Camera_1” group.
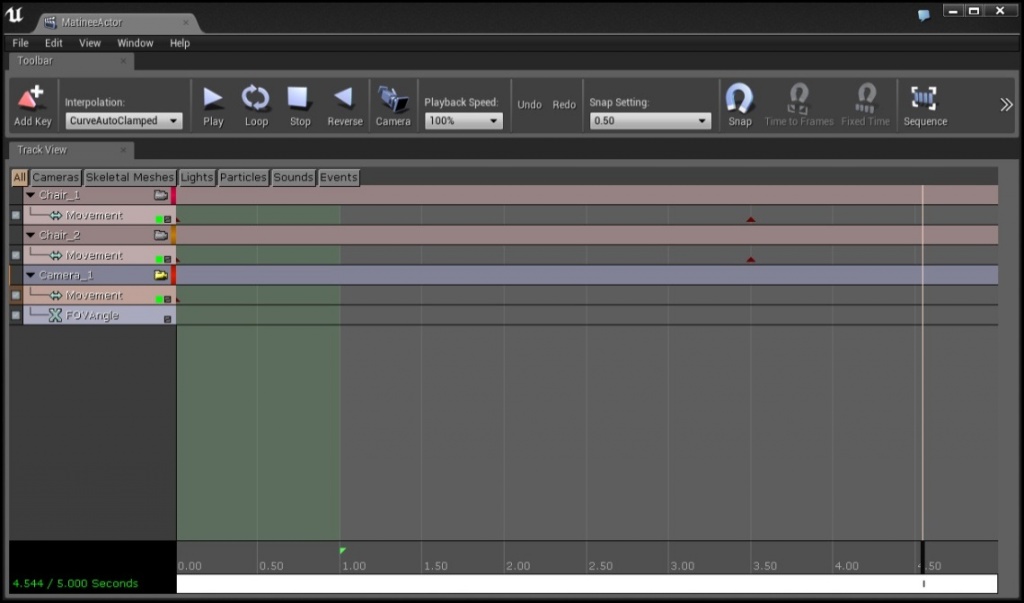
Go the viewport and position the camera to the final camera position, framing up the table and chairs.
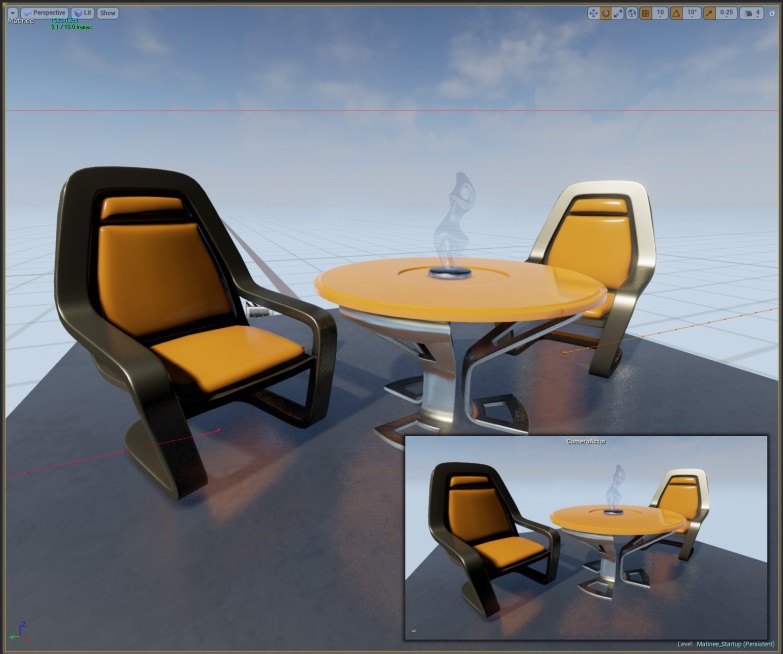
Now go back to Matinee and click the Movement Track in the “Camera_1” group. This now makes that track active and you can add a new key frame at the time bar position. Click “ Add Key ” or Enter on the keyboard. A new key frame will appear with the current values of the camera’s position in the viewport.
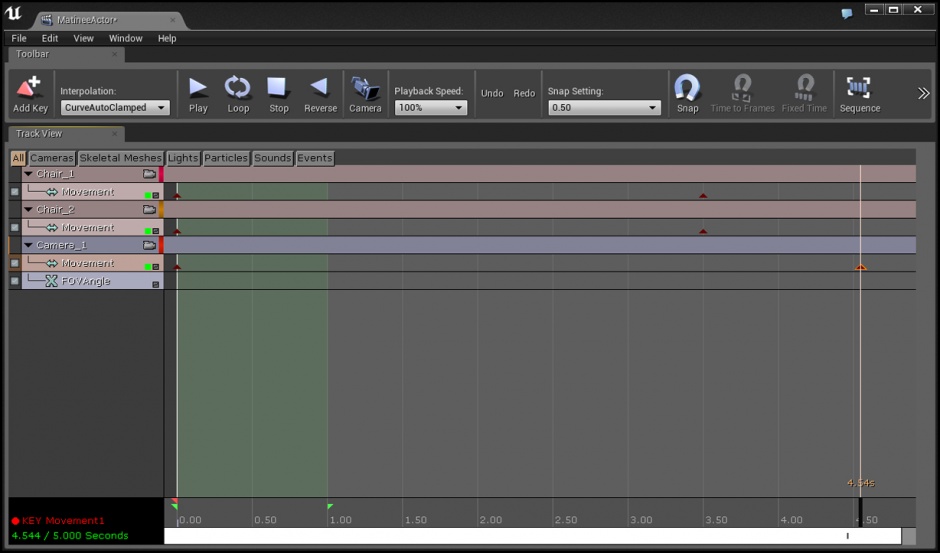
Now scrub the time bar in the Matinee and you’ll see the camera motion along with the chairs animating in the scene. Rewind the sequence to the beginning and select “ Play ” to see it play from start to finish.
The camera animation you have done here is the same as what you would use for a camera fly-through in your gameplay level. You can use as many keys as you need and extend the Matinee out however long you want. Again, we’re just scratching the surface with what you can do with cameras in Matinee.
Creating a Director Group and Blueprint Connections
For the Matinee to be visible in PIE and in game, we need to do two more things. We need to create a new Group called a Director Group. Right click in the black area just below the Camera_1 Group and the menu will appear. Select the one listed at the bottom - “Add New Director Group”.
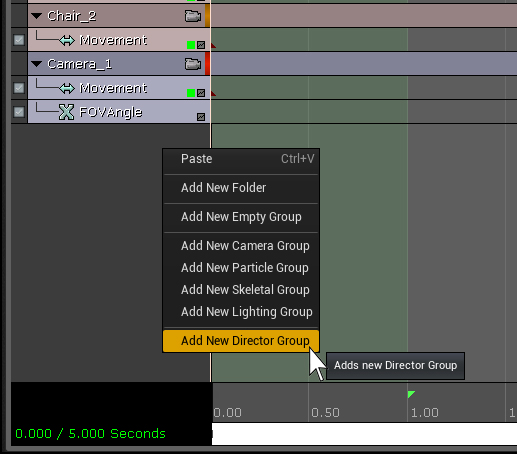
A new window appears called Director Track View . In it is a new Group called “DirGroup” and it contains one track called the Director .
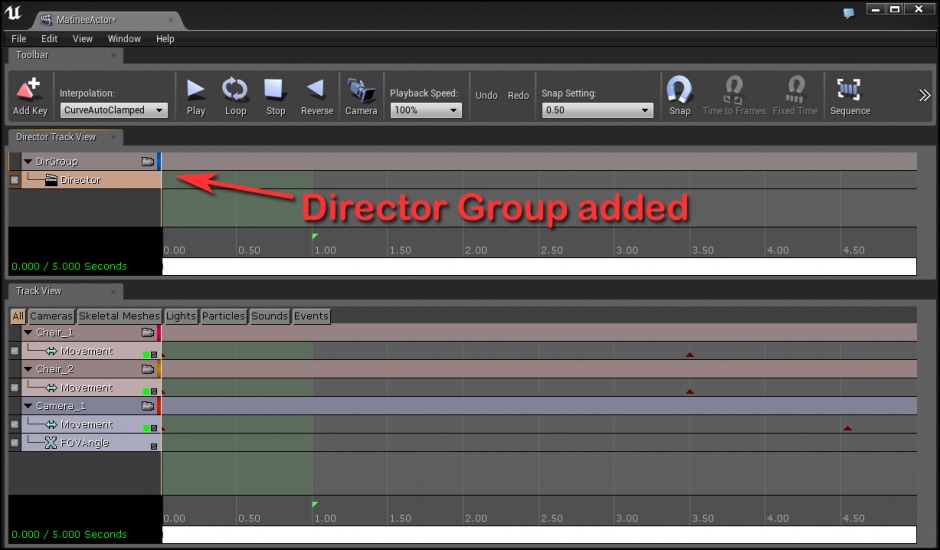
This Group serves the main function of controlling the visual and audio output of your Matinee. There are options to add fade, slow motion, color scaling, and an audio master track (for controlling the overall volume and pitch of the Matinee sounds). The most important function of the Director Track is to display which camera group is chosen to be seen at a particular time in the sequence. This is important once you start creating cinematic scenes involving multiple camera shots and you need to cut from one view to the next. For now we’re only concerned with one camera shot, so let’s put in a key frame to make that group active.
Click the Lock View icon in the “DirGroup” title bar to lock the editor view to the group. Move the time bar to 0.00 in the timeline and the Click on the Director track under DirGroup.
Now that the track is active, click “Add Key” or Enter on the keyboard to place a key frame. A requestor will pop up asking you to which group you want to cut. Choose “Camera_1” and click OK .
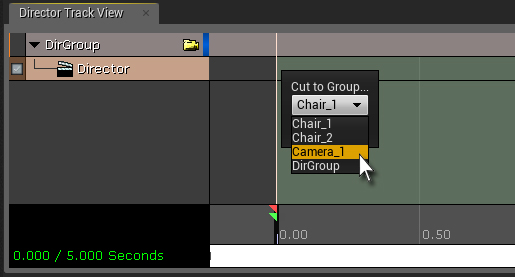
A new key frame will appear with a colored box to the right of it that is labeled “Camera_1 (Shot_0010)”. This means the Camera_1 group will now be the viewed group all through the duration of the Matinee. You can add a new key frame at any point after that and cut to another camera if it’s available. This is how you switch between camera shots or angles during the progression of a Matinee. We’ll dive more into this during another tutorial.
Your Director Track and entire Matinee should look like this below:
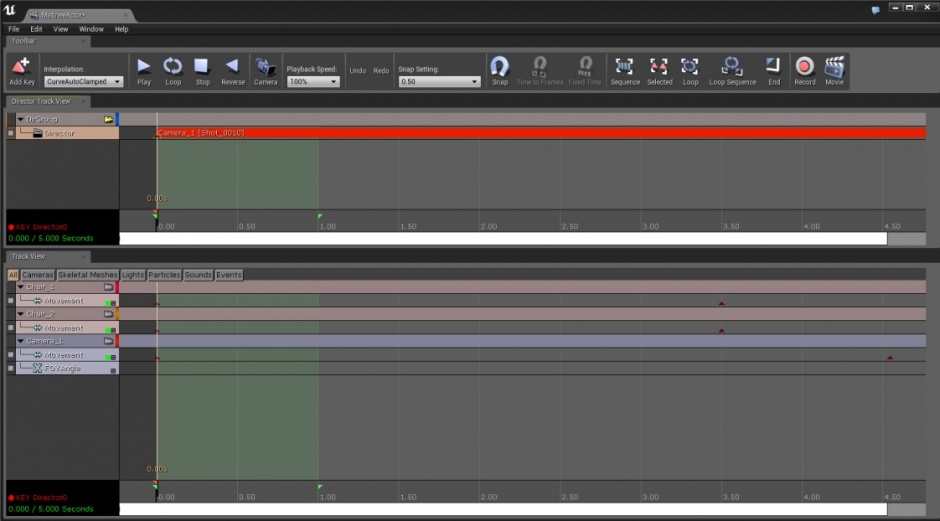
Now, play the Matinee from the beginning. You’ll see that it plays all the way through while viewing through Camera_1. You should see the camera motion and the chairs moving all at the same time.
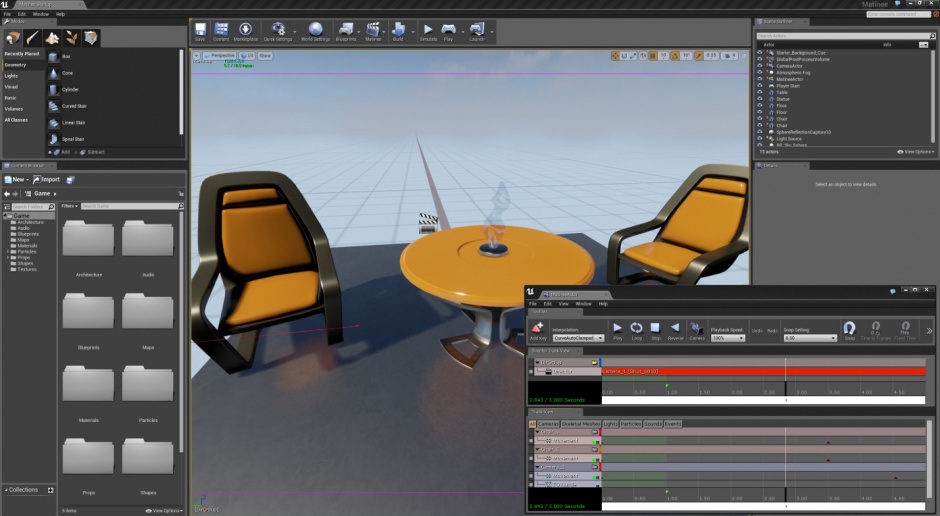
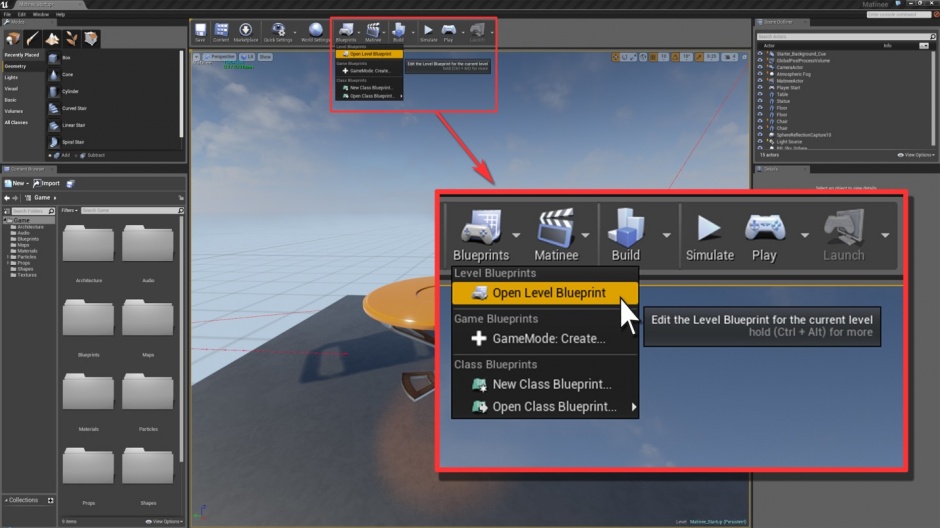
This is great for previewing in the viewport while working in the Matinee interface, but what about playing it in a game? Well, we need to add some function to Blueprint in order to make that happen. First, go to the main editor window click on the Blueprints Icon. Select Open Level Blueprint from the drop down menu.
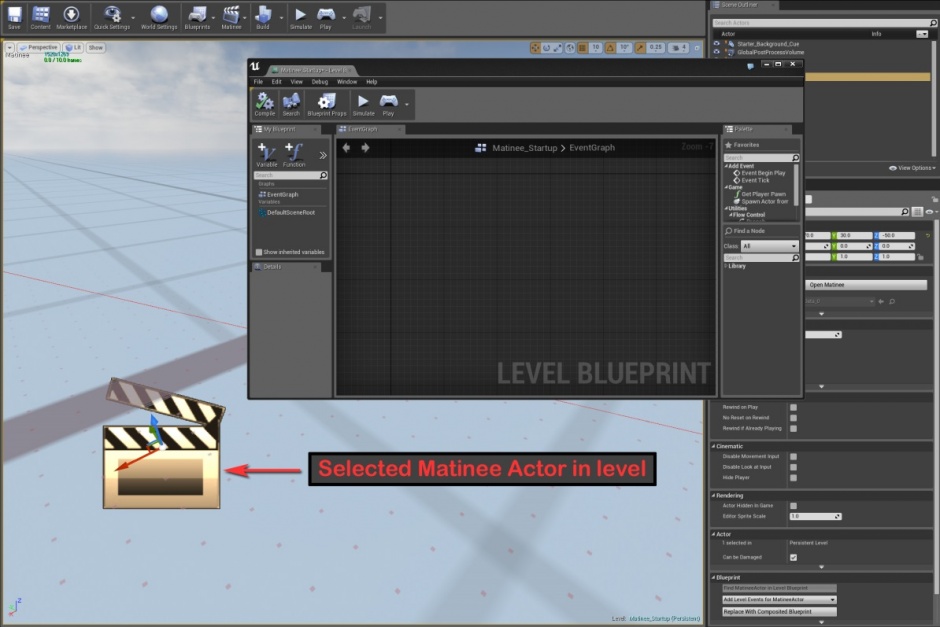
With the Level Blueprint window open, find the Matinee object in the world and select it.
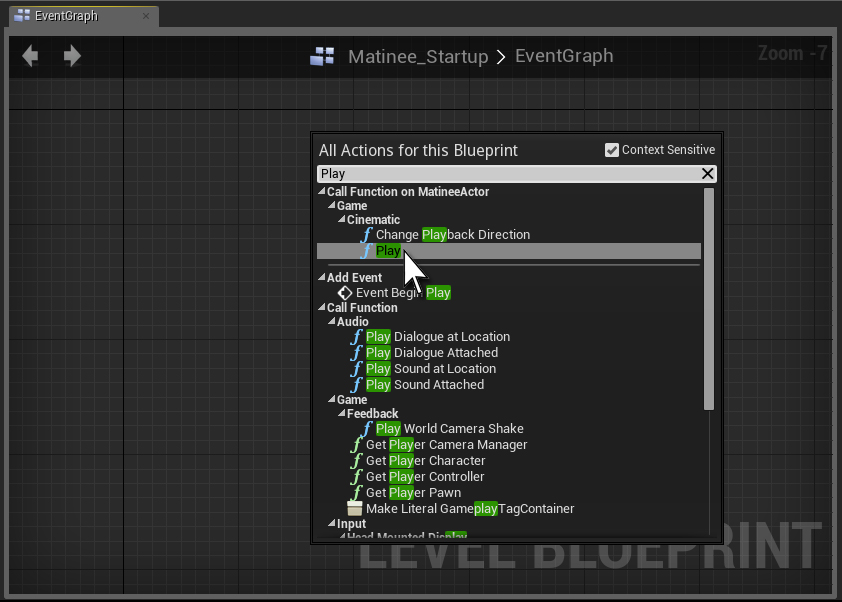
Go to the Blueprints window and right-click in the EventGraph area to bring up the actions window. In the search bar at the top, type in the word “Play”. You should see a filtered list appear and the word Play highlighted under the Cinematic section. Click on this selection.
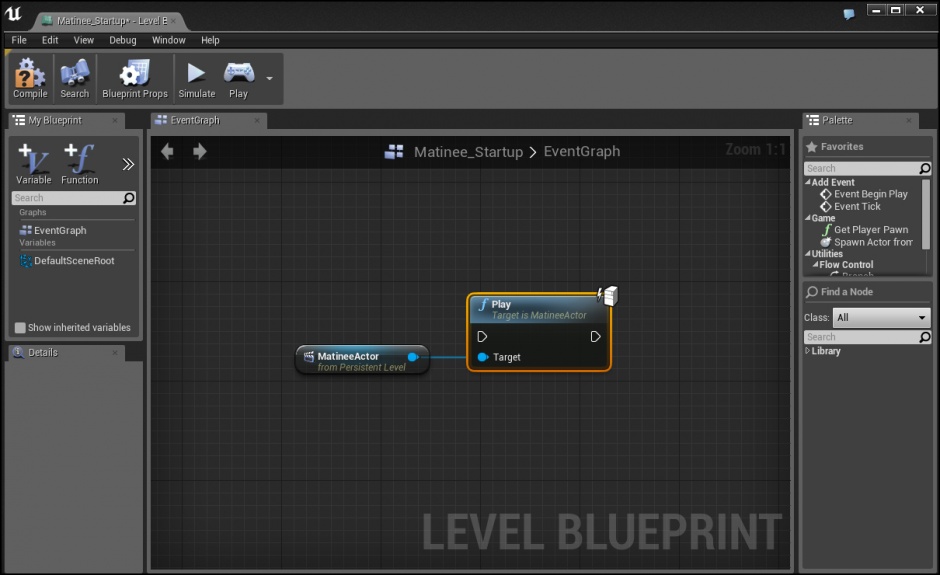
A Play node should appear with the Target Matinee Actor already connected.
You only need one more node to make this work. Now right click again in the EventGraph and bring the actions window up again. In the search bar type “Begin”. At the bottom of the list under Actions will be a choice called “Event Begin Play”.
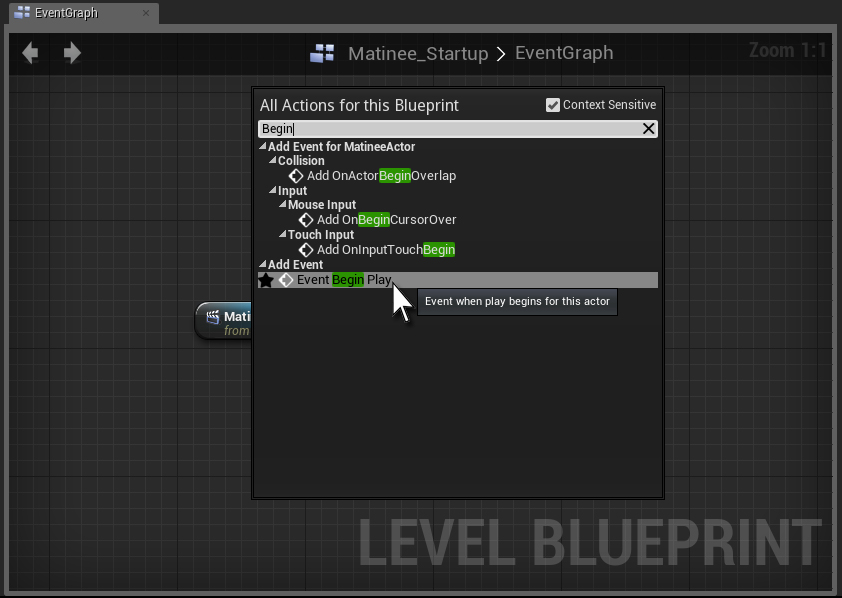
Choose this and a new node will appear.
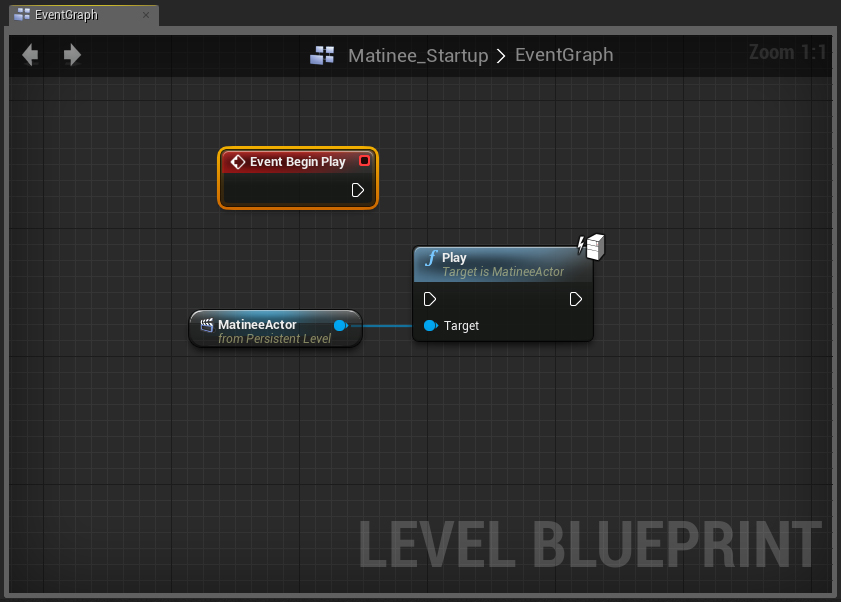
Connect this Event Begin Play node to the Cinematic Play node and then click the “Compile” icon in the top left of the Blueprint window.
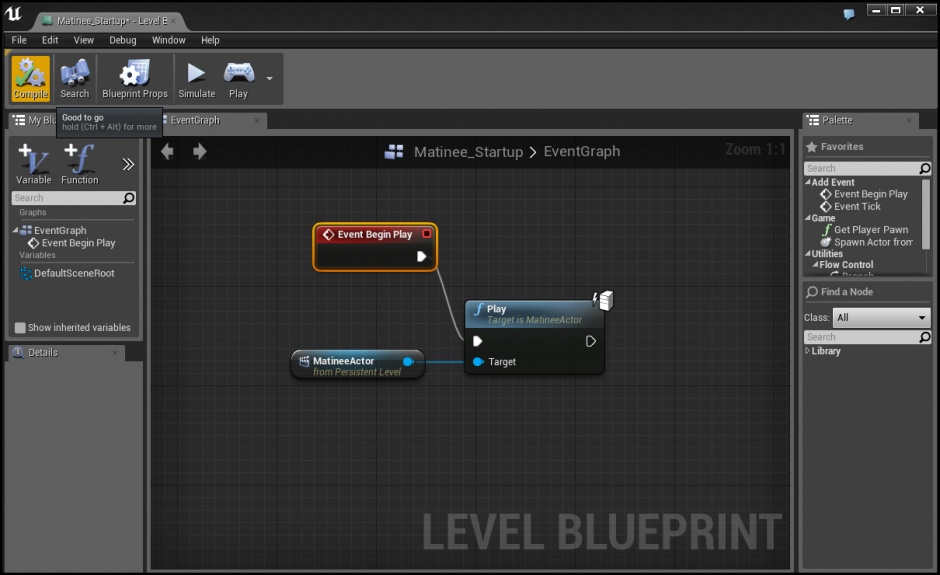
You’re now ready to see this trigger in game mode. Now, just click on the “Play” icon in the main editor window, and you will see your Matinee sequence play from beginning to end in the viewport window. If Matinee is open, you might get a request to close it before it will let you play. Click yes, and the editor will proceed with closing Matinee and playing the level in the viewport.
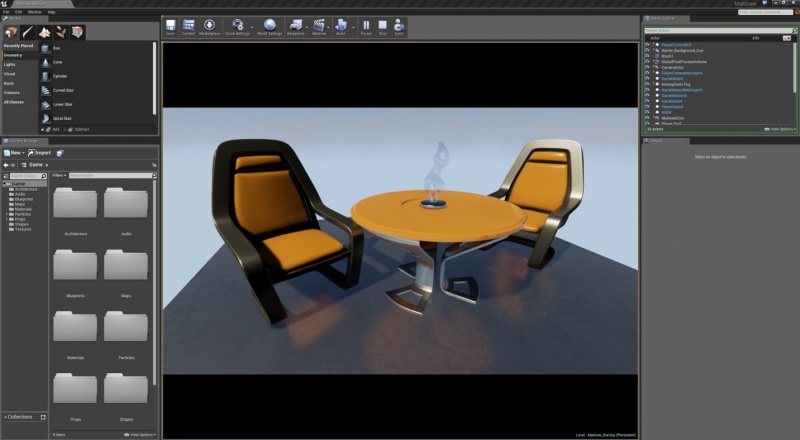
So there is your first Matinee sequence, animating objects and viewing camera shots playing real-time in the editor. This was just a tutorial to get you going as there is a lot more to learn with this tool. Be sure to check out the forums and send in any questions you have!