First Person Shooter C++ Tutorial
Warning:
This tutorial is outdated for newer versions of Unreal Engine and requires an update.
Contents
- 1 Overview
- 2 Starting a New Project
- 3 Creating a GameMode
- 4 Making a Character
- 5 WASD Movement
- 6 Mouse Camera Control
- 7 Jumping
- 8 Adding a mesh to your Character
- 9 Changing the Camera View
- 10 Adding a First Person Mesh
- 11 Adding Projectiles and Shooting
- 12 Projectile Collision and Lifetime
- 13 Projectiles Interacting with the World
- 14 Adding Crosshairs
-
15
Animating Your Character
- 15.1 EventGraph
-
15.2
AnimGraph
- 15.2.1 Add State Machine
- 15.2.2 Add States
- 15.2.3 Add the Idle to/from Run Transitions
- 15.2.4 Add the Idle to JumpStart Transition
- 15.2.5 Add the Run to JumpStart Transition
- 15.2.6 Add the JumpStart to JumpLoop Transition
- 15.2.7 Add the JumpLoop to JumpEnd Transition
- 15.2.8 Add the JumpEnd to Idle Transition
- 15.2.9 Associate the Animation Blueprint with the Character Blueprint
Overview
Over the course of this tutorial, you will transform a blank project template into the beginnings of a first-person shooter, with a character that moves and strafes, camera control, and projectiles you can fire at the environment. Using C++, you will create a GameMode, Character and HUD.
Starting a New Project
We will create a blank project as the starting point for our FPS game, using Unreal Engine 4's Project Browser.
1. Open Unreal Editor.
2. In the Project Browser , click on the New Project tab.
3. Select the Blank project.
4. Name the project FPSProject and uncheck the Copy starter content into new project? checkbox. (Uncheck "Include starter content checkbox" for UE 4.2.0)
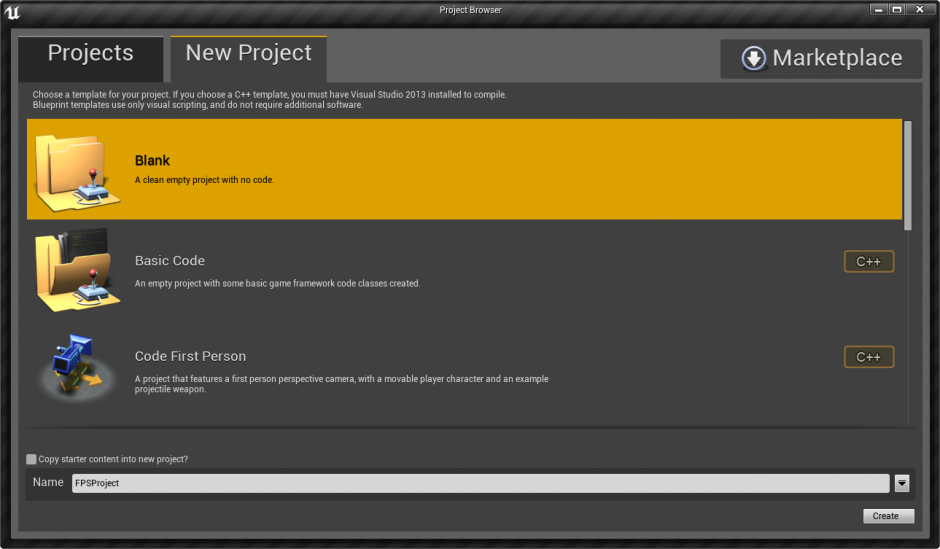
Note that some of the code samples provided in this tutorial will require alteration if the project's name is different, and we will make note of that at the appropriate step.
5. Click on Create .
6. Your project is now open in Unreal Editor. You can play in the starting level by clicking on the Play In button in the Level Editor Toolbar. The WASD keys will allow you to fly around within the level, and the mouse will aim your camera. Press Escape when you are ready to exit Play in Editor (PIE) mode.
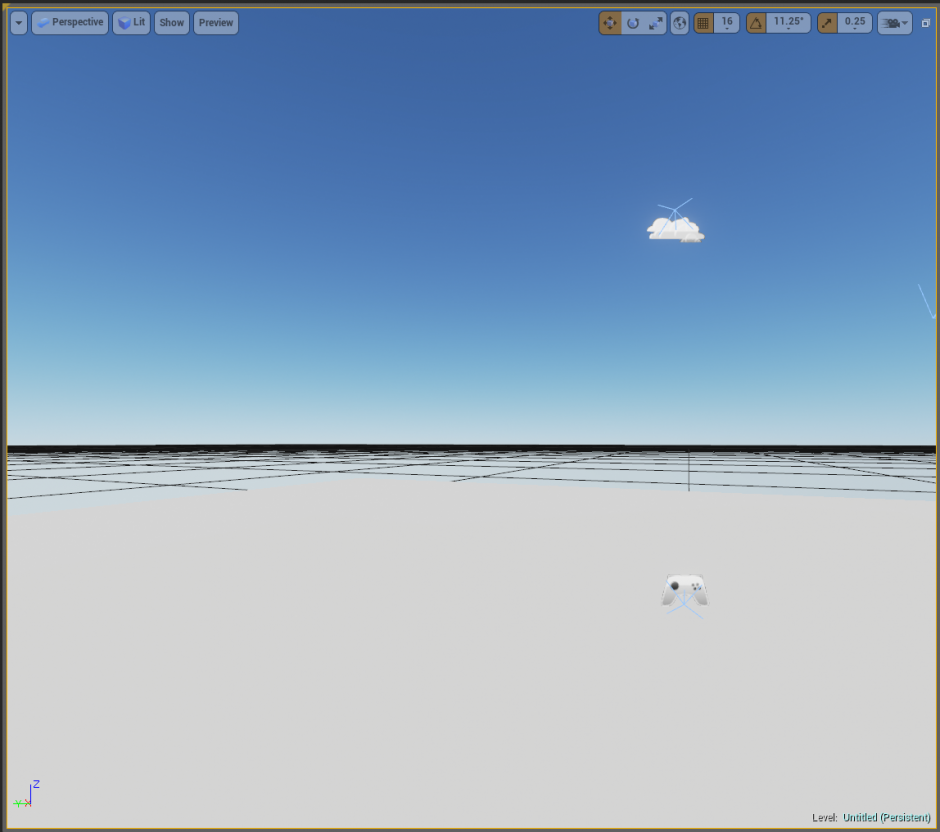
7. Create a Maps folder within the Content folder.
8. In the File menu, select Save as... to save your map as FPSMap within the Maps folder.
9. In the Edit menu, click on Project Settings .
10. Under the Game heading on the left side of the Project Settings tab, click on Maps & Modes .
11. Using the dropdown, select FPSMap as the Editor Startup Map . Now, whenever you re-open your project in the editor, you will automatically load this map.
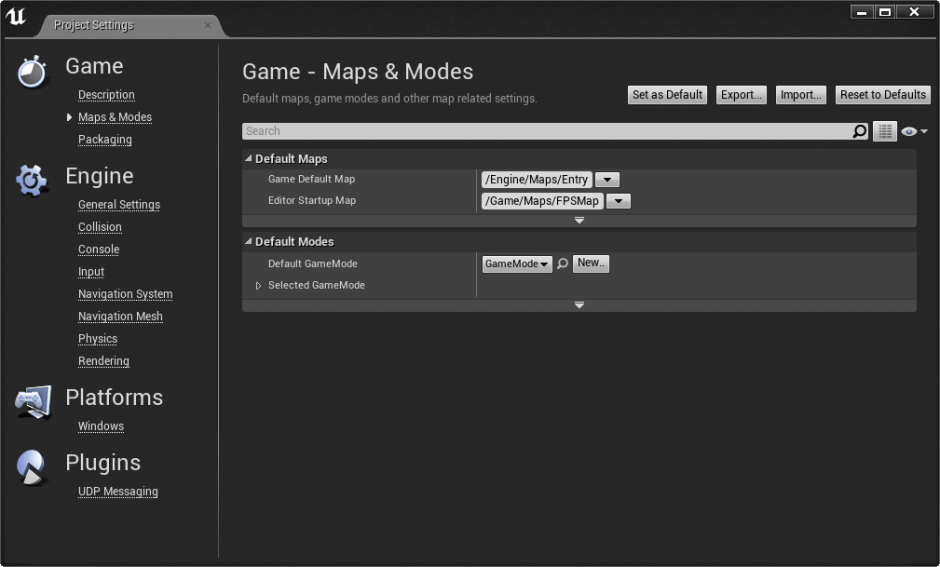
12. Close the Project Settings menu.
Creating a GameMode
Let's create a GameMode. A GameMode contains the definition of the game itself, such as game rules, win conditions, etc. It also sets the default classes to use for some basic gameplay framework types, including Pawn, PlayerController, and HUD. Before we set up our FPS character, we need to create the GameMode that will reference it.
First, we are going to use the C++ Class Wizard to add a new class to our project.
1.In the File menu, select Add Code to Project .
2. Scroll down and select GameMode as the parent class. Click Next.
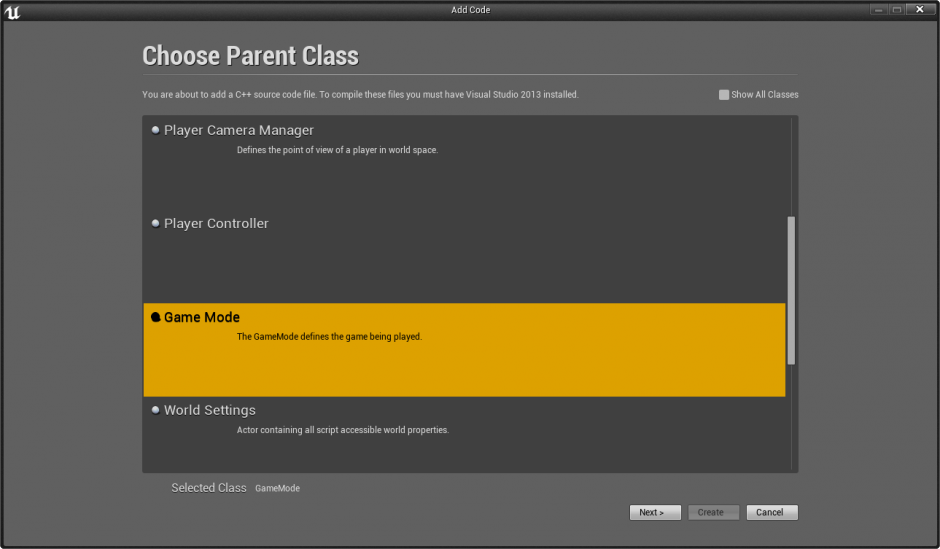
3. Name the new class FPSGameMode , then click Create .
4. Click on Yes to open the class in Visual Studio or XCode for editing.
Since this is the first code we've added to the project, the wizard will also create the initial files needed to compile and run our project.
We will add a log message to the FPSGameMode, so that when we start playing in our level, we can see that we are actually using our new GameMode. We will add code to FPSGameMode's constructor, so that it will run when gameplay begins.
1. Your code IDE will open.
2. In the Solution Explorer, expand FPSProject > Source > FPSProject .
3. Here, you will see the header file for your new FPSGameMode class, FPSGameMode.h. Double-click it to open it for editing.
4. Find the class declaration, which looks like:
UCLASS()
class FPSPROJECT_API AFPSGameMode : public AGameMode
{
GENERATED_BODY()
};
5. Under
GENERATED_BODY()
, add the following lines then save the file.
virtual void StartPlay() override; // Note that engine version 4.3 changed this method's name to StartPlay(), because of this engine versions before 4.3, or older tutorials, use BeginPlay()
This function declaration will allow you to override the StartPlay() function inherited from the `AActor` class, so that you can print a message to the screen when gameplay begins.
Note: 4.6 needs below line to be included (before or after StartPlay(). This is the definition of constructor whose signature is also different from older versions.
AFPSGameMode(const FObjectInitializer& ObjectInitializer);
6. Open FPSGameMode.cpp. It is located in FPSProject > Source > FPSProject as well.
If your project has a different name, your code will be located in [ProjectName] > Source > [ModuleName] . The module name is the same as your project name because you used the C++ Class Wizard .
First, at the top of the file, add the following line under the other #include lines:
#include "Engine.h" //for version 4.4+
// Note that this may no longer be necessary as this file will likely already include [ProjectName].h, which, by default, will include "Engine.h" itself
7. Find FPSGameMode's constructor. It looks like:
Note: In 4.6 this is no longer correct as the procedure for constructors has changed, you will not find this code. You will need to write the following line of code in if it is not present For users of previous versions, FPostConstructInitializeProperties is replaced with FObjectInitializer and variable name PCIP with ObjectInitializer (though variable name can be anything, its recommended to change as a good practice)
AFPSGameMode::AFPSGameMode(const FObjectInitializer& ObjectInitializer)
    : Super(ObjectInitializer)
{

}
The prefixed name of FPSGameMode is AFPSGameMode, because it derives from a class which eventually derives from the Actor class.
8. After the constructor, add the following lines, then save the file.
// Note that engine version 4.3 changed the method's name to StartPlay(), because of this engine versions before 4.3, or older tutorials, use BeginPlay()
void AFPSGameMode::StartPlay()
{
      Super::StartPlay();

      StartMatch();

      if (GEngine)
      {
            GEngine->AddOnScreenDebugMessage(-1, 5.f, FColor::Yellow, TEXT("HELLO WORLD"));
      }
}
This function definition will print "HELLO WORLD" to the screen in yellow text when gameplay begins.
We will now compile our project, so that we can see our code changes reflected in the game. If you are using Unreal 4.6 or below, you need to close the editor, compile, and then reopen the project in the editor to reload the game module.
1. If you are using Visual Studio, make sure that you have set up Visual Studio for compiling with Unreal Engine.
2. Close Unreal Editor. (Not required in 4.7)
3. Compile .
4. After the build finishes, open Unreal Editor, and then open FPSProject .
We need to set the project to use FPSGameMode as the default GameMode.
1. In the Edit menu, click on Project Settings .
2. Under the Game heading on the left side of the Project Settings tab, click on Maps & Modes .
3. Select FPSGameMode in the Default GameMode dropdown.
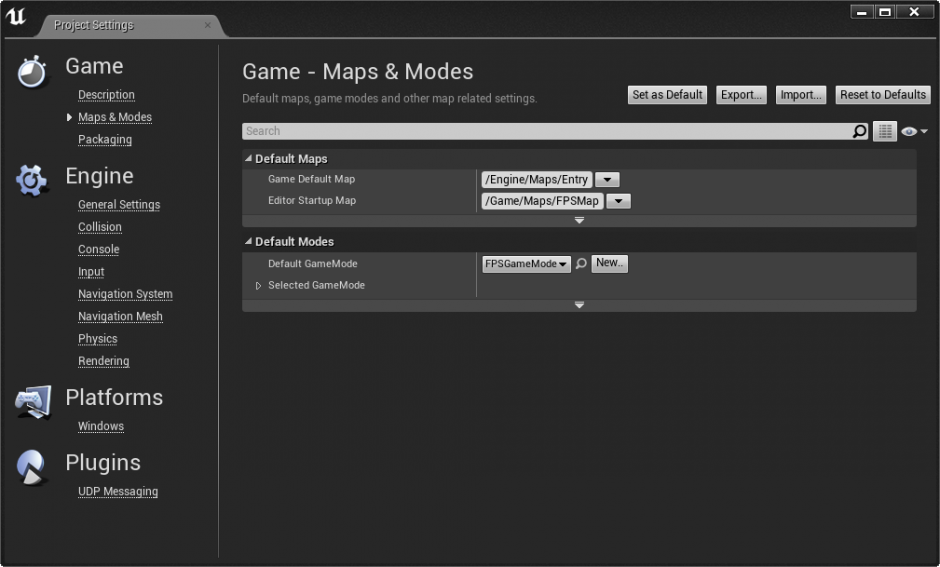
4. Close the Project Settings menu.
5. Click on the Play In button in the Level Editor Toolbar. "HELLO WORLD" should be displayed in the upper left corner of the viewport.
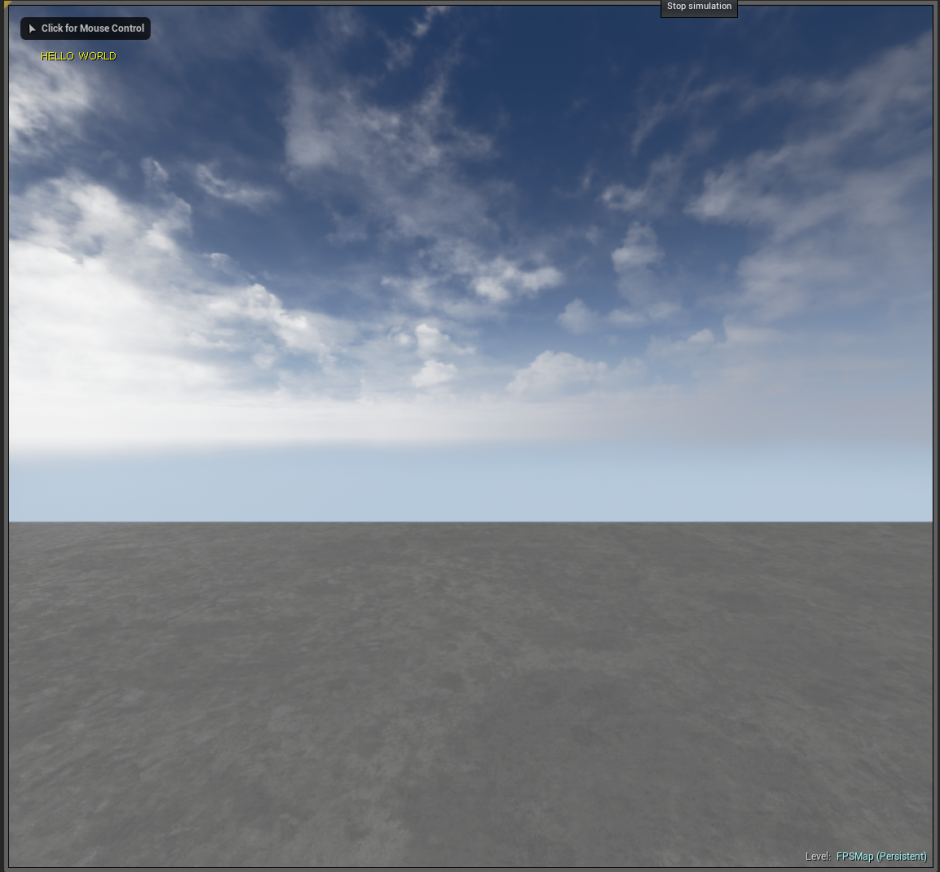
You can also look in the Scene Outliner while your game is running to see FPSGameMode listed.
6. Press Escape to exit Play in Editor (PIE) mode.
Making a Character
The engine has a built-in class called DefaultPawn which is a Pawn with some simple disembodied flying movement. We want to have a human-like avatar walking on the ground, so let's create our own Pawn to control. The engine includes a class for this called Character, which derives from Pawn but has built in functionality for bipedal movement like walking, running, and jumping. We will use Character as the base class for our FPS Pawn.
Again, we will use the C++ Class Wizard to add this new class to our project. It is possible to manually add the *.h and *.cpp files to your Visual Studio solution to add new classes, but the C++ Class Wizard fills in header and source templates which set up the Unreal-specific macros for us, which simplifies the process.
1. In the File menu, select Add Code to Project .
2. Scroll down and select Character as the parent class. Click Next .
3. Name the new class FPSCharacter , then click Create .
4. Click on Yes to open the class in Visual Studio for editing.
5. Visual Studio will prompt you asking to reload the project, since the C++ Class Wizard modified it. Select Reload .

First, we will edit our GameMode , so that FPSCharacter is the default Pawn used when starting gameplay.
1. First go to FPSGameMode.h. Below GENERATED_BODY() we will now add a constructor for the class, the following will be what our class looks like now (Engine Version 4.6).
UCLASS()
class FPSPROJECT_API AFPSGameMode : public AGameMode
{
	GENERATED_BODY()

	AFPSGameMode(const FObjectInitializer& ObjectInitializer);  // Our added constructor

	virtual void StartPlay() override;
};
2. Return to FPSGameMode.cpp. First, at the top of the file, add the following line under the other #include lines:
#include "FPSCharacter.h"
3. Then, we will find the constructor we previously added in FPSGameMode.cpp:
AFPSGameMode::AFPSGameMode(const class FObjectInitializer& ObjectInitializer)
	: Super(ObjectInitializer)
{
}
4. And following that we add the following line to the constructor:
DefaultPawnClass = AFPSCharacter::StaticClass();
This tells the GameMode which type of Pawn to spawn for the player when starting the game.
The constructor for FPSGameMode will now look like:
AFPSGameMode::AFPSGameMode(const class FObjectInitializer& ObjectInitializer)
	: Super(ObjectInitializer)
{
	DefaultPawnClass = AFPSCharacter::StaticClass();
}
Now, save the files.
Let's also add an on-screen message to FPSCharacter, so we can be sure our new class is being used properly.
1. Open FPSCharacter.h. It is located in FPSProject > Source > FPSProject.
If your project has a different name, your code will be located in [ProjectName] > Source > [ModuleName]. The module name is the same as your project name because you used the C++ Class Wizard.
2. Find the class declaration, which looks like:
class FPSPROJECT_API AFPSCharacter : public ACharacter
{
	GENERATED_BODY()

};
3. Under
GENERATED_BODY()
, add the following line, then save the file.
virtual void BeginPlay() override;
This function declaration will allow you to override the BeginPlay() function inherited from the AActor class, so that you can print a message to the screen when gameplay begins.
4. Now open FPSCharacter.cpp and add the following lines, then save the file.
void AFPSCharacter::BeginPlay()
{
      Super::BeginPlay();

      if (GEngine)
      {
            GEngine->AddOnScreenDebugMessage(-1, 5.f, FColor::Blue, TEXT("We are using FPSCharacter!"));
      }
}
This function definition will print "We are using FPSCharacter!" to the screen in blue text when gameplay begins.
We will again close the editor and compile our project, so that we can see our code changes reflected in the game. (Note that you should be able to hot-reload if you are using the latest engine version, which means you can compile without closing the Unreal Editor.)
1. Close Unreal Editor.
2. Compile .
3. After the build finishes, open Unreal Editor, and then open FPSProject.
4. Click on the Play In button in the Level Editor Toolbar. Your new Character does not have any movement controls yet, so you will not be able to move around in the level. So, if you are stuck and unable to move, you are using the FPSCharacter as your Pawn correctly! Your log message should also be displayed on the screen.
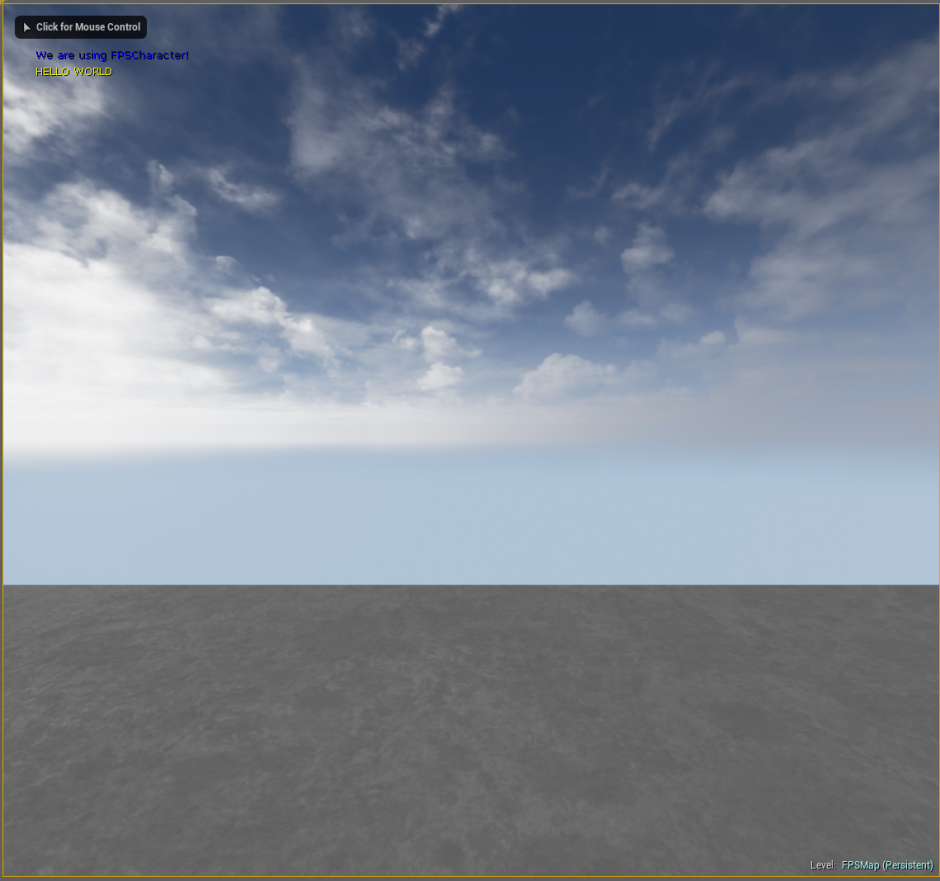
You can also look in the Scene Outliner while your game is running to see FPSCharacter listed.
5. Press Escape to exit Play in Editor (PIE) mode.
WASD Movement
Let's get our new Character moving around.
We will go through specifics of input processing in the next several steps, but you may also find the general overview of input framework useful to refer to.
The input controls for walking around in the world, such as WASD or arrow keys, are usually set up with axis mappings.
Axis Mappings
Map keyboard, controller, or mouse inputs to a "friendly name" that will later be bound to continuous game behavior, such as movement. The inputs mapped in AxisMappings are continuously polled, even if they are just reporting that their input value is currently zero. This allows for smooth transitions in movement or other game behavior, rather than the discrete game events triggered by inputs in ActionMappings. Hardware axes, such as controller joysticks, provide degrees of input, rather than discrete 1 (pressed) or 0 (not pressed) input. That is, they can be moved to a small degree or a large degree, and your character's movement can vary accordingly. While these input methods are ideal for providing scalable amounts of movement input, AxisMappings can also map common movement keys, like WASD or Up, Down, Left, Right, to continuously-polled game behavior.
First, we will set up axis mappings for the W, A, S, and D keys.
- In the Edit menu, click on Project Settings .
- Under the Engine heading on the left side of the Project Settings tab, click on Input .
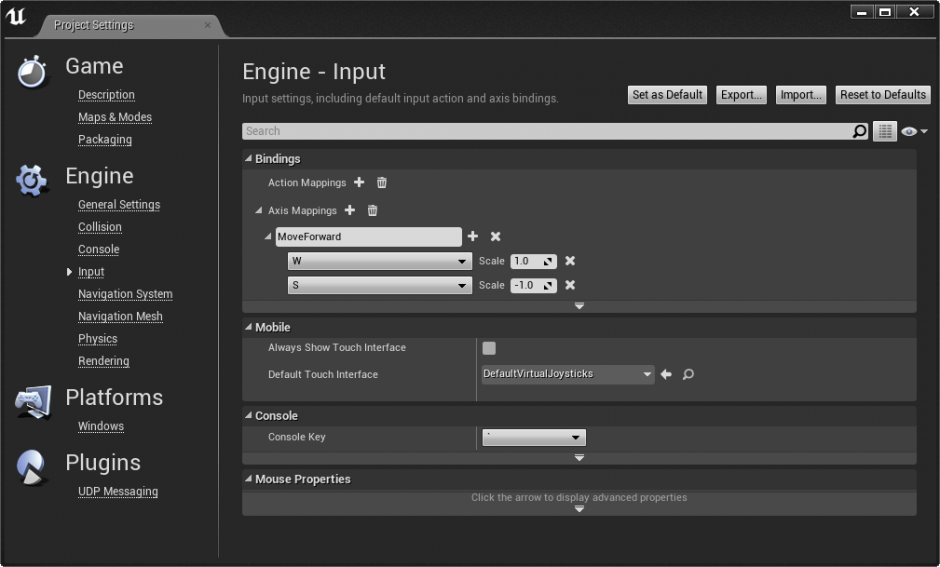
- Under Bindings , click on the plus sign next to Axis Mappings (If nothing appears, click the arrow to the left of Axis Mappings).
- Type "MoveForward" into the text field that appears, then click on the arrow to the left of the text box to expand the axis binding options.
- In the dropdown menu, select W . Your input settings should now look like the following:
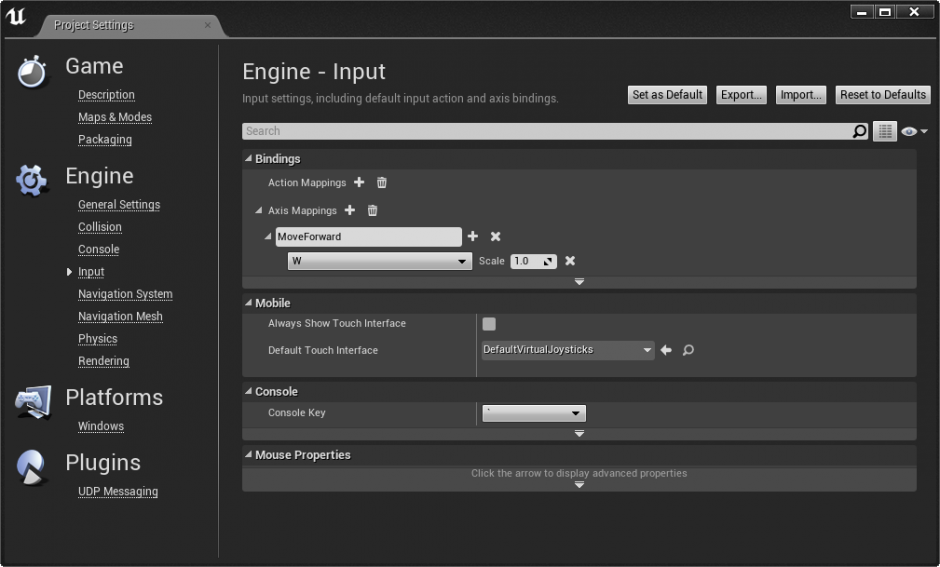
6. Now, click on the plus sign next to MoveForward
7. In the second dropdown menu, select S . Type "-1" in the Scale field. Your input settings should now look like the following:
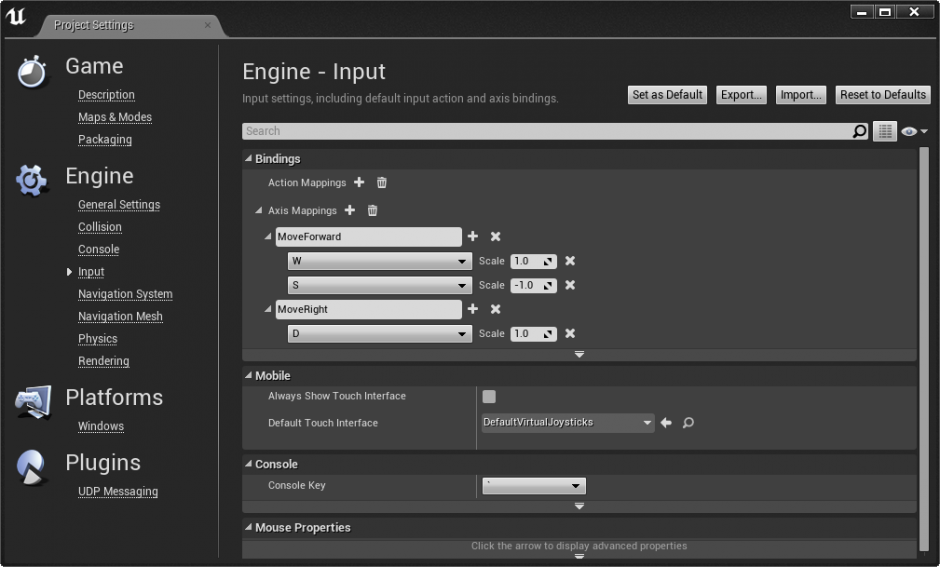
8. Under Bindings , click on the plus sign next to Axis Mappings .
9. Type "MoveRight" into the text field that appears, then click on the arrow to the left of the text box to expand the axis binding options.
10. In the dropdown menu, select D . Your input settings should now look like the following:
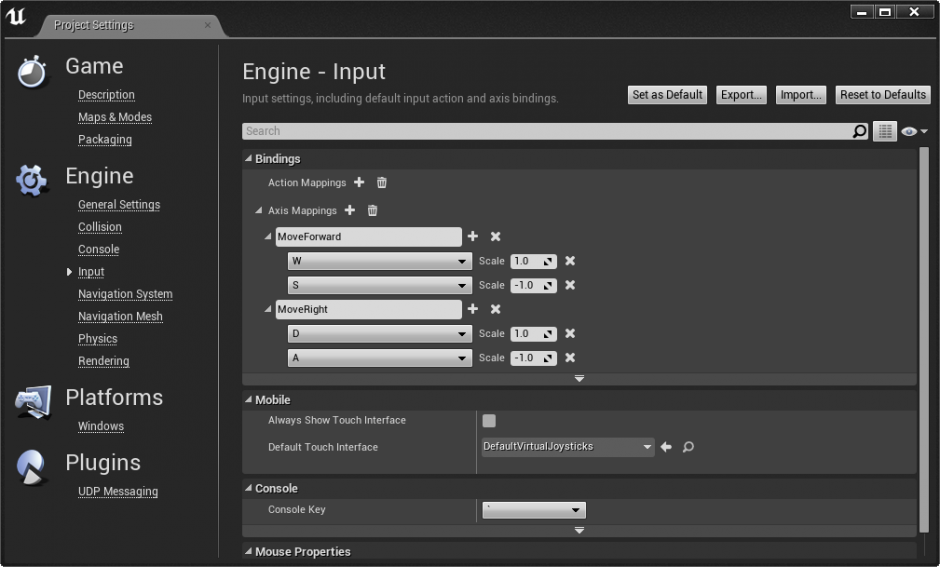
11. Under Bindings , click on the plus sign next to MoveRight .
12. In the second dropdown menu, select A . Type "-1" in the Scale field. Your input settings should now look like the following:
13. Close the Project Settings menu.
14. Switch to your project in Visual Studio.
15. The Character class has a function called SetupPlayerInputComponent that is called when the PlayerController possesses the Character. We will override this function to bind our own handlers for the MoveForward and MoveRight axis mappings.
16. In
FPSCharacter.h
, add the following declaration under
virtual void BeginPlay() override;
:
    protected:
        virtual void SetupPlayerInputComponent(class UInputComponent* InputComponent) override;
17. We also want to declare our handler functions, so add these lines under the
SetupPlayerInputComponent
declaration in
FPSCharacter.h
and save the file.
    //handles moving forward/backward
    UFUNCTION()
    void MoveForward(float Val);
    //handles strafing
    UFUNCTION()
    void MoveRight(float Val);
UFUNCTION() Macro
The UFUNCTION macro is used above each of these functions. By itself, the UFUNCTION macro makes the engine aware of these functions, so that they can be included in serialization, optimization, and other engine functionality. You may also have noticed the UCLASS macro above your new FPSGameMode and FPSCharacter class declarations, which does the same thing but for classes, and there is also a UPROPERTY macro for properties. There are a number of specifiers you can supply to these macros to change the function, class, and property behaviors in the engine, which can be found in ObjectBase.h.
After setting up our function declarations, we will implement them in
FPSCharacter.cpp
.
1. First, we will define
SetupPlayerInputComponent
. The following lines set up the gameplay key bindings. Add them below the constructor in
FPSCharacter.cpp
.
    void AFPSCharacter::SetupPlayerInputComponent(UInputComponent* InputComponent)
    {
        // set up gameplay key bindings
        InputComponent->BindAxis("MoveForward", this, &AFPSCharacter::MoveForward);
        InputComponent->BindAxis("MoveRight", this, &AFPSCharacter::MoveRight);
    }
An InputComponent is a component that defines how to handle input data and can be attached to an actor that wants to receive input.
We also need to implement our
MoveForward
and
MoveRight
functions. In a typical FPS control scheme, the movement axes are camera-relative. That is, "forward" means "direction the camera is pointing", right means "to the right of the direction the camera is pointing", and so on.
We will get the control rotation from the PlayerController. Also, since we want to move along the ground even while we are looking up or down (as opposed to trying to push into the ground), our
MoveForward
function will ignore the pitch component of the control rotation and restrict our input to the XY plane.
2. Add the following function to
FPSCharacter.cpp
:
    void AFPSCharacter::MoveForward(float Value)
    {
        if ( (Controller != NULL) && (Value != 0.0f) )
        {
            // find out which way is forward
            FRotator Rotation = Controller->GetControlRotation();
            // Limit pitch when walking or falling
            if (GetCharacterMovement()->IsMovingOnGround() || GetCharacterMovement()->IsFalling() )
            {
                Rotation.Pitch = 0.0f;
            }
            // add movement in that direction
            const FVector Direction = FRotationMatrix(Rotation).GetScaledAxis(EAxis::X);
            AddMovementInput(Direction, Value);
        }
    }
Our code for
MoveRight
is very similar, except we will move along a different axis of our control rotation. We also don't need to worry about zeroing the pitch in this case because pitching doesn't affect the Y direction vector.
3. Add the following function to
FPSCharacter.cpp
:
    void AFPSCharacter::MoveRight(float Value)
    {
        if ( (Controller != NULL) && (Value != 0.0f) )
        {
            // find out which way is right
            const FRotator Rotation = Controller->GetControlRotation();
            const FVector Direction = FRotationMatrix(Rotation).GetScaledAxis(EAxis::Y);
            // add movement in that direction
            AddMovementInput(Direction, Value);
        }
    }
Let's test out the Character now, and see how we can move throughout the level.
1. Close Unreal Editor.
2. Compile
3. After the build finishes, open Unreal Editor, and then open FPSProject .
4. Click on the Play In button in the Level Editor Toolbar . You should be able to move and strafe throughout the level, although your camera will be fixed in place.
5. Press Escape to exit Play in Editor (PIE) mode.
Mouse Camera Control
Let's add the ability to look around and steer with the mouse.
First, let's set up axis mappings for Turn and LookUp .
1. In the Edit menu, click on Project Settings .
2. Under the Engine heading on the left side of the Project Settings tab, click on Input.
3. Under Bindings, click on the plus sign next to Axis Mappings.
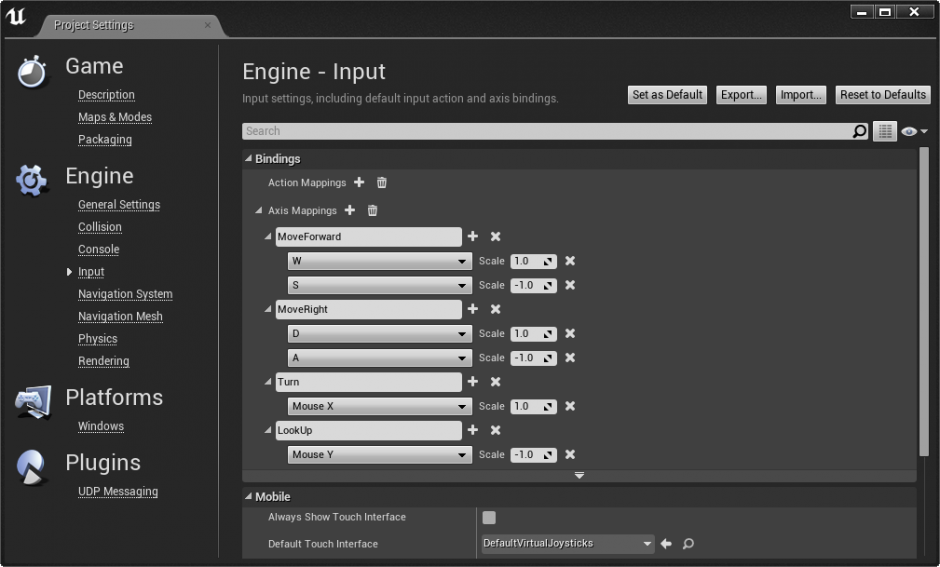
4. Type "Turn" into the text field that appears, then click on the arrow to the left of the text box to expand the axis binding options.
5. In the dropdown menu, select MouseX .
6. Under Bindings , click on the plus sign next to Axis Mappings .
7. Type "LookUp" into the text field that appears, then click on the arrow to the left of the text box to expand the axis binding options.
8. In the dropdown menu, select MouseY and enter "-1" for Scale . Your input settings should now look like the following:
9. Close the Project Settings menu.
Now, let's add some code to handle those inputs.
The Character class defines the two necessary functions for us:
AddYawInput
and
AddPitchInput
.
If we wanted to do additional processing, such as adding support for sensitivity or axis inversion, we could provide our own functions to adjust the values before passing them to these functions, but in this case let's bind our inputs directly to them.
1. Add the following lines to SetupPlayerInputComponent in FPSCharacter.cpp:
   InputComponent->BindAxis("Turn", this, &AFPSCharacter::AddControllerYawInput);
   InputComponent->BindAxis("LookUp", this, &AFPSCharacter::AddControllerPitchInput);
Because we only changed an existing function instead of making a new function, we can compile within the editor.
1. Switch back to Unreal Editor, and click on the Compile button.
2. The Compiling C++ Code notification will pop up in the bottom right of the screen. Wait for it to finish - it will say Compile Complete and then fade out.

3. Click on the Play In button in the Level Editor Toolbar. Now, you can control the camera direction with your mouse.
4. Press Escape to exit Play in Editor (PIE) mode.
Jumping
Now, let's add jumping to our movement abilities. Our movement and camera control steps used axis mappings, which handle continuous inputs needed for those types of controls. There are also action mappings, which deal with inputs for discrete events.
ActionMappings
Map a discrete button or key press to a "friendly name" that will later be bound to event-driven behavior. The end effect is that pressing (and/or releasing) a key, mouse button, or keypad button directly triggers some game behavior.
Let's add a new action mapping called Jump in the editor.
1. In the Edit menu, click on Project Settings.
2. Under the Engine heading on the left side of the Project Settings tab, click on Input.
3. Under Bindings, click on the plus sign next to Action Mappings.
4. Click on the arrow to the left of Action Mappings to expand the Action Mappings settings.
5. Type "Jump" in the text field.
6. Expand the dropdown, and select Space Bar.
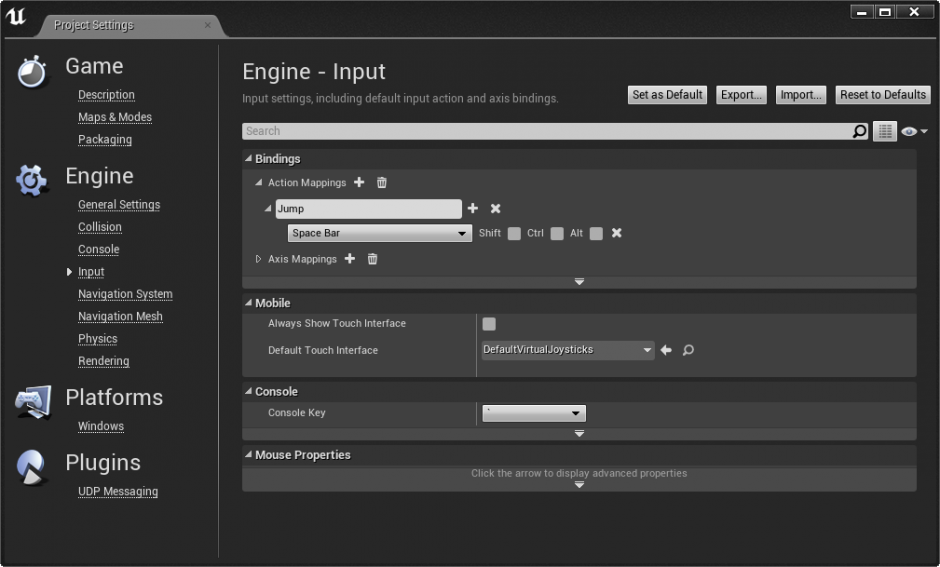
7. Close the Project Settings menu.
Now we want to bind this action to some code that will cause our character to jump.
If we look at Character.h, we can see there is jump support built in, tied to the bPressedJump variable. So all we need to do is set that flag to 1 when the jump action is pressed, and 0 when it is released. We need two functions to accomplish this.
1. In FPSCharacter.h, add the following public function declarations:
   //sets jump flag when key is pressed
   UFUNCTION()
   void OnStartJump();
   //clears jump flag when key is released
   UFUNCTION()
   void OnStopJump();
2. In FPSCharacter.cpp, we can implement them very simply:
   void AFPSCharacter::OnStartJump()
   {
       bPressedJump = true;
   }
   void AFPSCharacter::OnStopJump()
   {
       bPressedJump = false;
   }
Finally, we need to bind the Jump action to our new functions.
3. In
SetupPlayerInputComponent
, add the following:
   InputComponent->BindAction("Jump", IE_Pressed, this, &AFPSCharacter::OnStartJump);
   InputComponent->BindAction("Jump", IE_Released, this, &AFPSCharacter::OnStopJump);
Because we added new functions instead of just altering existing functions like in the previous step, we need to compile in Visual Studio instead of in the editor.
1. Close Unreal Editor.
2. Compile .
3. After the build finishes, open Unreal Editor, and then open FPSProject.
4. Click on the Play In button in the Level Editor Toolbar.
5. Press Spacebar to jump! You should now have a good set of starting movement controls, with WASD moving and strafing, camera control with the mouse, and jumping.
6. Press Escape to exit Play in Editor (PIE) mode.
Adding a mesh to your Character
Now let's give ourselves a body in the world. The Character class creates a SkeletalMeshComponent object for us by default, so all it needs to know is which SkeletalMesh asset to use. Let's make a Blueprint of our
FPSCharacter
class so we can easily set this asset and manipulate any future components we might want to add. We'll start by importing a third person Skeletal Mesh. Eventually, we will set it up so that there is one mesh that the player sees, and one mesh that other players would see in a multiplayer mode.
1. Download the following zip file, and unzip it to get the third person mesh file.
2. Open Unreal Editor.
3. Right-click in the Content Browser, and select Import to /Game in the menu that appears.
4. Navigate to wherever you saved the FBX file, then select it and click Open.
5. Open the Advanced dropdown and check Import Materials , then click on Import .
6. Click on the Save icon in the Content Browser to save your new Skeletal Mesh and its associated assets.
Now, we can create a Blueprint of our FPSCharacter class and assign this new Skeletal Mesh to the SkeletalMeshComponent.
1. Right-click in the Content Browser and select New Folder . Name this new folder Blueprints .
2. Double-click on the folder to open it.
3. Click on the New dropdown, and select Blueprint .
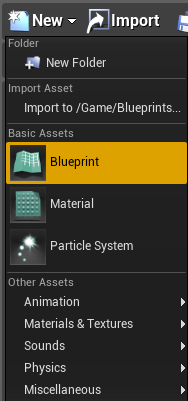
4. Expand the Custom Class dropdown, and type "FPSCharacter" into the search box.
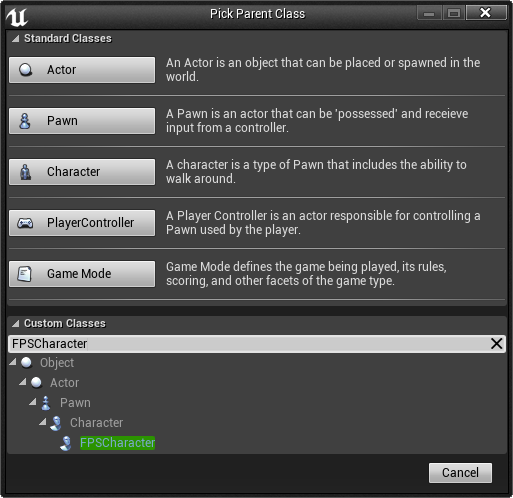
5. Click on FPSCharacter to select it as the parent class for your new Blueprint and then click on Select.
6. Name this new Blueprint BP_FPSCharacter , then double-click its icon to open it.
The Blueprint Editor will open in Components Mode, so we will be able to easily set our third-person mesh.
1. Click on the Mesh component in the Components tab.
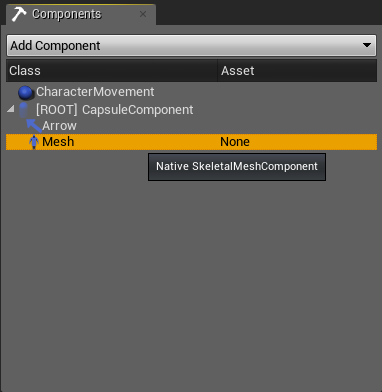
2. In the Details tab, scroll down to the Mesh section. Click on the dropdown that says None, then select your recently imported Skeletal Mesh asset. You may have to resize the Details tab to see this menu.
3. Align the SkeletalMeshComponent to the CapsuleComponent by setting its Z location to -88 in the Details tab.
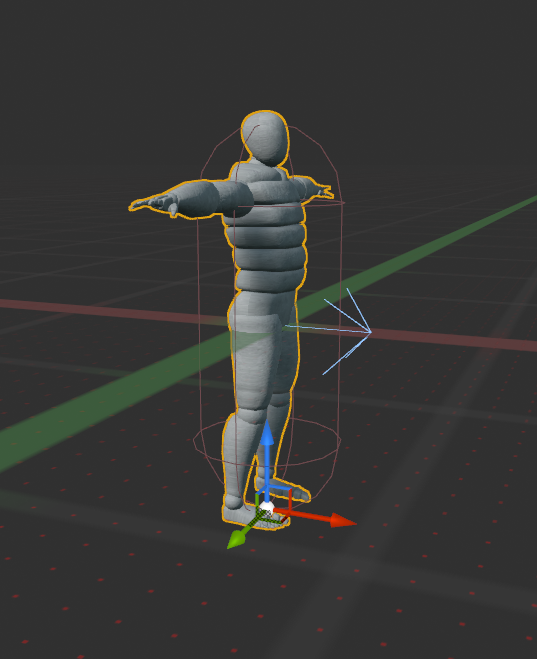
When using your own Skeletal Mesh assets, you may need to adjust them differently, but the overall goal is always to have the mesh contained within the CapsuleComponent, and facing the same direction that the ArrowComponent is pointing. This will ensure that your Character moves correctly through the world. You can also move components around with widgets in the Preview Viewport, rather than setting values in the Details tab.
4. Compile and save your Blueprint, then close the Blueprint Editor .
Now we need to tell our GameMode to use our Blueprint class for the player pawn, instead of the FPSCharacter class we set earlier.
1. Switch to Visual Studio.
2. Go to the FPSGameMode constructor in FPSGameMode.cpp, and replace the existing DefaultPawnClass assignment:
DefaultPawnClass = AFPSCharacter::StaticClass();
with the following code:
   // set default pawn class to our Blueprinted character
   static ConstructorHelpers::FClassFinder<APawn> PlayerPawnObject(TEXT("Pawn'/Game/Blueprints/BP_FPSCharacter.BP_FPSCharacter_C'"));
   if (PlayerPawnObject.Class != NULL)
   {
       DefaultPawnClass = PlayerPawnObject.Class;
   }
This code will find the class generated by your blueprint and assign it as your default pawn class. (Note the "_C" suffix in the asset path, this is what distinguishes the actual class used by the game from the Blueprint asset, which is an editor-only concept.) At this point, you could also remove the #include "FPSCharacter.h" from the top of FPSGameMode.cpp, since you are no longer referring to the FPSCharacter C++ class.
Note that if you put your Blueprint in a different folder in the asset tree, you can get the full path by right-clicking on it in the Content Browser and selecting "Copy Reference". The full path will be placed on your clipboard for handy pasting.
1. Switch back to Unreal Editor, and click on the Compile button.
2. The Compiling C++ Code notification will pop up in the bottom right of the screen. Wait for it to finish - it will say Compile Complete and then fade out.
3. Click on the Play In button in the Level Editor Toolbar. If you move the camera around, you should be able to see your character's shadow.
4. Press Shift+F1 to regain your mouse cursor, then click on Eject in the toolbar. You are no longer possessing the character, so you can move the camera around freely and see your character's mesh.
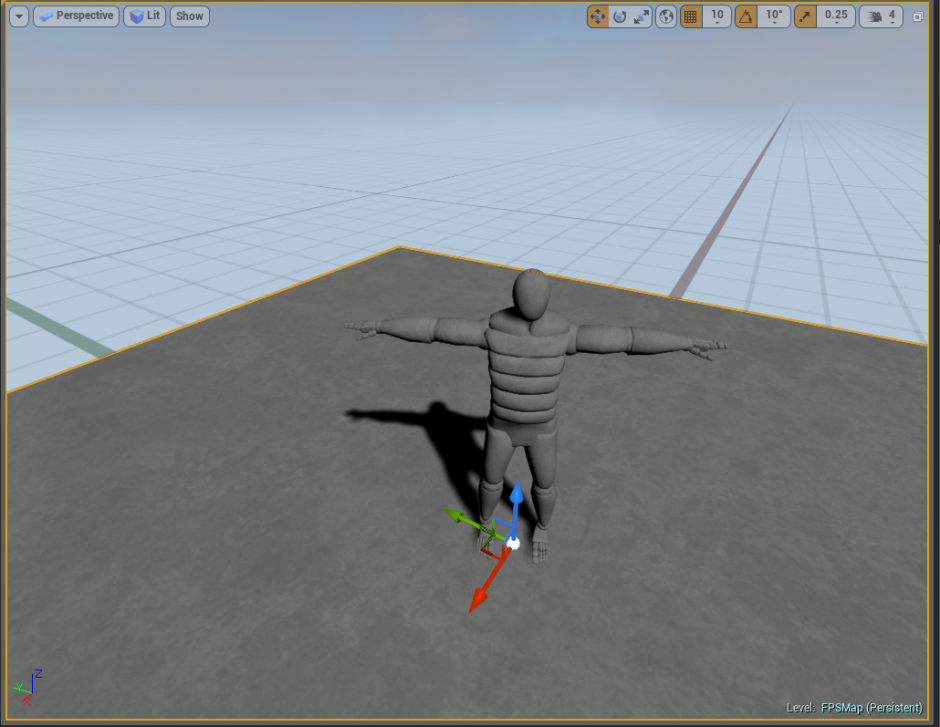
5. Click on Stop to exit Play in Editor (PIE) mode.
Changing the Camera View
At the end of the previous step, the default camera is positioned inside the mesh's neck. Let's set up a proper camera that we can use to adjust the camera's properties such as location and field of view. We're going to do this by adding a CameraComponent to our FPSCharacter. First, let's add a property to the FPSCharacter to hold a reference to our CameraComponent.
1. Go to
FPSCharacter.h
in Visual Studio and add the following to create a public property:
   /** First person camera */
   UPROPERTY(VisibleAnywhere, BlueprintReadOnly, Category=Camera)
   UCameraComponent* FirstPersonCameraComponent;
Note: 4.18.2 You need to include "Camera/CameraComponent.h".
We will also need to add a constructor to our
FPSCharacter.h
file.
   // Constructor for AFPSCharacter
   AFPSCharacter(const FObjectInitializer& ObjectInitializer);
We will create the actual component in the FPSCharacter constructor.
2. Add the following code in FPSCharacter.cpp to create the CameraComponent and attach it to the CapsuleComponent.
   AFPSCharacter::AFPSCharacter(const FObjectInitializer& ObjectInitializer)
       : Super(ObjectInitializer)
   {
       // Create a CameraComponent
       FirstPersonCameraComponent = ObjectInitializer.CreateDefaultSubobject<UCameraComponent>(this, TEXT("FirstPersonCamera"));
       FirstPersonCameraComponent->AttachParent = CapsuleComponent;
   }
Note: 4.11.2 CapsuleComponent not accessible, use GetCapsuleComponent() instead
Note: 4.13 AttachParent is now private. Use AttachTo()
Finally, let's adjust the camera's position to be a little above the character's eye location.
3. Add this to the constructor, after the component is created. You can tweak the camera's position in the BP_FPSCharacter Blueprint later as well, but this gives a good starting location for the CameraComponent. Also, you will only set the CameraComponent's location, not its rotation, because our earlier Turn and LookUp functions will control the camera's orientation.
   // Position the camera a bit above the eyes
   FirstPersonCameraComponent->RelativeLocation = FVector(0, 0, 50.0f + BaseEyeHeight);
   // Allow the pawn to control rotation.
   FirstPersonCameraComponent->bUsePawnControlRotation = true;
Because we added a new property, we need to compile in Visual Studio instead of in the editor.
1. Close Unreal Editor.
2. Compile .
3. After the build finishes, open Unreal Editor, and then open FPSProject .
4. Click on the Play In button in the Level Editor Toolbar.
5. Your camera should be above the character's head now, and if you look down, you will be able to see the top of your character's head.
6. Press Escape to exit Play in Editor (PIE) mode.
Adding a First Person Mesh
A common FPS approach is to use 2 separate meshes. One is the normal full-body mesh, used when seeing the character from third person but hidden when in first person. The second is a "weapon and hands" mesh that is attached to the camera and is visible only to the player when the player is in a first person perspective.
To implement this, we'll keep the existing component named Mesh as our third person mesh and make a new
SkeletalMeshComponent
to be our first person mesh.
1. First add a public variable to
FPSCharacter.h
to keep a reference to this new mesh:
    /** Pawn mesh: 1st person view (arms; seen only by self) */
    UPROPERTY(VisibleDefaultsOnly, Category=Mesh)
    USkeletalMeshComponent* FirstPersonMesh;
2. Then, in the constructor for FPSCharacter.cpp, we'll add code to create and configure this mesh after our code that configures the FirstPersonCameraComponent:
    // Create a mesh component that will be used when being viewed from a '1st person' view (when controlling this pawn)
    FirstPersonMesh = ObjectInitializer.CreateDefaultSubobject<USkeletalMeshComponent>(this, TEXT("FirstPersonMesh"));
    FirstPersonMesh->SetOnlyOwnerSee(true);         // only the owning player will see this mesh
    FirstPersonMesh->AttachParent = FirstPersonCameraComponent;
    FirstPersonMesh->bCastDynamicShadow = false;
    FirstPersonMesh->CastShadow = false;
Note: 4.13 AttachParent is now private. Use the AttachTo() function. (Api Reference)
We are using
SetOnlyOwnerSee
here to indicate that this mesh is only visible to the "owning" player, in this case the PlayerController who has possessed this Character. We also set the mesh to be attached to the camera. Finally, we disable some environmental shadowing since seeing shadows of these camera-attached arms would look odd and destroy the illusion.
3. Finally, we have to change the settings for Mesh, the existing third person SkeletalMeshComponent. Add the following lines to the constructor to set its visibility so it is hidden from the owning player.
    // everyone but the owner can see the regular body mesh
    Mesh->SetOwnerNoSee(true);
As before, we will set the mesh asset in the Blueprint, so let's compile and run the editor.
1. Close Unreal Editor.
2. Compile .
3. After the build finishes, open Unreal Editor, and then open FPSProject .
4. Download this zip file and unzip it to receive the first person mesh FBX file, which contains a SkeletalMesh with just arms.
5. Navigate to the Game folder in the Content Browser .
6. Right-click in the Content Browser , and select Import to /Game in the menu that appears.
7. Navigate to wherever you saved the FBX file, then select it and click Open .
8. Open the Advanced dropdown and make sure Import Materials is checked, then click on Import.
If you receive an error about smoothing groups, you can disregard it. This mesh will still work to illustrate the first person mesh setup, and will work with the animations set up in a later step.
1. Click on Save in the Content Browser to save your new Skeletal Mesh and its associated assets.
2. Navigate back to the Blueprints folder in the Content Browser .
3. Open BP_FPSCharacter and switch to Components Mode .
(NOTE: There is an additional step required as a workaround to an current issue we are looking into. To be able to find the FirstPersonMesh in the component list, you will need to delete the BP_FPSCharacter blueprint and recreate it. After doing this you can continue with step 4.)
4. Find the new FirstPersonMesh we added. Notice that it is a child of the FirstPersonCameraComponent , so it will always be attached to the camera. You may have to expand the FirstPersonCameraComponent dropdown.
You may encounter an issue where the new FirstPersonMesh and FirstPersonCameraComponent do not appear in your blueprint. If this happens to you, you can remove the blueprint BP_FPSCharacter and create it again as described above, and the new properties will appear.
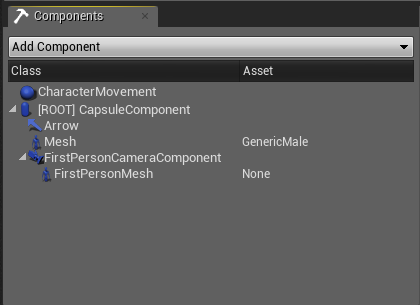
5. Click on the FirstPersonMesh component in the Components tab.
6. In the Details tab, scroll down to the Mesh section. Click on the dropdown that says None , then select your recently imported Skeletal Mesh asset. You may have to resize the Details tab to see this menu. Now, the arms should appear in the Viewport , although you may have to zoom out to see them.
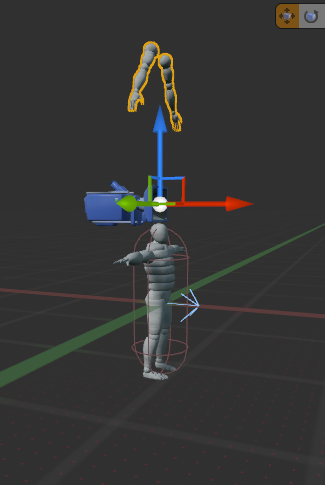
7. To adjust the relative transform so the arms appear on the camera, set the Location to {240,0,35} and the Rotation to {-180, 50, -180}. You will readjust this position after the arms are animated, but for now, this position lets you see that you are using this first person mesh when playing.
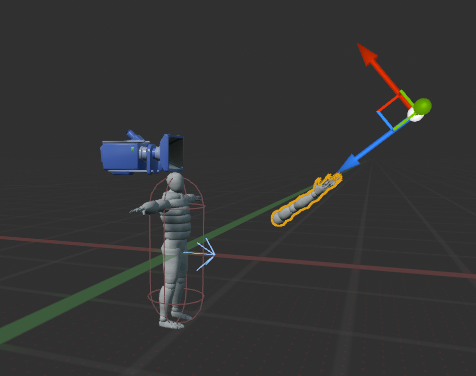
8. Compile and Save your Blueprint, then close the Blueprint Editor .
9. Click on the Play In button in the Level Editor Toolbar.
10. At this point, you will no longer be able to see the third person SkeletalMesh, but you will be able to see the disembodied arms of the first person SkeletalMesh.
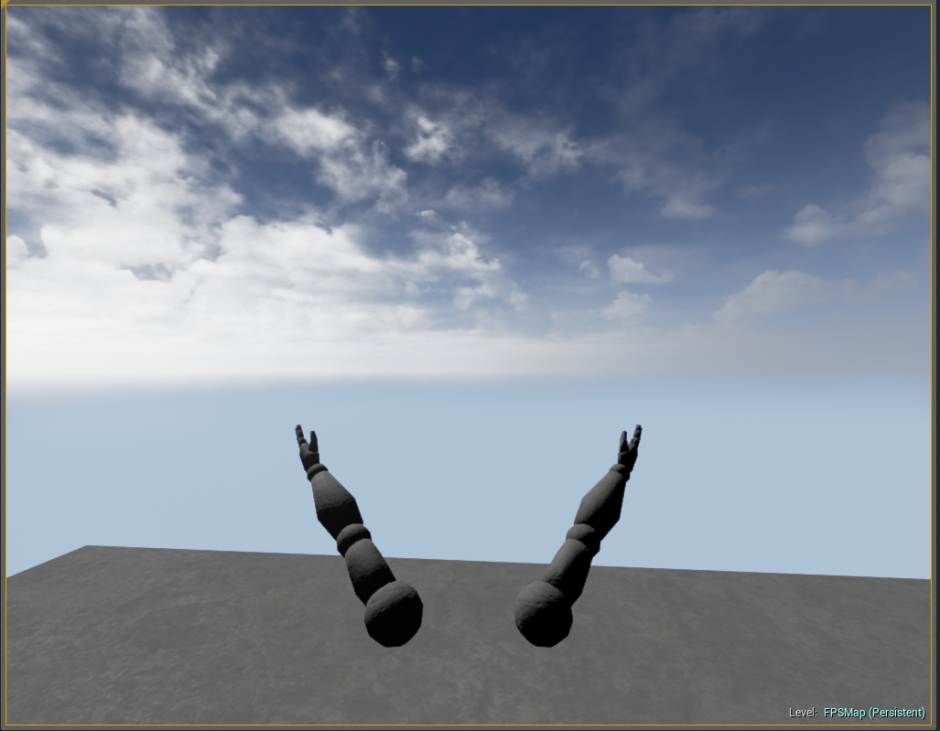
11. Press Shift+F1 to regain your mouse cursor, then click on Eject in the toolbar. You are no longer possessing the character, so you can move the camera around freely and see both the third person and the first person meshes.
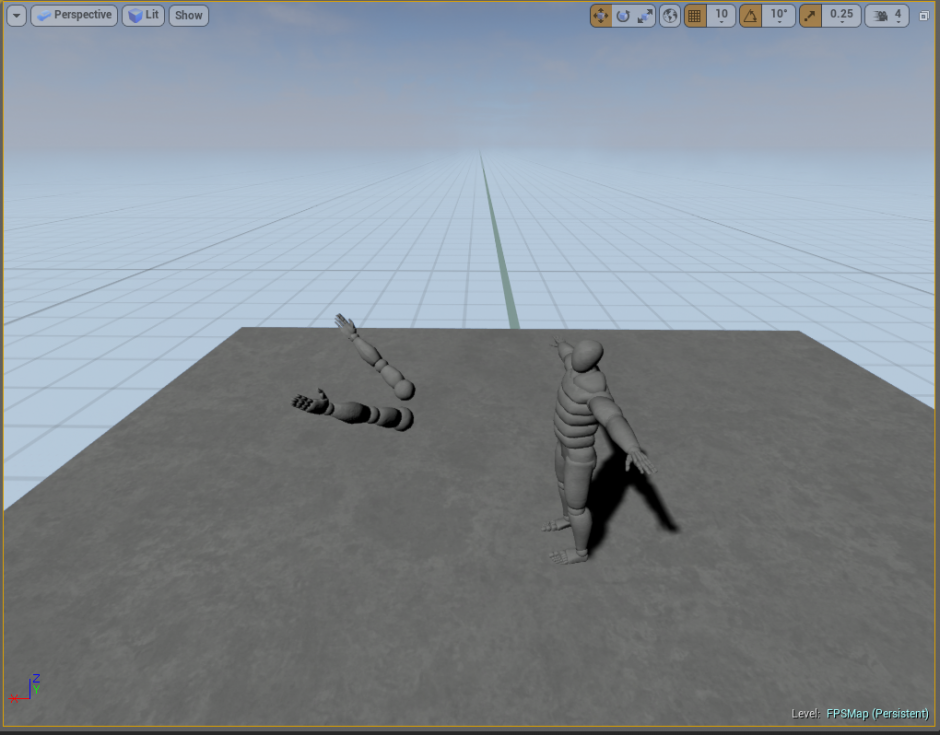
12. Press Escape to exit Play in Editor (PIE) mode.
Adding Projectiles and Shooting
Now that the character is set up, let's implement a simple projectile weapon - when you fire, a simple grenade-like projectile will shoot from the center of the screen and fly until it hits the world. While we have the editor open, let's add an input and create a new code class for our projectile.
1. In the Edit menu, click on Project Settings .
2. Under the Engine heading on the left side of the Project Settings tab, click on Input .
3. Under Bindings , click on the + next to Action Mappings .
4. Click on the arrow to the left of Action Mappings to expand the Action Mappings settings.
5. Type "Fire" in the text field.
6. Expand the dropdown, and select Left Mouse Button.
7. Close the Project Settings menu.
Now let's create the projectile class.
1. Go to File > Add Code to Project .
2. Choose Actor , then click Next .
3. Name your new class FPSProjectile , then click on Create.
4. Click on Yes to open the class in Visual Studio for editing.
5. Visual Studio will prompt you asking to reload the project, since the C++ Class Wizard modified it. Select Reload.
First, we should decide on a simplified physical representation to use for collision and simulation. For our case, let's use a USphereComponent.
1. Add a reference to this component in your FPSProjectile class declaration in FPSProjectile.h.
    /** Sphere collision component */
    UPROPERTY(VisibleDefaultsOnly, Category=Projectile)
    USphereComponent* CollisionComp;
2. Add a constructor to
FPSProjectile.h
.
AFPSProjectile(const FObjectInitializer& ObjectInitializer);
3. Create the component in the FPSProjectile constructor in FPSProjectile.cpp. We'll make it the root component since the simulation will drive it, and we can attach visual components to it later in a Blueprint.
    AFPSProjectile::AFPSProjectile(const FObjectInitializer& ObjectInitializer)
        : Super(ObjectInitializer)
    {
        // Use a sphere as a simple collision representation
        CollisionComp = ObjectInitializer.CreateDefaultSubobject<USphereComponent>(this, TEXT("SphereComp"));
        CollisionComp->InitSphereRadius(15.0f);
        RootComponent = CollisionComp;
    }
UE4 comes with a ProjectileMovementComponent that can be used to easily do simple ballistic-style movement, so let's add that to FPSProjectile.
1. First, add a public reference in your FPSProjectile class declaration in FPSProjectile.h.
    /** Projectile movement component */
    UPROPERTY(VisibleAnywhere, BlueprintReadOnly, Category=Movement)
    UProjectileMovementComponent* ProjectileMovement;
2. Then, add the following lines to the FPSProjectile constructor in FPSProjectile.cpp to create this component:
    // Use a ProjectileMovementComponent to govern this projectile's movement
    ProjectileMovement = ObjectInitializer.CreateDefaultSubobject<UProjectileMovementComponent>(this, TEXT("ProjectileComp"));
    ProjectileMovement->UpdatedComponent = CollisionComp;
    ProjectileMovement->InitialSpeed = 3000.f;
    ProjectileMovement->MaxSpeed = 3000.f;
    ProjectileMovement->bRotationFollowsVelocity = true;
    ProjectileMovement->bShouldBounce = true;
    ProjectileMovement->Bounciness  = 0.3f;
We've also set a few properties here to influence the simulation, the most important of which is the UpdatedComponent.
Looking ahead, we're also going to want a function to "launch" our projectile by setting its initial velocity.
1. Declare a public function in the FPSProjectile class declaration in FPSProjectile.h:
    /** inits velocity of the projectile in the shoot direction */
    void InitVelocity(const FVector& ShootDirection);
2. Implement the function in FPSProjectile.cpp by adding the following definition after the constructor.
    void AFPSProjectile::InitVelocity(const FVector& ShootDirection)
    {
        if (ProjectileMovement)
        {
            // set the projectile's velocity to the desired direction
            ProjectileMovement->Velocity = ShootDirection * ProjectileMovement->InitialSpeed;
        }
    }
Note that our projectile's speed is defined in the ProjectileMovementComponent, so we only need to supply a launch direction.
Finally, we will add code to the FPSCharacter so that when the Fire input is pressed, it will launch a projectile. As before, we will declare a public function called OnFire that we will bind to the Fire input we defined earlier.
1. In FPSCharacter.h, add this function to the class declaration:
    //handles firing
    UFUNCTION()
    void OnFire();
2. In the FPSCharacter.cpp, add the following to SetupPlayerIputComponent to bind the Fire action to our new OnFire function.
InputComponent->BindAction("Fire", IE_Pressed, this, &AFPSCharacter::OnFire);
There are two points to consider for the OnFire implementation. We know we want to spawn an FPSProjectile actor, so we have to define:
- Where to spawn the projectile
- The projectile class so the FPSCharacter (and its derived Blueprint) will know what projectile to spawn.
To determine a spawn location, we'll use a camera-space offset vector as an editable parameter, so we can set and tweak it in our BP_FPSCharacter Blueprint.
We can then calculate an initial location for the projectile based on this data.
1. Add the following to the FPSCharacter class declaration in FPSCharacter.h:
    /** Gun muzzle's offset from the camera location */
    UPROPERTY(EditAnywhere, BlueprintReadWrite, Category=Gameplay)
    FVector MuzzleOffset;
The EditAnywhere specifier allows you to change the value of the muzzle offset either within the Defaults mode of the Blueprint Editor, or within the Details tab for any instance of the character. The BlueprintReadWrite specifier allows you to both get and set the value of the muzzle offset within a Blueprint.
Let's also introduce a projectile class as an editable parameter. This will allow us to later specify a Blueprint derived from FPSProjectile as the projectile we want to spawn.
1. Add the following to the FPSCharacter class declaration in FPSCharacter.h as well:
    /** Projectile class to spawn */
    UPROPERTY(EditDefaultsOnly, Category=Projectile)
    TSubclassOf<class AFPSProjectile> ProjectileClass;
Here, we use the EditDefaultsOnly specifier, which means that you will only be able to set the projectile class as a default on the Blueprint, not on each instance of the Blueprint.
Our OnFire function will involve several steps.
- Since our projectile spawn location is derived in camera space, we find the camera transform before calculating the spawn location.
- We attempt to spawn the projectile.
- Finally, we give it an initial velocity using the function we defined.
1. Add the following function to
FPSCharacter.cpp
:
    void AFPSCharacter::OnFire()
    {
        // try and fire a projectile
        if (ProjectileClass != NULL)
        {
            // Get the camera transform
            FVector CameraLoc;
            FRotator CameraRot;
            GetActorEyesViewPoint(CameraLoc, CameraRot);
            // MuzzleOffset is in camera space, so transform it to world space before offsetting from the camera to find the final muzzle position
            FVector const MuzzleLocation = CameraLoc + FTransform(CameraRot).TransformVector(MuzzleOffset);
            FRotator MuzzleRotation = CameraRot;
            MuzzleRotation.Pitch += 10.0f;          // skew the aim upwards a bit
            UWorld* const World = GetWorld();
            if (World)
            {
                FActorSpawnParameters SpawnParams;
                SpawnParams.Owner = this;
                SpawnParams.Instigator = Instigator;
                // spawn the projectile at the muzzle
                AFPSProjectile* const Projectile = World->SpawnActor<AFPSProjectile>(ProjectileClass, MuzzleLocation, MuzzleRotation, SpawnParams);
                if (Projectile)
                {
                    // find launch direction
                    FVector const LaunchDir = MuzzleRotation.Vector();
                    Projectile->InitVelocity(LaunchDir);
                }
            }
        }
    }
2. Add an #include at the top of FPSCharacter.cpp, since we're using FPSProjectile from within FPSCharacter.
#include "FPSProjectile.h"
3. Close Unreal Editor.
4. Compile.
5. After the build finishes, open Unreal Editor, and then open FPSProject.
Now let's finalize our projectile by creating a Blueprint and adding a mesh so we can see the effect of shooting our projectile.
6. Download this zip file and unzip it to receive the sphere FBX file, which contains the StaticMesh you will use for your projectile.
7. Navigate to the Game folder in the Content Browser .
8. Right-click in the Content Browser , and select Import to /Game in the menu that appears.
9. Navigate to wherever you saved the FBX file, then select it and click Open.
10. Open the Advanced dropdown and make sure Import Materials is checked, then click on Import.
If you receive an error about smoothing groups, you can disregard it. This mesh will still work to illustrate the first person mesh setup, and will work with the animations set up in a later step.
11. Click on Save in the Content Browser to save your new StaticMesh.
12. Navigate back to the Blueprints folder in the Content Browser , then right-click in the Content Browser and create a new Blueprint.
13. Expand the Custom Classes dropdown and search for FPSProjectile , then select that as the parent class for your Blueprint.
14. Name your new Blueprint BP_FPSProjectile , then double-click it to open it in the Blueprint Editor.
15. To add a child StaticMeshComponent to the root SphereComponent, click on CollisionComp in the Components tab, then select Static Mesh from the Add Component dropdown.
16. Name this new component ProjectileMesh .
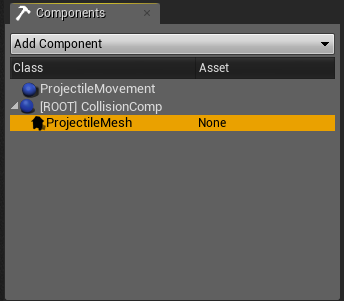
17. Set its Static Mesh asset to your sphere StaticMesh using the dropdown menu under Mesh in the Details panel.
Note that if you are making a multiplayer game, that you must also uncheck "Initial Velocity in Local Space" in the "MovementComp" Component in order for this projectile to replicate correctly over a server.
18. Set the scale to 0.09 in X, Y, and Z.
Clicking on the the lock icon locks all three axes so they preserve their relative scale.
19. Set the ProjectileMesh's Collision Presets value to NoCollision , since we're using the SphereComponent for collision and not this Static Mesh .
20. Compile and Save your Blueprint, then close the Blueprint Editor .
21. Now open BP_FPSCharacter for editing, and open Defaults Mode .
22. Find the Projectile Class property and set it to BP_FPSProjectile .
23. Set the MuzzleOffset property to {100, 0, 0} in order to spawn the projectile slightly in front of the camera.

24. Compile and Save your Blueprint, then close the Blueprint Editor .
25. Click on the Play In button in the Level Editor Toolbar.
26. Left-click to fire your projectiles
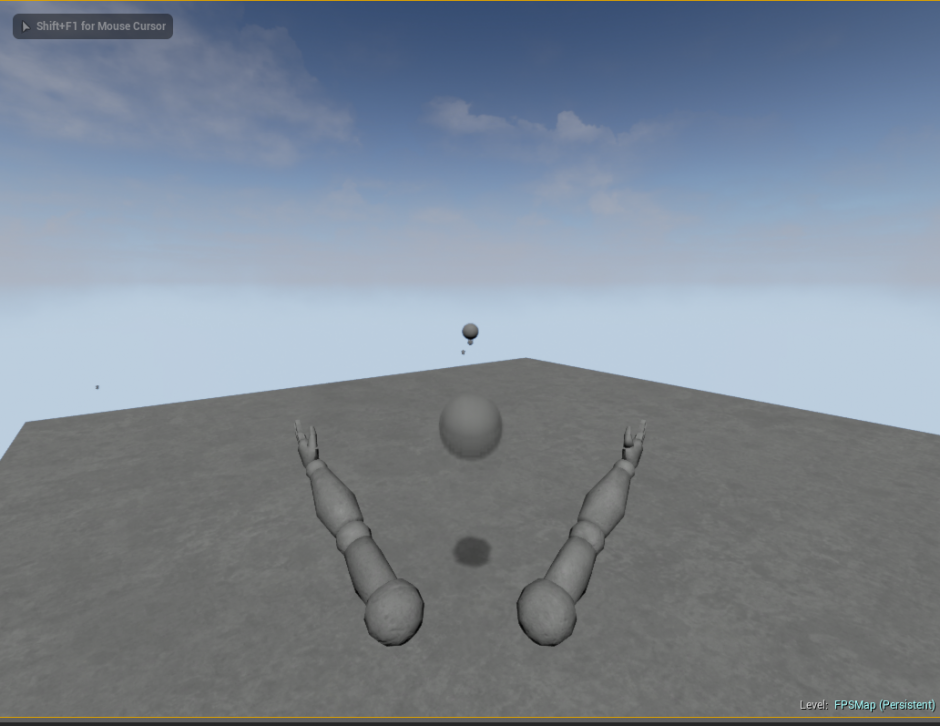
27. Press Escape to exit Play in Editor (PIE) mode.
Projectile Collision and Lifetime
After adding our projectiles, there are two interesting things to notice that we should address.
- The projectiles live forever, as evidenced by the fact that they stay forever in the Scene Outliner.
- The projectiles don't collide with anything.
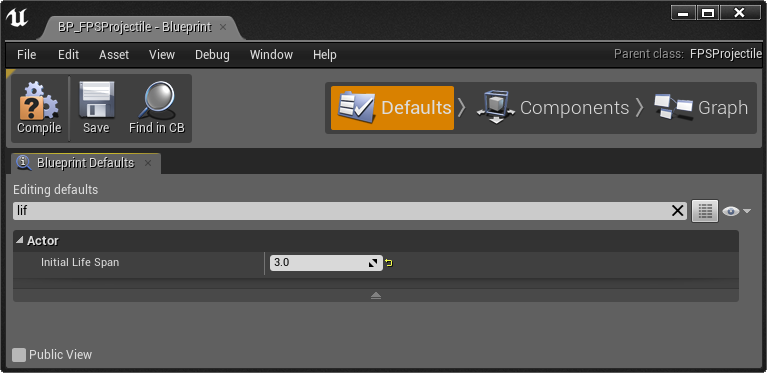
Fortunately, all Actors in UE4 can have a limited lifespan, controlled by the InitialLifeSpan property.
1. Add the following lines to the FPSProjectile constructor to set the projectile's lifespan. You could also modify the Initial Life Span default in the BP_FPSProjectile Blueprint.
   // Die after 3 seconds by default
   InitialLifeSpan = 3.0f;
UE4 comes with several useful collision channels, but also provides several customizable channels that game projects can use. Let's define a custom channel for projectiles, so everything can explicitly choose how to interact with a projectile in our game.
1. To customize a channel, open the Project Settings and select Collision.
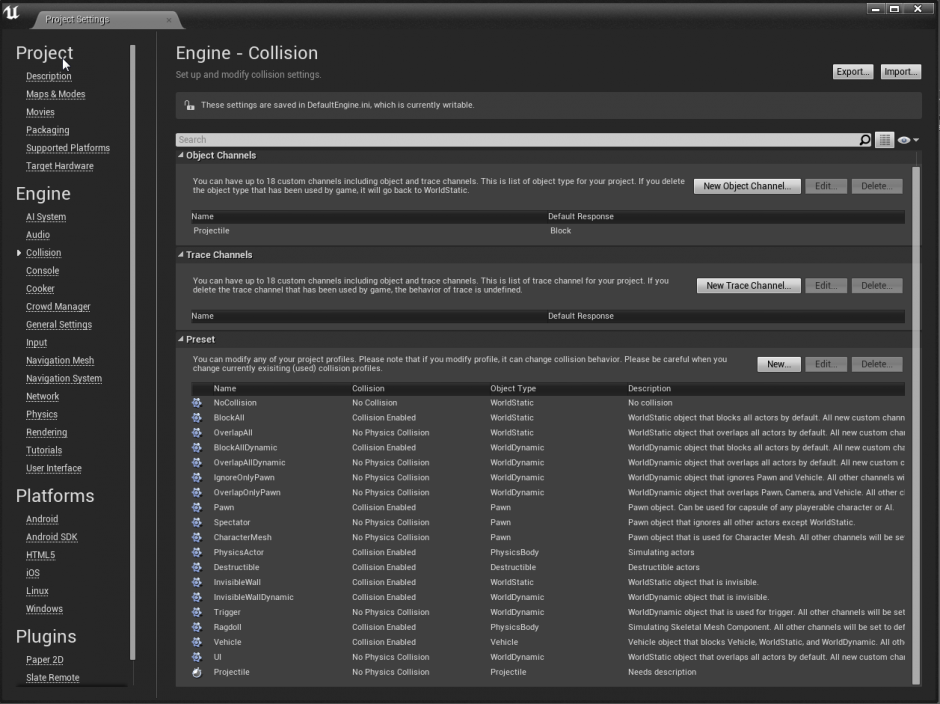
2. Select New Object Channel... to make a new collision channel. Name this Projectile and be sure the Default Response is set to Block
3. Now select New... under Preset. Name this one Projectile as well. Set the settings for this collision preset as shown in the image below.
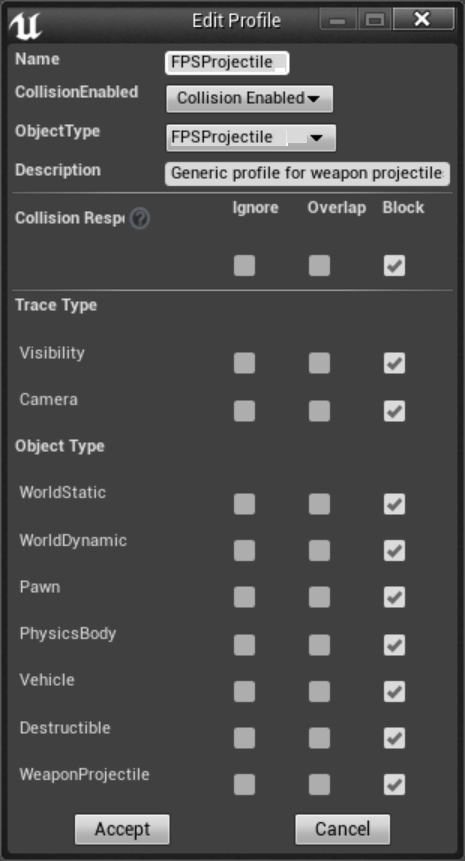
This profile means that the projectile will be blocked by Static Actors, Pawns, Dynamic Actors, Actors simulating Physics, Vehicles, and Destructible Actors.
Now we'll set our projectile to use this profile.
1. In the
FPSProjectile
constructor in
FPSProjectile.cpp
, add the following line after the creation of
CollisionComp
.
CollisionComp->BodyInstance.SetCollisionProfileName("Projectile");
2. Close Unreal Editor.
3. Compile.
In the next step, we will set up how the projectile interacts with objects that it collides with.
Projectiles Interacting with the World
Now that we can detect our projectile's collision interactions, we can determine how to respond to them. In our projectile collision settings, we've set our interactions to be Blocks, so let's add a function to FPSProjectile called OnHit to respond to these events.
1. In the
FPSProjectile
class definition, add the following function declaration:
   /** called when projectile hits something */
   UFUNCTION()
   void OnHit(class AActor* OtherActor, class UPrimitiveComponent* OtherComp, FVector NormalImpulse, const FHitResult& Hit);
Now, we will implement OnHit with functionality to add a physics impulse to whatever the projectile hits.
1. Add the following to FPSProjectile.cpp:
   void AFPSProjectile::OnHit(AActor* OtherActor, UPrimitiveComponent* OtherComp, FVector NormalImpulse, const FHitResult& Hit)
   {
       if ( OtherActor && (OtherActor != this) && OtherComp )
       {
           OtherComp->AddImpulseAtLocation(ProjectileMovement->Velocity * 100.0f, Hit.ImpactPoint);
       }
   }
Lastly, we need to hook this function to the projectile's
SphereComponent's OnComponentBeginOverlap
delegate.
1. In the
FPSProjectile
constructor, add the following after
CollisionComp
is created.
CollisionComp->OnComponentHit.AddDynamic(this, &AFPSProjectile::OnHit);
2. Compile.
3. After the build finishes, open Unreal Editor, and then open FPSProject.
4. Select the SM_Template_Map_Floor floor StaticMesh.
5. Copy and paste the floor mesh, then rescale the copy to {0.2, 0.2, 3.0}.
6. Position the mesh copy at {-230, 0, 160}.
7. Scroll down to the Physics section and check Simulate Physics .
8. Save your map.
9. Click on the Play In button in the Level Editor Toolbar.
10. Left-click to fire your projectiles and move the cube around your level. Your projectiles are now complete!
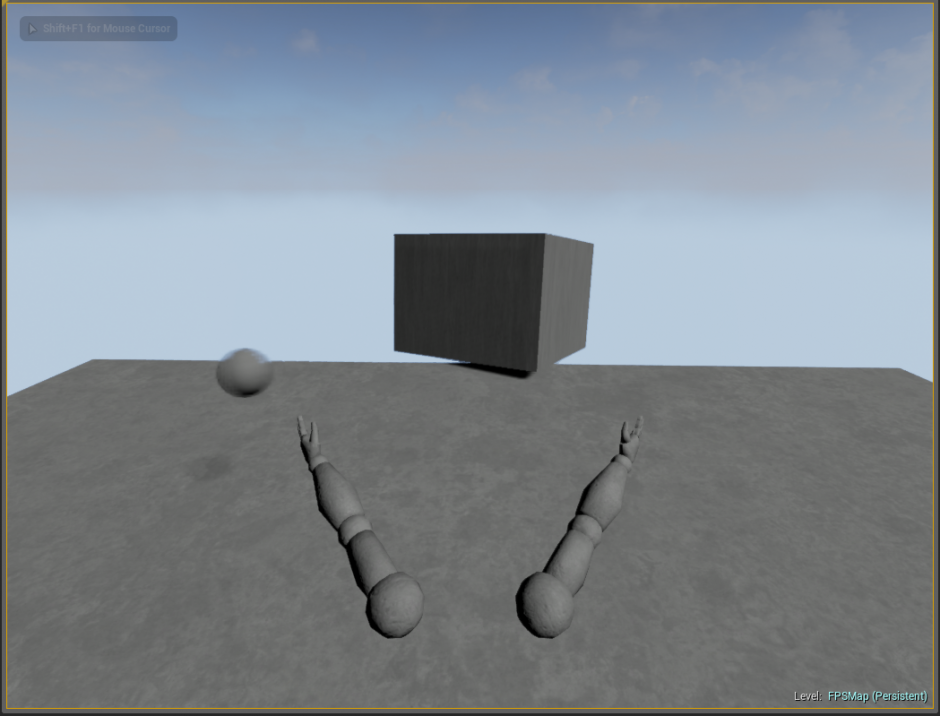
11. Press Escape to exit Play in Editor (PIE) mode.
Adding Crosshairs
Now that you are able to shoot projectiles while playing your game, let's add a HUD with crosshairs to show where you are aiming.
1. Download the following file, and unzip it to get the crosshair image crosshair.TGA.
2. In Unreal Editor, navigate to the Game folder in the Content Browser .
3. Right-click in the Content Browser , and select Import to /Game in the menu that appears.
4. Navigate to wherever you unzipped the crosshair.TGA file, then select it and click Open .
5. Click on Save in the Content Browser to save your new asset.
UE4 comes with a basic HUD class we can extend, so let's add a new class derived from that.
1. Go to File > Add Code to Project.
2. Select HUD as the parent class for your new class, and click Next .
3. Name your new class FPSHUD , then click on Create .
4. Click on Yes to open the class in Visual Studio for editing.
5. Visual Studio will prompt you asking to reload the project, since the C++ Class Wizard modified it. Select Reload .
What we want to do here is to draw a crosshair icon on the center of the screen. First, we need a reference to our texture asset.
1. First we must set up the constructor for this new class. Place the following code in FPSHUD.h, under GENERATED_BODY().
AFPSHUD(const FObjectInitializer& ObjectInitializer);
2. Next we need to implement the constructor. Place the following code in FPSHUD.cpp.
    AFPSHUD::AFPSHUD(const FObjectInitializer& ObjectInitializer)
    :Super(ObjectInitializer)
3. Add the following to the FPSHUD class definition in FPSHUD.h. We're only going to use this internally to this class, so let's make it private.
    private:
    /** Crosshair asset pointer */
    UTexture2D* CrosshairTex;
4. We can then get a reference to our desired asset in the FPSHUD constructor.
As a reminder, you can get the asset path to your texture in the editor by right clicking the asset in the Content Browser and selecting Copy Reference.
AFPSHUD::AFPSHUD(const FObjectInitializer& ObjectInitializer)
:Super(ObjectInitializer)
{
    // Set the crosshair texture
    static ConstructorHelpers::FObjectFinder<UTexture2D> CrosshairTexObj(TEXT("Texture2D'/Game/crosshair.crosshair'"));
    CrosshairTex = CrosshairTexObj.Object;
}
The HUD base class has a virtual function called DrawHUD that we can override to add our custom drawing code and draw the crosshairs on the screen.
1. Add a function declaration to the FPSHUD class declaration, below GENERATED_UCLASS_BODY():
    /** Primary draw call for the HUD */
    virtual void DrawHUD() OVERRIDE;
2. Implement the DrawHUD override in FPSHUD.cpp.
    void AFPSHUD::DrawHUD()
    {
        Super::DrawHUD();
        // Draw very simple crosshair
        // find center of the Canvas
        const FVector2D Center(Canvas->ClipX * 0.5f, Canvas->ClipY * 0.5f);
        // offset by half the texture's dimensions so that the center of the texture aligns with the center of the Canvas
        const FVector2D CrosshairDrawPosition( (Center.X - (CrosshairTex->GetSurfaceWidth() * 0.5)),
            (Center.Y - (CrosshairTex->GetSurfaceHeight() * 0.5f)) );
        // draw the crosshair
        FCanvasTileItem TileItem( CrosshairDrawPosition, CrosshairTex->Resource, FLinearColor::White);
        TileItem.BlendMode = SE_BLEND_Translucent;
        Canvas->DrawItem( TileItem );
    }
Finally, we need to tell our GameMode to use our custom HUD class when creating players.
1. In The FPSGameMode constructor, add:
HUDClass = AFPSHUD::StaticClass();
2. Add an include statement at the top of FPSGameMode.cpp.
#include "FPSHUD.h"
3. Close the editor, build FPSProject, and open the editor with FPSProject one more time. This is the last step of the tutorial that utilizes Visual Studio, so you can close it now.
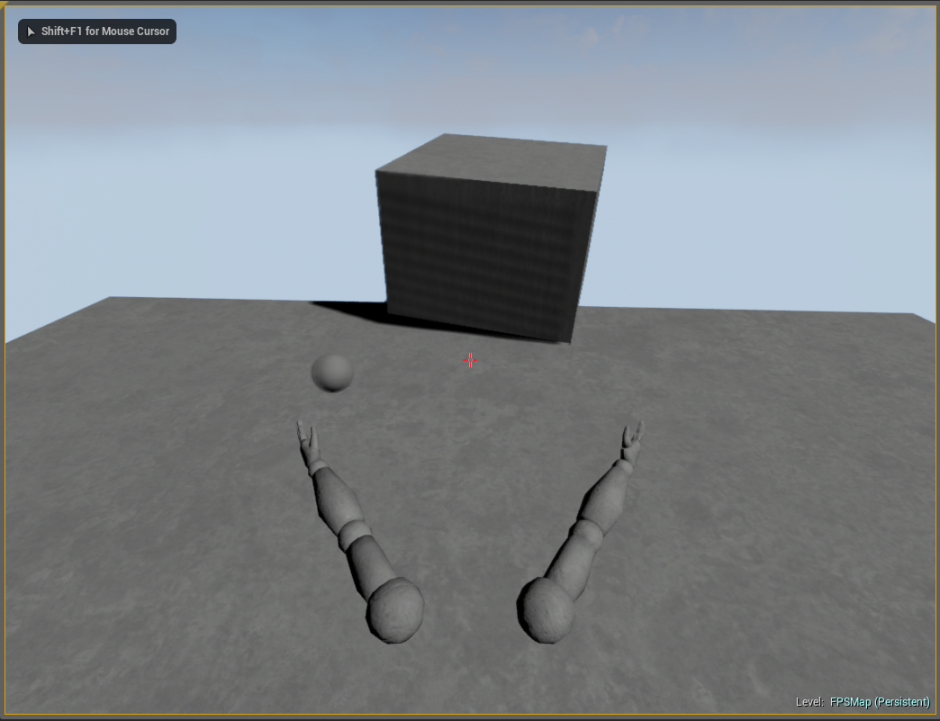
4. Play your game in the editor. At this stage, you can move around, jump, control the camera, and shoot projectiles that interact with physics objects!
Animating Your Character
Now let's get some animation into our game, by animating the first person arms we added a few steps back.
1. Download the following file, and unzip it to get the five animations we will be working with in this step.
2. Back in the editor, navigate to the Game folder in the Content Browser . Right-click in the Content Browser and create a new folder called Animations .
3. Open the Animations folder, then right-click and select Import to /Game/Animations .
4. Navigate to the location you saved the five animations to, select all five, and then click on Open .
5. Select HeroFPP_Skeleton under the Select Skeleton heading, then click on Import.
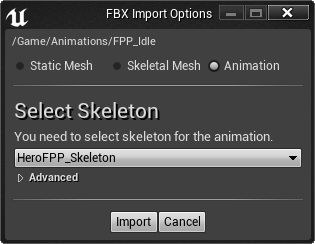
6. Repeat for the other four FBX Import Options prompts.
7. Click on Save in the Content Browser to save your new assets.
Now that we have our assets imported, we need to create an Animation Blueprint.
1. Right click and select Animation > Animation Blueprint .
2. Choose AnimInstance as the Parent Class and choose /Game/HeroFPP_Skeleton as the Target Skeleton .

3. Name it Arms_AnimBP and open it for edit.
Looking at our animation data, we have 5 animations to hook up:
- Idle: When standing still
- Run: When running on the ground
- JumpStart: play once when jumping, then play JumpLoop
- JumpLoop: play while in the air
- JumpEnd: play once when landing, then back to Idle
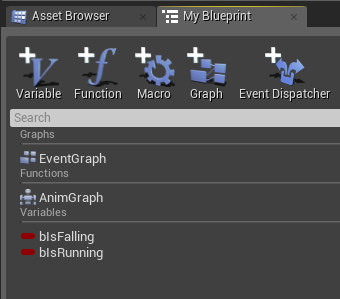
We'll use a state machine to set up these animation states and their transitions. But first, thinking about how to drive this state machine, we are going to need 2 pieces of data - whether the pawn is walking (versus standing still), and whether the pawn is airborne (versus on the ground). Let's add 2 variables to the Blueprint to store this information. For an overview of variable creation, see the Blueprint Variables documentation.
1. In the My Blueprint tab, click on the New Variable button.
2. Make the variable a Boolean called IsRunning .
3. Click on the New Variable button again and add a boolean called IsFalling .
EventGraph
To set these variables properly while the game is running, we'll edit the Event Graph.
1. Open the EventGraph by double-clicking on EventGraph in the My Blueprint tab.
2. Right-click in the graph to bring up the context menu.
3. Type Update in the context menu search, then click on Event Blueprint Update Animation to add that node.

The Event Blueprint Update Animation node will allow us to update our state variables every time the Animation updates, so they are always in sync with the game state.
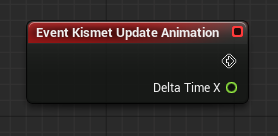
We can find the proper values for our variables by querying the character's CharacterMovementComponent. To get this, we must first get a reference to the animation's owning Character.
1. Right-click in the graph to bring up the context menu.
2. Type Owner in the context menu search, then click on Try Get Pawn Owner to add that node.
3. Drag off the output pin and select Cast to Character from the context menu.

4. Wire the output execution pin on Event Blueprint Update Animation to the input execution pin on Cast to Character .
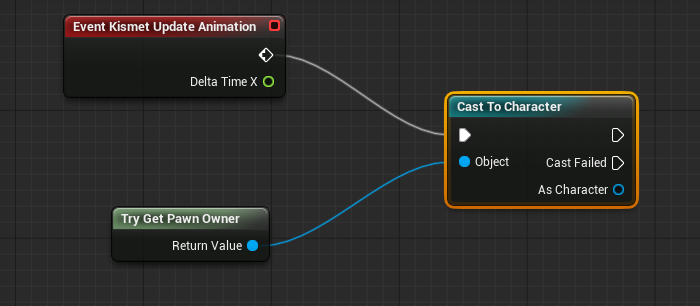
5. Drag off the As Character output pin and select Get Character Movement .

6. Drag off the Character Movement output pin and select Get Movement Mode .

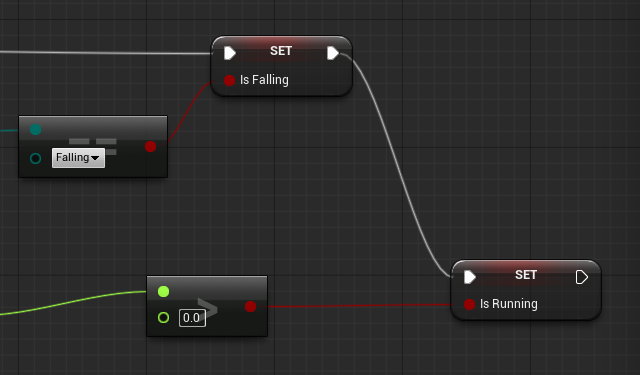
Now we can query the CharacterMovementComponent's MovementMode and set IsFalling to true if we're in the falling state, or false otherwise.
1. Drag off the Movement Mode output pin and select Equal (Enum) .

2. Set the dropdown value on the Equal (Enum) node to Falling .
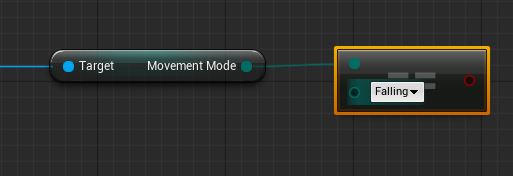
3. Alt-click on IsFalling in the My Blueprint tab and drag into the graph to create a Set Is Falling node.
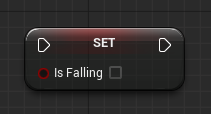
4.Connect the unlabeled output execution pin of the Cast to Character node to the input execution pin of the Set Is Falling node, and connect the output Boolean data pin of the Equal (Enum) node to the input Boolean data pin of the Set Is Falling node.

Then, to determine if we're running or standing still, we can get the character's velocity and set IsRunning to true if the magnitude is >0, or false otherwise.
1. Go back to the Cast To Character node and drag off the As Character pin again. This time, select the Get Velocity node.
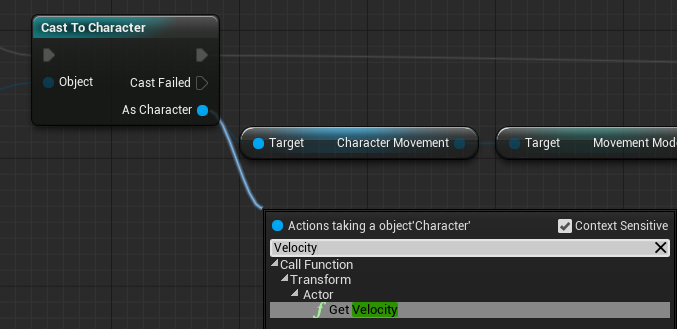
2. If the character is not standing still, the length of its velocity vector will be >0. So, drag off the Return Value vector output pin, and select Vector Length to add that node to the graph.

3.Drag off the Return Value float output pin, and select the > (float) node.

4. Alt-click on IsRunning in the My Blueprint tab and drag into the graph to create a Set Is Running node.
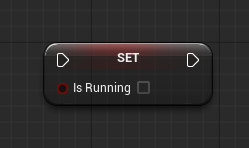
5. Connect the output execution pin of the Set Is Falling node to the input execution pin of the Set Is Running node, and connect the output Boolean pin of the > (float) node to the input Boolean pin of the Set Is Running node.
AnimGraph
Now that our variables are being set properly, we can put together our state machine.
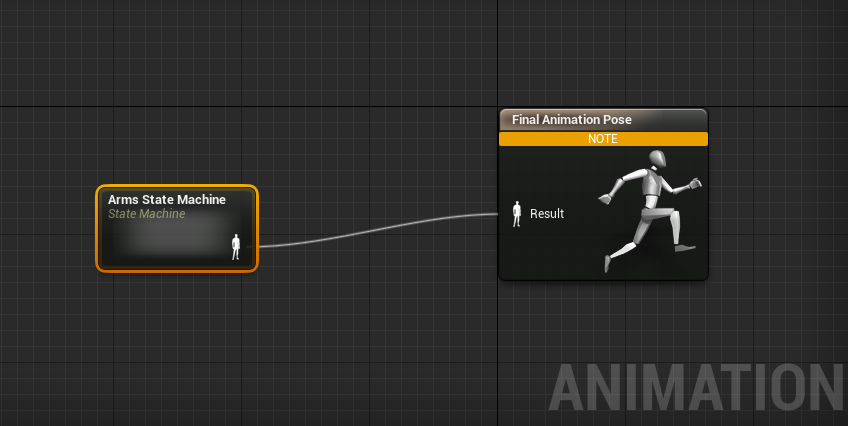
Add State Machine
1. Double-click on AnimGraph in the My Blueprint tab to open it.
2. Right-click the graph and select State Machines >Add New State Machine... in the context menu.
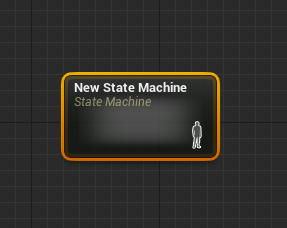
3. Right-click on New State Machine in the My Blueprint tab, and rename the state machine to Arms State Machine .
4. Connect the output execution pin on the Arms State Machine node to the Result input execution pin on the Final Animation Pose node.

5. Double-click the Arms State Machine node to open its graph for editing.
We need to add our 5 states to this graph.
Add States
1. Right-click in the graph and select Add State... from the context menu.

2. Name the state Idle .
3. Double click the state to edit it.
4. Right-click in the graph, and search for "Idle" in the context menu. Click on Play FPP_Idle to insert that node.
5. Connect the output execution pin of the Play FPP_Idle node to the Result input execution pin of the Final Animation Pose node
6. Repeat steps 1-5 for each of the other 4 states:
- Run
- JumpStart
- JumpEnd
- JumpLoop
When you are done, the Arms State Machine graph should look like the below image. Each state should contain the appropriate Play node connected to the Final Animation Pose node.
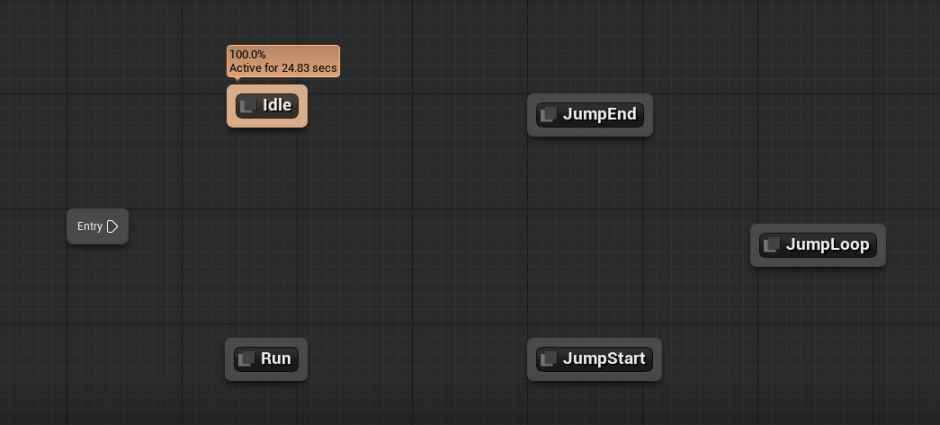
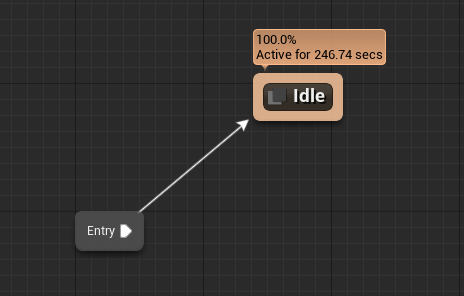
Now, we will wire up the transitions between our states. Start by dragging a wire from the Entry node to Idle state.
Add the Idle to/from Run Transitions
When our character starts moving the state machine should transition from the Idle to the Run state.
1. Drag a wire from the Idle state to the Run state to create a transition.
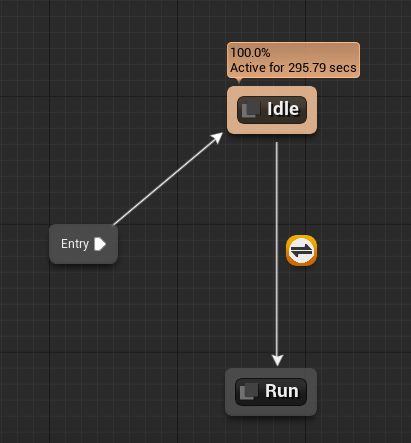
2. Double click the transition to edit it. Control-click on IsRunning in the My Blueprint tab and drag into the graph to create a Get Is Running node.
3. Connect the output pin on the Get Is Running node to the input Can Enter Transition pin on the Result node.
When our character stops moving the state machine should transition from the Run state to the Idle state.
1. Return to the Arms State Machine graph, and drag a wire from the Run state to the Idle state.
2. Double click the transition to edit it. Control-click on IsRunning in the My Blueprint tab and drag into the graph to create a Get Is Running node.
3. Drag off the output Boolean pin on the Get Is Running node and create a Not Boolean node.
4. Connect the output pin on the Not Boolean node to the input Can Enter Transition pin on the Result node.

Add the Idle to JumpStart Transition
1. Return to the Arms State Machine graph, and drag a wire from the Idle state to the JumpStart state.
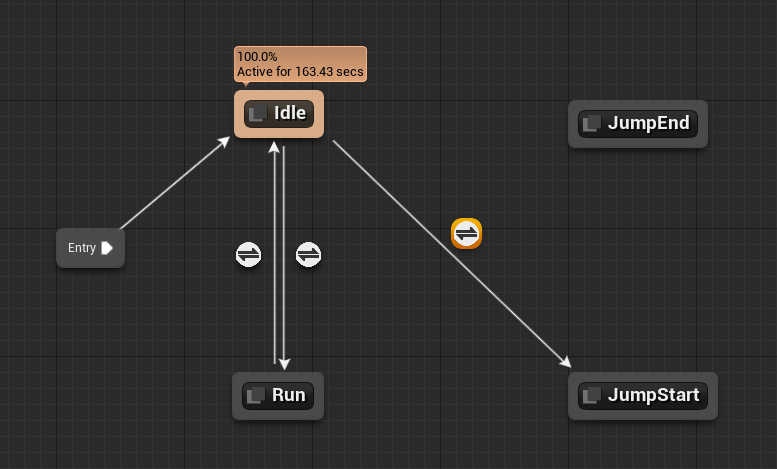
2. Double click the transition to edit it. Control-click on IsFalling in the My Blueprint tab and drag into the graph to create a Get Is Falling node.
3. Connect the output Boolean pin on the Get Is Falling node to the input Boolean Can Enter Transition pin on the Result node.

Add the Run to JumpStart Transition
1. Return to the Arms State Machine graph, and drag a wire from the Run state to the JumpStart state.
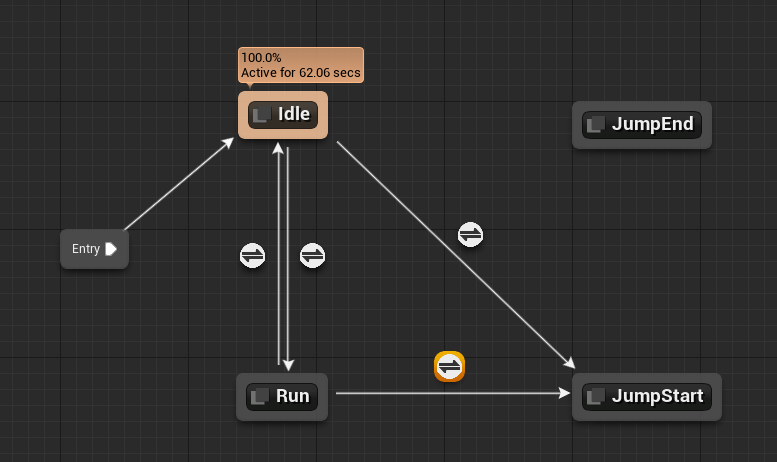
2. Double click the transition to edit it. Control-click on IsFalling in the My Blueprint tab and drag into the graph to create a Get Is Falling node.
3. Connect the output Boolean pin on the Get Is Falling node to the input Boolean Can Enter Transition pin on the Result node.

Add the JumpStart to JumpLoop Transition
1. Return to the Arms State Machine graph, and drag a wire from the JumpStart state to the JumpLoop state.
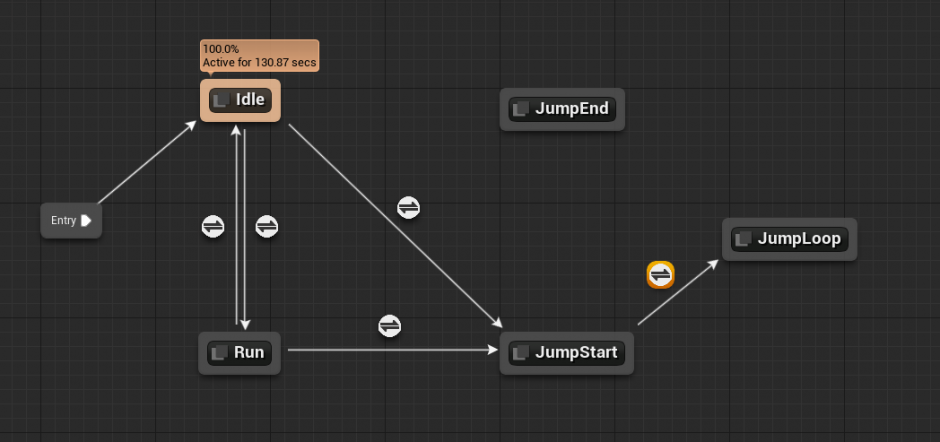
2. Double click the transition to edit it. For this transition, we want it to happen when the JumpStart animation is nearly finished. Right-click in the graph, then search for and select the TimeRemaining for 'FPP_JumpStart' node.
3. Drag off of the Time Remaining output pin, and add a <= (float) node using the context menu.
4. Enter 0.1 in the other input field on the <= (float) node, and then wire the Boolean output pin from that node to the Can Enter Transition input pin on the Result node.

Add the JumpLoop to JumpEnd Transition
1. Return to the Arms State Machine graph, and drag a wire from the JumpLoop state to the JumpEnd state.
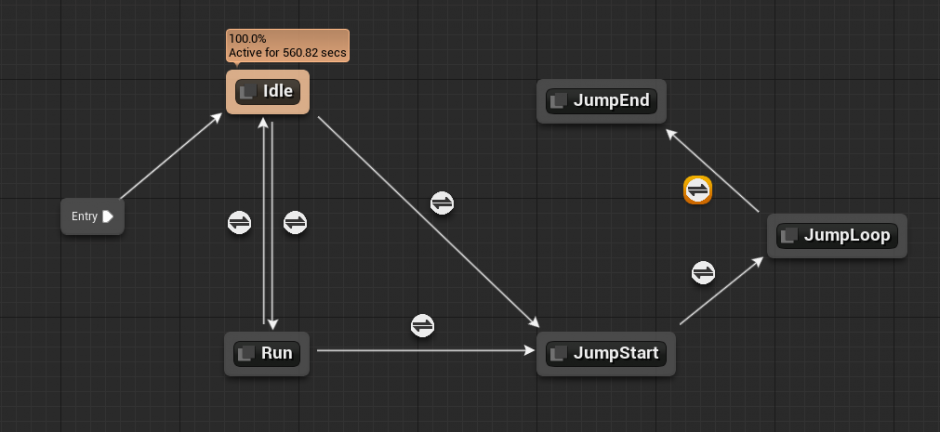
2. Double click the transition to edit it. Control-click on IsFalling in the My Blueprint tab and drag into the graph to create a Get Is Falling node.
3. Drag off the output Boolean pin on the Get Is Falling node and create a Not Boolean node. Connect the output Boolean pin on the Not Boolean node to the input Boolean Can Enter Transition pin on the Result node.
Add the JumpEnd to Idle Transition
1. Return to the Arms State Machine graph, and drag a wire from the JumpEnd state to the Idle state.
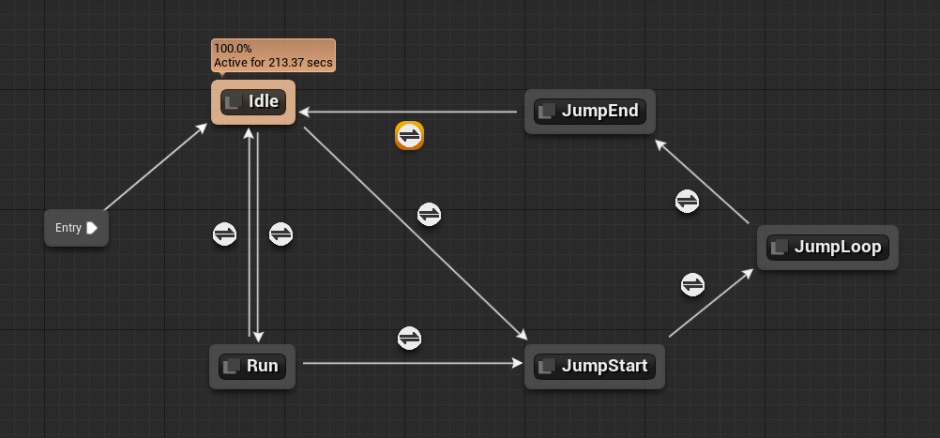
2. Double click the transition to edit it. For this transition, we want it to happen when the JumpEnd animation is nearly finished. Right-click in the graph, then search for and select the TimeRemaining for 'FPP_JumpEnd' node.
3. Drag off of the Time Remaining output pin, and add a <= (float) node using the context menu.
4. Enter 0.1 in the other input field on the <= (float) node, and then wire the Boolean output pin from that node to the Can Enter Transition input pin on the Result node.

Associate the Animation Blueprint with the Character Blueprint
1. Compile and save the Arms_AnimBP Animation Blueprint, then close it.
2. Navigate to the Blueprints folder in the Content Browser , then open the BP_FPSCharacter Blueprint.
3. In Defaults mode, find the Animation section, and then the FirstPersonMesh subsection. Set the AnimationBlueprint for the FirstPersonMesh to the Arms_AnimBP Animation Blueprint we just made.
4. Also in Defaults mode, change the FirstPersonMesh transform to {0,0,-150} for translation and {0,0,0} for rotation.
5. Compile and save the Blueprint, then close it.
6. Play your game in the editor. Your arms will be animated, and will transition through their animations as you play. You have completed the FPS tutorial!
- Note : Please make sure that you have play in selected viewport checked instead of simulate before pressing the play button. More information can be found here