Exporting the Mannequin Skeleton from Unreal Engine 4 to Blender and Re-importing
Contents
Overview
Author:
Searching online, I see many (like me) have wanted to work on characters in Blender using the Mannequin skeleton, but there are problems with doing this. The older versions of Unreal it just doesn’t work, apparently, but the later versions, I got it to mostly work by searching online, through the Udemy Blender Character Creator course, and through lots of trial-and-error.
I am using Unreal Engine version 4.18, but it should be similar in recent engine versions. I'm also using Blender 2.79, again should work in recent Blender versions (2.8 and above is supposed to be a major change in Blender so it might fail there).
The first job is to export the mannequin so it can be used in Blender. Yeah, that’s 18 steps, but then the other jobs take lots of steps too…. This is not really a quick-and-easy job despite the humor in the next heading.
Export the Mannequin in 18 easy steps!
- Start with a UE4 project, an existing one or create a new one.
-
Download, if you don’t already have it, the Animation Starter Pack available for free in the Marketplace.
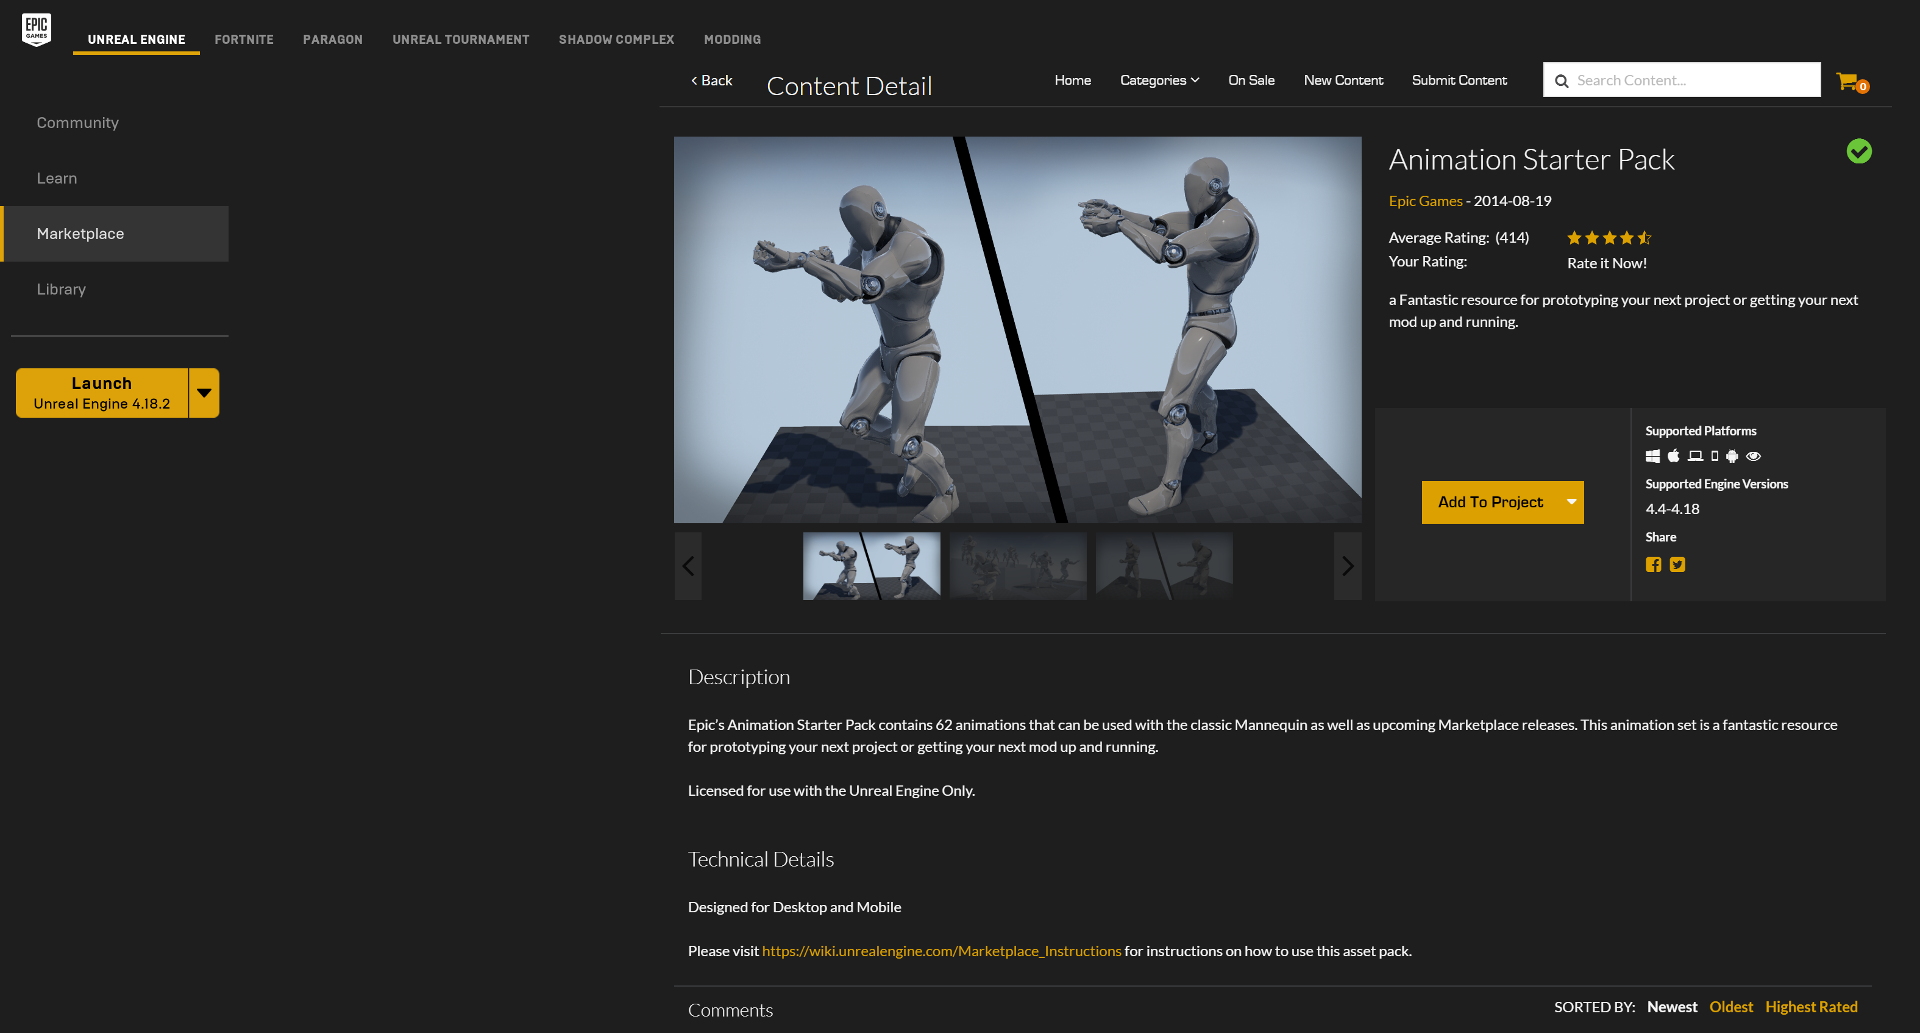
- In the Epic Games Launcher, find the Animation Starter Pack in your vault and click Add to Project, and select the project you have created or chosen to use.
- Open your project. In the content directory, you should now see an AnimStarterPack folder.
- Navigate to the folder Content/AnimStarterPack/UE4_Mannequin/Mesh, then right-click the SK_Mannequin asset in the content browser. Select Asset Actions→ Export.
- Choose an appropriate directory and name (such as SK_Mannequin.fbx).
-
An FBX Export Options window will appear. Blender uses FBX 7.4 which is the same as FBX 2014 (7.5 == 2015, 7.6==2016, and so on). So, change Fbx Export Compatibility to FBX 2014. All other options can be left as default. Unchecking Level of Detail and Collision should be harmless (I don’t think they have any effect on a skeletal mesh).
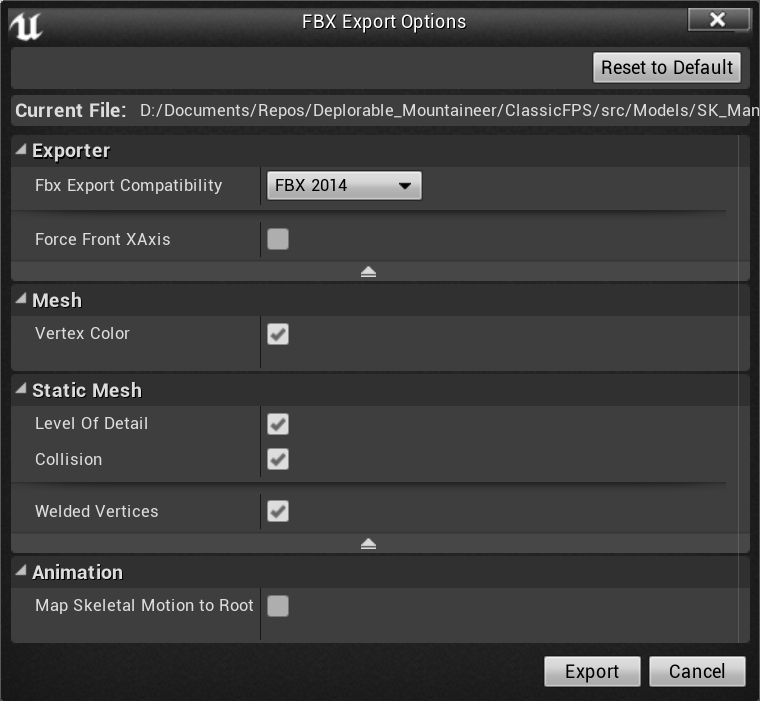
- Click the Export button.
- Open Blender to a new scene and delete the default cube.
- In the menu bar at the top (assuming the default layout), select File→Import→FBX (.fbx).
- You will see a screen with (by default at the lower-left corner) an Import FBX panel.
-
Select the Main tab in this panel and keep the default values, which look like this.
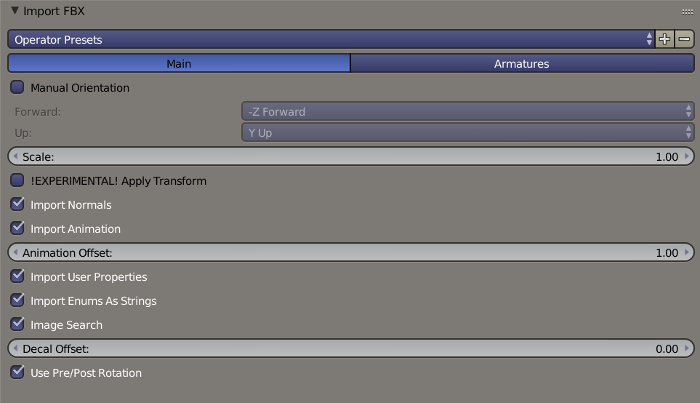
-
Click the Armatures tab. A few settings do have to be changed from the defaults: UE4’s bone axes are a little different from the Blender default. Note changing the axes is optional—you might actually prefer the defaults! (I actually do, but googling shows many don’t). Of course, later when you export FBX from blender, make sure the axes settings are the same as the import axes settings!
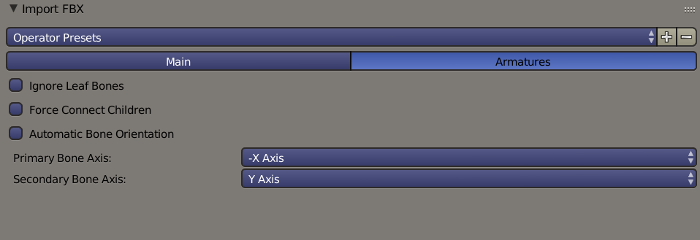
- Optionally, click the plus sign (+) to the right of Operator Presets to save these settings, giving it a name like UE4. Then henceforth you can load the settings instantly by clicking on Operator Presets and selecting UE4 or whatever you named it.
- Navigate to the file you just exported from UE4 and select it, then click Import FBX.
- The model should appear in Blender. You might have to zoom to see it: It is 1.927 blender units high. Verify the skeleton is correct by selecting one of the bones (there are a few huge IK bones that are easy to select) to select the armature, and then in the Properties panel (by default to the right) with the Armature tab (looks like a little man with arms stretched out and a wide stance) selected, check the X-Ray box in the Display section. Annoyingly (and I know no workaround), the left-side bones are oriented in the opposite direction from the right-side bones. Also, while the bones are parented correctly, they are not actually connected—leave it like this, since “fixing” it will cause problems, as I was able to verify.
- One annoying change has to be made. The importer parents the armature to an empty. In the Outliner view, if you expand a couple levels, you will see the hierarchy with an empty having an armature child, having a mesh child.
- There is an SK_Mannequin empty, and its child is the “root” armature, and its child is the SK_Mannequin.001 (or something like that—the .001 might change) mesh. The empty is a problem: when you export from Blender and re-import into UE4, the empty turns into a new root bone and that fouls everything up. Don’t just delete it, that will not keep the transform of the children. Instead, select the “root” armature, then click (with the cursor in the 3D view window, and do this in Object mode) ALT-P, then select Clear and Keep Transformation. Now, you can delete the empty.
Now, you can work on your character. You probably want to replace the mesh with your own. I recommend not moving the bones around in edit mode or Pose mode or it might confuse Unreal (Edit mode it definitely will, pose mode might impact retargeting). Make your mesh, and parent it to the root armature. Unreal uses vertex groups for rigging, so either select “create empty vertex groups” and manually put vertices in the right groups, or select one of the options to convert bone weights to vertex groups or something like that. Test your rig in pose mode to make sure it still works right! Also unparent the original mannequin from the root armature (keep transformation if you want to keep the mannequin, or just delete the mannequin otherwise—I keep it around during modelling, making it semi-transparent, so you can have a reference for the right humanoid proportions compatible with the rig).
Now that you have your new character with Unreal’s Mannequin rig, you want to get it back into UE4.
But if you are only testing, ignore those last two paragraphs and just re-import the mannequin to see that this works right.
Get Your Character From Blender Into Unreal Engine 4
- Use the A key once or twice to ensure nothing else is selected. Then Ctrl-click in the Outliner to select the Root Armature and all (one) of its children.
- Now that the armature and its child mesh are selected, in the menu bar, select File→Export→FBX (.fbx).
-
To export properly, lots of export settings must be changed. Here they are (and optionally, save them as a preset so you can select these settings instantly in the future). There are more tabs to select in the export dialog than in the import dialog: Main, Geometries, Armatures, and Animation. (the last is relevant only if you are exporting animations). Note if you used the default axes for importing FBX, you must use those same axes settings for exporting FBX.
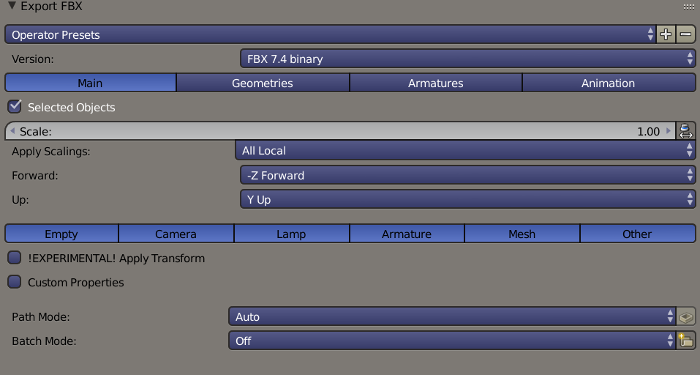
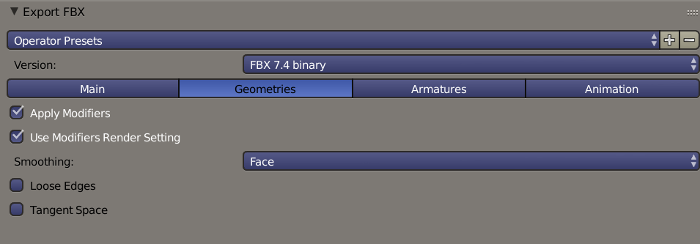

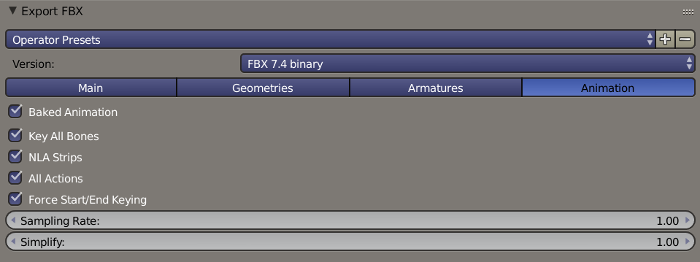
- Switch to an appropriate directory and choose a name to save the .fbx file to. For the test, the author chose SK_Mannequin2.fbx so as not to overwrite the original mannequin export.
- In Unreal, in the Content Browser, click the Import button.
- Navigate to the proper directory and select the file to import (such as SK_Mannequin2.fbx). Then click Open.
- The FBX Import Options window pops up. Most of the default values can be left as-is but here are some changes.
- There are two ways that can work now. If you made significant changes to the character, you might have no choice but to use the annoyingly complex Option 2. If not, the simpler Option 1 can be done. So now we fork and exec two procedures. If you try Option 1 and it fails, delete the imported assets, redo the steps in this section, and then go to Option 2.
Completing the Import into Unreal, Option 1: using the same Mannequin skeleton
-
Select the FBX Import Options as follows (mostly the defaults, a few changes):
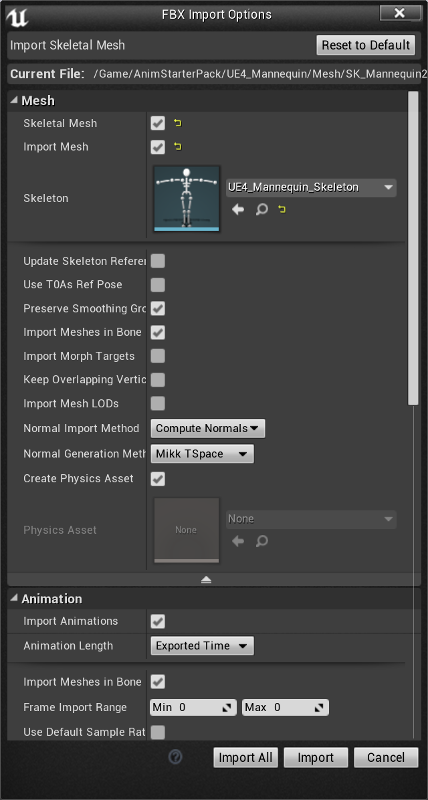
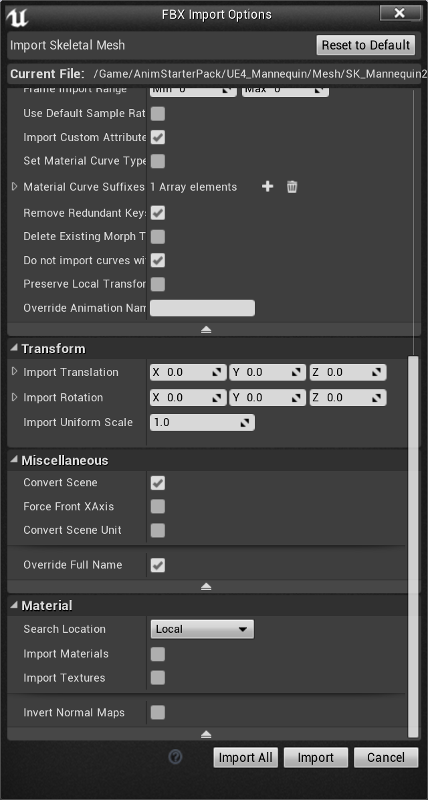
- As you see, this option imports and keeps the old skeleton. Click Import All, and look at your new assets (e.g. SK_Mannequin2 and SK_Mannequin2_PhysicsAsset). Open these up and make sure they look right. You will have to set the materials appropriately on the mesh, or skip that if you are just testing.
- To really test, navigate to Content/AnimStarterPack and find the blueprint UE4ASP_Character. Drag it into the scene.
- With the character selected in the scene, go to the Details panel (by default to the right),and select the Mesh component near the top of the panel in the Components section.
- Below the Transform and Animation sections, there is a Mesh section. Change the skeletal mesh from SK_Mannequin to your new mesh (e.g. SK_Mannequin2). When you play the game, the character should be in the idle pose, breathing and posed to hold a weapon. Optionally, set the character up as your game pawn and try that too (advanced topic). Also, go to the Content/AnimStarterPack directory and open several of the animations files and look at the animations and make sure arms aren’t being ripped out of sockets, head screwed on backward, etc.
- If your character is too different from the Mannequin, you will have problems, arms pulling out of sockets, things like that. In that case, Option 2 needs to be done instead, so delete your character from the scene, save the scene, then delete the assets that were imported (e.g. SK_Mannequin2 and SK_Mannequin2_PhysicsAsset), and start over with importing, but go to option 2 instead. If you get warning messages trying to delete, you might have to quit and restart the UE4 editor and possibly fix up redirectors as well. Ultimately, I had to ignore an “Asset still in memory” kind of error and just force delete, and luckily, it didn’t crash, but I then exited and restarted the editor just to be sure.
Completing the Import into Unreal, Option 2: Regenerating and retargetting the skeleton
-
Select the FBX Import Options as follows:
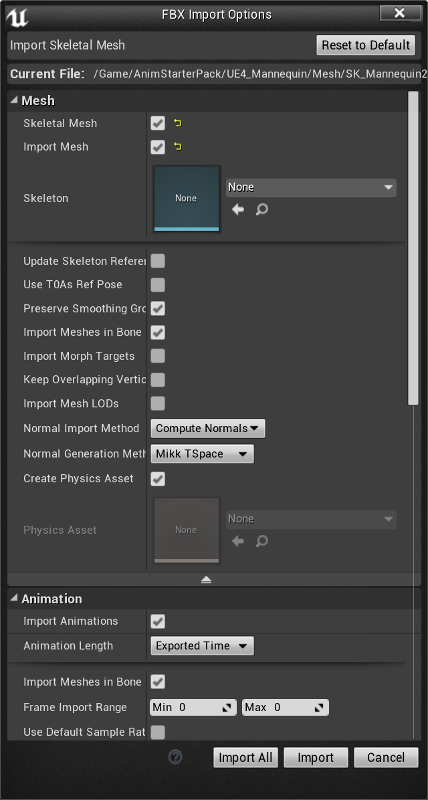

- As you see, this option imports with no skeleton selected, so a new one is generated from the rig. Click Import All, and look at your new assets (e.g. SK_Mannequin2 and SK_Mannequin2_PhysicsAsset and SK_Mannequin2_Skeleton). Open these up and make sure they look right. You might have to set the materials appropriately on the mesh.
- You can optionally do a quick check now, optionally, to see if this character “accepts” the original mannequin skeleton. To do that, right click the mesh asset (e.g. SK_Mannequin2) and select Skeleton→Assign Skeleton, then select the original SK_Mannequin_Skeleton. Then follow steps 3, 4, and 5 of Option 1 to see if it works. If so, you can stop here, relieved you don’t have to go into the weeds below. If not, change the skeleton back to the generated skeleton (e.g. SK_Mannequin2_Skeleton).
- Now, let us set up retargeting for this skeleton. Open up the skeleton asset (e.g. SK_Mannequin2_Skeleton).
- In the toolbar, click the Retarget Manager icon which looks like a small man standing behind a larger man, and a curved arrow goes from the smaller man to the larger man’s head.
- In the Retarget Manager panel, click Add New Retarget Source, and in the popup, select the skeleton (e.g. SK_Mannequin2_Skeleton). Click some blank area to accept it.
- In the Setup Rig section, click the Select Rig selector and choose the Select Humanoid Rig option.
- In the list that opens up below, check that the source and target bones correspond correctly. They probably will. You can change anything that doesn’t match (e.g. if you deleted a bone or added a new bone to the rig in Blender, which can confuse the retargeter).
- Click the Show Advanced button above the list, and check that the advanced bone sources and targets correspond. Be sure to save the skeleton or later steps will fail. You have now set up retargeting for the new skeleton and can close the skeleton editor.
- You also have to set up retargeting for the original skeleton. Find it in Content/AnimStarterPack/UE4_Mannequin/Mesh/UE4_Mannequin_Skeleton and open it, then repeat steps 5, 6, 7, 8, and 9, except with this skeleton instead of the newly generated one. Be sure to save the skeleton or later steps will fail. You have now set up retargeting for the original skeleton and can close the skeleton editor.
- If you wish to use existing animations for the Mannequin, you now need to retarget them to the new skeleton. This is not necessary if you are creating your own animations in Blender. The next section shows how to do this. This next section is not necessary at all for Option 1 that uses the original mannequin skeleton.
Retargeting Animations from the Original Mannequin Skeleton to the New Skeleton Generated in Option 2 (Advanced Topic)
These steps are needed for Option 2, but not for Option 1.
- Navigate to Content/AnimStarterPack in the Content Browser of the Unreal Engine 4 Editor. We shall retarget all the animations. We cannot retarget blueprints or maps or folders so we skip Showcase (a map), and UE4ASP_Character (an actor blueprint) and UE4ASP_HeroTPP_AnimBlueprint (an animation blueprint) and the UE4_Mannequin folder. Select every asset in the folder but those four (one way to do this is click a blank area in the Content Browser to make it active, then type CTRL-A to select everything, then use CTRL-Click to deselect the four unwanted items). Right click on any one of the selected assets and select Retarget Anim Assets→Duplicate Anim Assets and Retarget. There will be a popup window.
- In the Select Skeleton popup, find your newly generated skeleton and select it. (if it is not there, try closing and restarting Unreal editor and start with step 1 again).
- You should see your new character appear in the rightmost box. If you didn’t change the pose of the bones, it should be posed just like the Mannequin in the leftmost box. If it is blank, it probably is OK since UE4 is stubborn about refreshing. Closing and restarting Unreal Editor should fix that.
- Click the Change button at the lower-right corner of the popup. Then select a directory for the new retargeted animations to go. You should probably create a new folder (right click an existing folder in the list and click New Folder and give it an appropriate name) for them rather than mix them with the old animations, which would be confusing. Click OK when you have the desired folder selected.
- Consider adding a prefix or suffix to the new names to make it easier to tell which is which in the future. I strongly recommend this.
- Click the “Retarget” button. It happens fast, couple of seconds.
- Navigate to the folder you selected for the new retargeted animations. In the menu bar, select File→Save All to save them all.
- Click to open a few animations and make sure they look right. (sometimes, depending on how much you changed the character from the original mannequin, it just can’t be made to work and you need to create your own animations in Blender.) If all is well, arms will not pull out of sockets, the head won’t be backward, legs will not be above the head, and so on.
- Advanced: I’m not going to walk you through this, it’s very involved—but you probably want to use this new character in a game or something. You would need to duplicate the UE4ASP_HeroTPP_AnimBlueprint, then edit it (very involved...it is complex with lots of parts) to replace the old skeleton with the new skeleton, the old animations with the new animations, etc. (I wish UE4 could retarget anim blueprints automatically!) Alternatively, start from scratch and write a new Anim Blueprint. Then, duplicate and edit the UE4ASP_Character blueprint to make it use the new anim blueprint and the new skeletal mesh character (this is much easier). Test the new UE4ASP_Character actor.