Detailed Account Of Integrating OpenCV Into UE4 With VS2017
Overview
The goal of this tutorial is to illustrate in detail about how to integrate OpenCV into UE 4.17 using the Visual Studio 2017 . This tutorial is mainly based on the great tutorial of Ginku .
I wrote this because I want to give some help to newbies like me, who have difficulty following Ginku's tutorial, and those who want to integrate OpenCV into UE 4.17 using Visual Studio 2017. Also, this tutorial can be useful to those who want to add more functions using OpenCV. I strongly recommend you to read my previous about linking static library to UE4 because it offers an insight into the integration of external library into UE4. Also, my previous deals with many errors you might face, which can be helpful.
Caution: To follow this tutorial, please use OpenCV 3.2.0 and UE4.17 and VS2017 . UE4.17 supports VS2017. The version number of VS2017 is VC15. OpenCV 3.2.0 is compiled with VC14, which is binary-compatible with VC15. Therefore, using other versions of OpenCV, Unreal Engine or Visual Studio might cause error.
Scope & Notes
- You will be able to integrate OpenCV into UE 4.17 and make blueprint node using OpenCV by the end
- I expect you to have, at the very least, a more than cursory level of knowledge about C++, C# and MS Visual Studio 2017
Linking OpenCV in Visual Studios
Before you continue, make sure you are starting from a code project. Go start your UE4 launcher. In your project browser, click new project and select C++ tab . Choose the basic code template. Name your project CV1 . Now generate the project. When your project opens up, go to content browser and right-click the mouse, select new c++ class . An window will open up. Choose Actor as parent class. Name the Actor as 'MyActor'. Unreal Engine will create Binaries folder in your project folder automatically.
Downloading OpenCV 3.2.0
Click here and download OpenCV 3.2.0 . I'm using Windows operating system, so I chose Win pack . Extract the compressed OpenCV file to wherever you want. I did it on my C drive .
Copying the OpenCV Files
In order to begin, all of OpenCV's header files and library files will need to be added to your project’s ‘/ThirdParty’ directory. Do the following:
- Inside the OpenCV install directory you will find the ‘/build/include’ directory. Copy all of the contents of this directory into the ‘[UE4 ProjectRootDirectory]/ThirdParty/OpenCV/Includes’ directory.
Caution: You don't have ThirParty folder by default. So you should create the folders needed by yourself.

- Next, copy the 'opencv_world320.dll' and 'opencv_ffmpeg320_64.dll' files in the ‘/build/x64/vc14/bin’ folder and the 'opencv_world320.lib', files in the ‘/build/x64/vc14/lib’ folder to the ‘[ProjectRootDirectory]/ThirdParty/OpenCV/Libraries/Win64/’ directory.
Note: This process is similar for any version of OpenCV or any third party library. You only need the runtime libraries (not the debug ones with a 'd' appended, such as 'opencv_world320d.dll' unless you need the debug versions).
Adding OpenCV Dependencies
Locate and open your projects module rules file , which should be in your projects ‘Source/[Project Name]’ directory. (It will be in the format of ProjectName.Build.cs ) In this file, we will add the necessary code so that the unreal build tool will include all of the necessary dependencies during build time.
First, be sure to add the following include at the top of the file:
using System.IO;
This lets you use the Path helper class, which is very useful for assembling directory paths!
Inside your ModuleRules class and before the constructor, add the following getter:
private string ModulePath
    {
        get { return ModuleDirectory; }
    }

    private string ThirdPartyPath
    {
        get { return Path.GetFullPath(Path.Combine(ModuleDirectory, "../../ThirdParty/")); }
    }
This is a helpful little function for retrieving the /ThirdParty/ path, and can be very convenient when including more than one third party dependency to a project. Now, add the following function after the constructor:
public bool LoadOpenCV(TargetInfo Target)
{
    // Start OpenCV linking here!
    bool isLibrarySupported = false;

    // Create OpenCV Path
    string OpenCVPath = Path.Combine(ThirdPartyPath, "OpenCV");

    // Get Library Path
    string LibPath = "";
    bool isdebug = Target.Configuration == UnrealTargetConfiguration.Debug && BuildConfiguration.bDebugBuildsActuallyUseDebugCRT;
    if (Target.Platform == UnrealTargetPlatform.Win64)
    {
        LibPath = Path.Combine(OpenCVPath, "Libraries", "Win64");
        isLibrarySupported = true;
    }
    else
    {
        string Err = string.Format("{0} dedicated server is made to depend on {1}. We want to avoid this, please correct module dependencies.", Target.Platform.ToString(), this.ToString()); System.Console.WriteLine(Err);
    }

    if (isLibrarySupported)
    {
        //Add Include path
        PublicIncludePaths.AddRange(new string[] { Path.Combine(OpenCVPath, "Includes") });

        // Add Library Path
        PublicLibraryPaths.Add(LibPath);

        //Add Static Libraries
        PublicAdditionalLibraries.Add("opencv_world320.lib");

        //Add Dynamic Libraries
        PublicDelayLoadDLLs.Add("opencv_world320.dll");
        PublicDelayLoadDLLs.Add("opencv_ffmpeg320_64.dll");
    }

    Definitions.Add(string.Format("WITH_OPENCV_BINDING={0}", isLibrarySupported ? 1 : 0));

    return isLibrarySupported;
}
This function includes all of the required includes and libraries for OpenCV. Now, edit your constructor as follows:
public CV0(TargetInfo Target)
{
	PCHUsage = PCHUsageMode.UseExplicitOrSharedPCHs;

        PublicDependencyModuleNames.AddRange(new string[] { "Core", "CoreUObject", "Engine", "InputCore", "RHI", "RenderCore", "ShaderCore" });

        LoadOpenCV(Target);
}
Be sure to add the InputCore, RHI, and RenderCore engine modules to the public dependency list, we will use these later to create a dynamic texture from the camera feed. The PrivateIncludePaths will allow you to include the OpenCV header files without full paths.
The full code of CV1.Build.cs is as follows:
(You can just copy and paste it in your CV1.Build.cs file. However, if your project name is different from me (CV1), be sure to make your class name and constructor name match your project name.)
using System.IO;
using UnrealBuildTool;

public class CV1 : ModuleRules
{

    private string ModulePath
    {
        get { return ModuleDirectory; }
    }

    private string ThirdPartyPath
    {
        get { return Path.GetFullPath(Path.Combine(ModuleDirectory, "../../ThirdParty/")); }
    }
    //constructor
    public CV1(TargetInfo Target)
    {
        PCHUsage = PCHUsageMode.UseExplicitOrSharedPCHs;

        PublicDependencyModuleNames.AddRange(new string[] { "Core", "CoreUObject", "Engine", "InputCore", "RHI", "RenderCore", "ShaderCore" });

        LoadOpenCV(Target);
    }

    public bool LoadOpenCV(TargetInfo Target)
    {
        // Start OpenCV linking here!
        bool isLibrarySupported = false;

        // Create OpenCV Path
        string OpenCVPath = Path.Combine(ThirdPartyPath, "OpenCV");

        // Get Library Path
        string LibPath = "";
        bool isdebug = Target.Configuration == UnrealTargetConfiguration.Debug && BuildConfiguration.bDebugBuildsActuallyUseDebugCRT;
        if (Target.Platform == UnrealTargetPlatform.Win64)
        {
            LibPath = Path.Combine(OpenCVPath, "Libraries", "Win64");
            isLibrarySupported = true;
        }
        else
        {
            string Err = string.Format("{0} dedicated server is made to depend on {1}. We want to avoid this, please correct module dependencies.", Target.Platform.ToString(), this.ToString()); System.Console.WriteLine(Err);
        }

        if (isLibrarySupported)
        {
            //Add Include path
            PublicIncludePaths.AddRange(new string[] { Path.Combine(OpenCVPath, "Includes") });

            // Add Library Path
            PublicLibraryPaths.Add(LibPath);

            //Add Static Libraries
            PublicAdditionalLibraries.Add("opencv_world320.lib");

            //Add Dynamic Libraries
            PublicDelayLoadDLLs.Add("opencv_world320.dll");
            PublicDelayLoadDLLs.Add("opencv_ffmpeg320_64.dll");
        }

        Definitions.Add(string.Format("WITH_OPENCV_BINDING={0}", isLibrarySupported ? 1 : 0));

        return isLibrarySupported;
    }
}
Right-click your project on your solution explorer, click Debug - Start new instance. Now, your project should successfully compile with OpenCV included within the engine build! However, there is one more thing that needs to be included before you can use OpenCV's function inside your UE4 editor.
Caution: If your build fails with 'cannot open opencv_world320.lib' error, please make sure that you have made correct folder structure and included all the header files and library files as I mentioned above. In my case, I forgot to make 'Win64' folder under the 'Libraries' folder. After I created 'Win64' folder under 'Libraries' folder and included all the dlls and libs, I was able to solve my problem.
Copying the DLL's to the Build
This stage is very important! So don't forget to follow this stage, unless you can't make your UE4 work with OpenCV.
Before your project will run with any OpenCV code, you will first need to add all of the dynamically linked library (.dll) files that you use to your editor’s bin folder. Your editor will typically be a 64-bit application, so copy all of the .dll files (opencv_world320.dll and opencv_ffmpeg320_64.dll) from the OpenCV’s 64 bit bin folder (full directory shown above) and paste them inside the ‘[ProjectRootDirectory]/Binaries/Win64’ directory.
Note: These DLL's should also be included with any distributions of the project (such as when packaging your game/project), by including them in the same directory as the project's executable (MY_PROJECT.exe).
Fixing Library Collisions
There is a collision between the OpenCV3 library and UE4. To fix this, comment out lines ~51 to ~55 and line ~852 of the utility.hpp header file in the '[ProjectRootDirectory]\ThirdParty\OpenCV\Includes\opencv2\core' directory.
// NOTE: The OpenCV 'check' function has been commented out, as it conflicts with UE4 check - see line ~852
//#if defined(check)
//#  warning Detected Apple 'check' macro definition, it can cause build conflicts. Please, include this header before any Apple headers.
//#endif

...

//bool check() const;
Configuring Include Directory
Open your Project Properties and go to Configuration Properties -> VC++ Directories section. Add ..\..\ThirdParty\OpenCV\Includes to Include Directories tab.
Adding a WebcamReader Class
You are now ready to launch an instance of your editor and start using OpenCV! Right click the project name in your solution explorer, and select Debug > Start new instance. If you get an error about the os being unable to load your dll, check out the discussion page. Once the editor loads, select File > New C++ Class… and select the ‘Actor’ parent class. Press Next, name the actor ‘WebcamReader’ and press Create Class. Once Unreal has finished adding the new actor, the new header and source files will be opened inside Visual Studios. Add the following code to each of them:
Header
// A simple webcam reader using the OpenCV library
// Author: The UE4 community & Ginku & Mintchococookie

#pragma once

#include "opencv2/core.hpp"
#include "opencv2/highgui.hpp"
#include "opencv2/imgproc.hpp"
#include "opencv2/videoio.hpp"
#include "CoreMinimal.h"
#include "GameFramework/Actor.h"
#include "Runtime/Engine/Classes/Engine/Texture2D.h"
#include "WebcamReader.generated.h"

UCLASS()
class CV1_API AWebcamReader : public AActor
{
	GENERATED_BODY()

public:
	// Sets default values for this actor's properties
	AWebcamReader();

	// Called when the game starts or when spawned
	virtual void BeginPlay() override;

	// Called every frame
	virtual void Tick(float DeltaSeconds) override;

	// The device ID opened by the Video Stream
	UPROPERTY(BlueprintReadWrite, EditAnywhere, Category = Webcam)
		int32 CameraID;

	// The operation that will be applied to every frame
	UPROPERTY(BlueprintReadWrite, EditAnywhere, Category = Webcam)
		int32 OperationMode;

	// If the webcam images should be resized every frame
	UPROPERTY(BlueprintReadWrite, EditAnywhere, Category = Webcam)
		bool ShouldResize;

	// The targeted resize width and height (width, height)
	UPROPERTY(BlueprintReadWrite, EditAnywhere, Category = Webcam)
		FVector2D ResizeDeminsions;

	// The rate at which the color data array and video texture is updated (in frames per second)
	UPROPERTY(BlueprintReadWrite, EditAnywhere, Category = Webcam)
		float RefreshRate;

	// The refresh timer
	UPROPERTY(BlueprintReadWrite, Category = Webcam)
		float RefreshTimer;

	// Blueprint Event called every time the video frame is updated
	UFUNCTION(BlueprintImplementableEvent, Category = Webcam)
		void OnNextVideoFrame();

	// Change OpenCV operation that will be applied to every frame
	UFUNCTION(BlueprintCallable, meta = (DisplayName = "Change Operations", Keywords = "Change Operation"), Category = Webcam)
		void ChangeOperation();


	// OpenCV fields
	cv::Mat frame;
	cv::VideoCapture stream;
	cv::Size size;

	// OpenCV prototypes
	void UpdateFrame();
	void DoProcessing();
	void UpdateTexture();

	// If the stream has succesfully opened yet
	UPROPERTY(BlueprintReadOnly, Category = Webcam)
		bool isStreamOpen;

	// The videos width and height (width, height)
	UPROPERTY(BlueprintReadWrite, Category = Webcam)
		FVector2D VideoSize;

	// The current video frame's corresponding texture
	UPROPERTY(BlueprintReadOnly, Category = Webcam)
		UTexture2D* VideoTexture;

	// The current data array
	UPROPERTY(BlueprintReadOnly, Category = Webcam)
		TArray<FColor> Data;

protected:

	// Use this function to update the texture rects you want to change:
	// NOTE: There is a method called UpdateTextureRegions in UTexture2D but it is compiled WITH_EDITOR and is not marked as ENGINE_API so it cannot be linked
	// from plugins.
	// FROM: Dynamic Textures
	void UpdateTextureRegions(UTexture2D* Texture, int32 MipIndex, uint32 NumRegions, FUpdateTextureRegion2D* Regions, uint32 SrcPitch, uint32 SrcBpp, uint8* SrcData, bool bFreeData);

	// Pointer to update texture region 2D struct
	FUpdateTextureRegion2D* VideoUpdateTextureRegion;


};
Source
// A simple webcam reader using the OpenCV library
// Author: The UE4 community & Ginku & Mintchococookie

#include "WebcamReader.h"
#include "CV1.h" //don't forget to include this!
#include <iostream>

using namespace cv;
using namespace std;

AWebcamReader::AWebcamReader()
{
	// Set this actor to call Tick() every frame.  You can turn this off to improve performance if you don't need it.
	PrimaryActorTick.bCanEverTick = true;

	// Initialize OpenCV and webcam properties
	CameraID = 0;
	OperationMode = 0;
	RefreshRate = 15;
	isStreamOpen = false;
	VideoSize = FVector2D(0, 0);
	ShouldResize = false;
	ResizeDeminsions = FVector2D(320, 240);
	RefreshTimer = 0.0f;
	stream = cv::VideoCapture();
	frame = cv::Mat();
}

// Called when the game starts or when spawned
void AWebcamReader::BeginPlay()
{
	Super::BeginPlay();

	// Open the stream
	stream.open(CameraID);
	if (stream.isOpened())
	{
		// Initialize stream
		isStreamOpen = true;
		UpdateFrame();
		VideoSize = FVector2D(frame.cols, frame.rows);
		size = cv::Size(ResizeDeminsions.X, ResizeDeminsions.Y);
		VideoTexture = UTexture2D::CreateTransient(VideoSize.X, VideoSize.Y);
		VideoTexture->UpdateResource();
		VideoUpdateTextureRegion = new FUpdateTextureRegion2D(0, 0, 0, 0, VideoSize.X, VideoSize.Y);

		// Initialize data array
		Data.Init(FColor(0, 0, 0, 255), VideoSize.X * VideoSize.Y);

		// Do first frame
		DoProcessing();
		UpdateTexture();
		OnNextVideoFrame();
	}

}

// Called every frame
void AWebcamReader::Tick(float DeltaTime)
{
	Super::Tick(DeltaTime);

	RefreshTimer += DeltaTime;
	if (isStreamOpen && RefreshTimer >= 1.0f / RefreshRate)
	{
		RefreshTimer -= 1.0f / RefreshRate;
		UpdateFrame();
		DoProcessing();
		UpdateTexture();
		OnNextVideoFrame();
	}
}

void AWebcamReader::ChangeOperation()
{
	OperationMode++;
	OperationMode %= 3;
}

void AWebcamReader::UpdateFrame()
{
	if (stream.isOpened())
	{
		stream.read(frame);
		if (ShouldResize)
		{
			cv::resize(frame, frame, size);
		}
	}
	else {
		isStreamOpen = false;
	}
}

void AWebcamReader::DoProcessing()
{
	// TODO: Do any processing with frame here!

	if (OperationMode == 0) {
		// Apply nothing
	}
	else if (OperationMode == 1) {
		// Apply median blur
		cv::Mat src = frame.clone();
		cv::medianBlur(src, frame, 7);
	}
	else if (OperationMode == 2) {
		cv::Mat src, dst;
		cv::cvtColor(frame, src, cv::COLOR_RGB2GRAY);

		int thresh = 50;

		Canny(src, dst, thresh, thresh * 2, 3);
		cv::cvtColor(dst, frame, cv::COLOR_GRAY2BGR);
	}

}

void AWebcamReader::UpdateTexture()
{
	if (isStreamOpen && frame.data)
	{
		// Copy Mat data to Data array
		for (int y = 0; y < VideoSize.Y; y++)
		{
			for (int x = 0; x < VideoSize.X; x++)
			{
				int i = x + (y * VideoSize.X);
				Data[i].B = frame.data[i * 3 + 0];
				Data[i].G = frame.data[i * 3 + 1];
				Data[i].R = frame.data[i * 3 + 2];
			}
		}

		// Update texture 2D
		UpdateTextureRegions(VideoTexture, (int32)0, (uint32)1, VideoUpdateTextureRegion, (uint32)(4 * VideoSize.X), (uint32)4, (uint8*)Data.GetData(), false);
	}
}

void AWebcamReader::UpdateTextureRegions(UTexture2D* Texture, int32 MipIndex, uint32 NumRegions, FUpdateTextureRegion2D* Regions, uint32 SrcPitch, uint32 SrcBpp, uint8* SrcData, bool bFreeData)
{
	if (Texture->Resource)
	{
		struct FUpdateTextureRegionsData
		{
			FTexture2DResource* Texture2DResource;
			int32 MipIndex;
			uint32 NumRegions;
			FUpdateTextureRegion2D* Regions;
			uint32 SrcPitch;
			uint32 SrcBpp;
			uint8* SrcData;
		};

		FUpdateTextureRegionsData* RegionData = new FUpdateTextureRegionsData;

		RegionData->Texture2DResource = (FTexture2DResource*)Texture->Resource;
		RegionData->MipIndex = MipIndex;
		RegionData->NumRegions = NumRegions;
		RegionData->Regions = Regions;
		RegionData->SrcPitch = SrcPitch;
		RegionData->SrcBpp = SrcBpp;
		RegionData->SrcData = SrcData;

		ENQUEUE_UNIQUE_RENDER_COMMAND_TWOPARAMETER(
			UpdateTextureRegionsData,
			FUpdateTextureRegionsData*, RegionData, RegionData,
			bool, bFreeData, bFreeData,
			{
				for (uint32 RegionIndex = 0; RegionIndex < RegionData->NumRegions; ++RegionIndex)
				{
					int32 CurrentFirstMip = RegionData->Texture2DResource->GetCurrentFirstMip();
					if (RegionData->MipIndex >= CurrentFirstMip)
					{
						RHIUpdateTexture2D(
							RegionData->Texture2DResource->GetTexture2DRHI(),
							RegionData->MipIndex - CurrentFirstMip,
							RegionData->Regions[RegionIndex],
							RegionData->SrcPitch,
							RegionData->SrcData
							+ RegionData->Regions[RegionIndex].SrcY * RegionData->SrcPitch
							+ RegionData->Regions[RegionIndex].SrcX * RegionData->SrcBpp
						);
					}
				}
		if (bFreeData)
		{
			FMemory::Free(RegionData->Regions);
			FMemory::Free(RegionData->SrcData);
		}
		delete RegionData;
			});
	}
}
Note: If your project name is different from me (CV1), you need to change CV1 in the class definition of the header file and the project include in the source file with the your project name.
This class is used as a wrapper for a future unreal blueprint class. It allows you to specify the device ID, target resolution and framerate of the camera, as well as providing a dynamic texture and FColor array of the current frame's pixels and a blueprint native event that is called whenever the next webcam frame is available!
Moving to Blueprints
You can now access your webcam feed in blueprints. From this point forward we will be working in the editor.
Adding the WebcamBillboard Actor
Now that all the code has been included for accessing your webcams, I will now show you how to use the dynamic texture from the WebcamReader actor in a new WebcamBillboard subclass. This time, the code will be implemented in unreal blueprints! Launch the editor again with Debug > Start new instance.
In your choice of directory, right click and add a new blueprint class. At the bottom of the new window, expand ‘All Classes’ and search AWebcamReader and select it as the parent class. Name the new blueprint BP_WebcamBillboard and open it.
Within the viewport, add a cube static mesh component, and name it Billboard . This will be the component that the texture is rendered to.
At the beginning of the game, we will want to create a dynamic material instance and set it to the billboard mesh. Under Variables, click the + button to add a new Material Instance Dynamic type variable. Name the variable as DynamicMaterial .
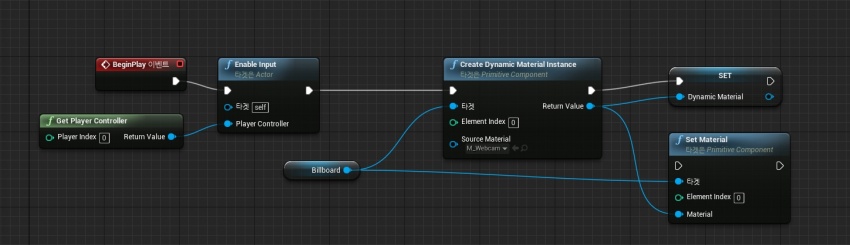
Drag the Billboard component onto the Event Graph, and create a getter node. Drag out from this new getter and create a Create Dynamic Material Instance node and connect the white execution wire to the transparent BeginPlay event (or create one). This creates an special unreal material instance that can be altered at runtime. However, we have not created this unreal material!
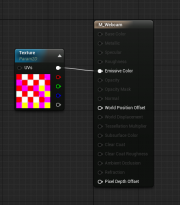
Go back to your content browser, right click and create a new material . Call this material M_Webcam and open it. Click on the M_Webcam node and set the Shading Mode to Unlit . Hold T and left click anywhere in the new graph to create a texture node. You will have to set the default texture to anything (I used T_Ceramic_Tile_M ). Right click this node and convert it to a parameter . Call this parameter Texture and connect its white Float3 pin to the Emissive Color pin on the M_Webcam node. Make sure the save the material!
Now, back in the BP_WebcamBillboard blueprint, select the M_Webcam as the Source Material for the Create Dynamic Material Instance node , and make sure the Element Index is set to 0.
Drag out from the original billboard getter and create a Set Material node. Set the Material pin to the output of the Create Dynamic Material Instance node, and again make sure the Element Index is set to 0.
Finally, drag out the DynamicMaterial variable we created earlier and create a setter . Connect the output of the Create Dynamic Material Instance node to the DynamicMaterial input pin to save a reference of this special material for later use.
We have dynamically set the material of our Billboard mesh, and now we need to update its texture parameter each time a new frame is received. To do this, right click on the Event Graph and create a OnNextVideoFrame event. This event is called in the WebcamReader actor whenever a new frame is read.
Drag out the DynamicMaterial variable and create a getter underneath the new event. Drag out from the getter and create a Set Texture Parameter Value node. Set the Parameter Name to Texture (the name of the texture parameter in the M_Webcam material). Right click on the Event Graph and type VideoTexture to retrieve a reference to the webcam texture provided by the WebcamReader parent class. Connect the output pin of this VideoTexture reference to the Value pin of the Set Texture Parameter Value node. With that, the BP_WebcamBillboard is ready for use!
In case you have difficulty following the description above, I made a video. <youtube> https://youtu.be/xw6VMIStFxA
Adding the WebcamBillboard to a Level
Drag the BP_WebcamBillboard blueprint from the content browser into your level. Orientate and position it however you like, and scale it to a similar scale of your images resolution (about 6.4, 4.8, and 0.5 for my webcam). Now, set the Webcam properties in the detail panel. (I used a Camera ID of 0, Should Resize to false, and Refresh Rate of 2.0) Your Camera ID will determine the camera that renders, it should be 0 unless you have more than one webcam. In the case of a laptop, 0 will probably be the integrated laptop, and 1+ will be any additional webcams. You can now press play to see the results!
Adding More Functions to the Blueprint
Now I am going to add more features to the Blueprint. I want to apply an operation to the video frame, and change the operation to another one whenever I press the 'C' key.
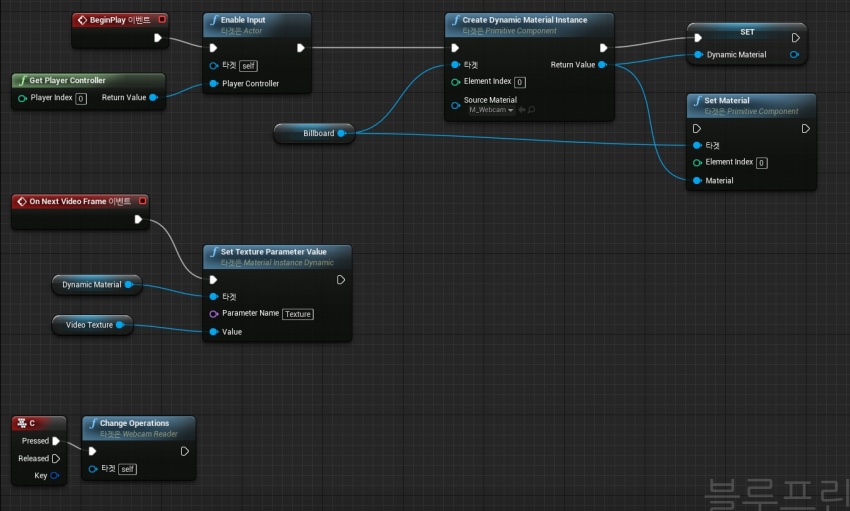
Open BP_WebcamBillboard editor window again. Right click the editor window, search for Enable Input and create the node by click it. This time, right click the editor window, search for Get Player Controller and add the node by click it. Modify the existing connection to BeginPlay node as the picture. Now we can get any input from player!
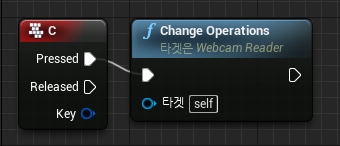
Right click the editor window, search for input c and create the node by click it. Right click the editor window again, search for Change Operations and add the node by click it. Connect the two node following the picture below.
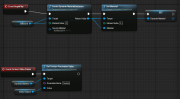
The finished state of your BP_WebcamBillboard should be the same as the following picture.
Everything is ready. Click Compile and then Save your blueprint. We finished adding new feature to our blueprint! Let's start using this newly added function from now on.
Enjoying New Function!
Click the Play button on your UE4 editor. Press C key. Everytime you press your C key, you can see that different operations (default, median filter, Canny edge detection) are applied to your webcam billboard:) I also uploaded the result video below. Enjoy it!
<youtube> https://youtu.be/EC1ZUEV0rxg
More Information
You have finished your long journey. Congratulations. You will be able to integrate OpenCV into UE4 and use functions of OpenCV inside UE4 as you wish.
You can read more about me on my . Have a nice day :).
- Mintchococookie