Creating Vector Fields (Tutorial)
Contents
- 1 Overview
- 2 Authoring Vector fields
- 3 VectorayGen
-
4
Maya Fluids
- 4.1 Installing the 'UE4_FX' Maya shelf and FGA Export Script
- 4.2 Setting up the Maya Fluid Container
- 4.3 Emitting Attributes into the Container and Simulating
- 4.4 Exporting Velocity Values From Maya Fluid Containers
- 4.5 Importing an .FGA File into UE4
- 4.6 Setting up a particle system with a Local Vector Field
- 4.7 Local Vector Field Module Parameters
Overview
In UE4, a vector grid is a 3 dimensional grid sub-divided into individual volume pixels, or 'voxels,' with each voxel storing a velocity vector (in x, y and z). This grid is useful because Cascade can treat it as a field which can influence the motion of particles inside of it. It may help to think of a vector field as a volume in space which contains 'wind' that can affect particles which move through it.
Two types of vector fields exist: Local Vector fields, which live inside a particle system, and global vector fields which live in the world and may affect any particle systems located within its bounding box, if those particle system have the Global Vector Field module's Field Scale parameter set higher than 1.
The focus of this document is authoring a local vector field.
Authoring Vector fields
There is no way to create vector fields in UE4, however there are a few options that allow you to create them outside of the engine.
- VectorayGen - A real time vector field generator made by JangaFX.
- Maya Fluids MEL script
Both of these options are detailed below.
You may author vector fields any way you like but VectorayGen is a straightforward way to generate vector fields, which are exported in the .FGA file (Fluid Grid ASCII) format. This file is a text table which you can easily edit by hand if needed.
The other way is to use Maya fluids. To ease this process, we have written a MEL script which only exports velocity data from Maya's fluid containers and stores them as an .FGA file (Fluid Grid ASCII). Once again, this file is a text table which you can easily edit by hand if need be.
VectorayGen
Creating Vector Fields with VectorayGen and Using them in UE4
If you don't want to edit vector fields with Maya or Blender plugins/scripts, go to https://jangafx.com/software-downloads/ and download an evaluation version of VectorayGen. It is a tool built specifically for editing vector fields in real time. No waiting for fluid simulations and it is easy to learn and use.
VectorayGen is immensely powerful with a built in node editor, real time view port, and the ability to simulate millions of particles and vectors.
<youtube>TGbY0aUVZIM
To see other tutorials for VectorayGen, go here: https://jangafx.com/vectoraygen-starter-tutorial-series/
Maya Fluids
Installing the 'UE4_FX' Maya shelf and FGA Export Script
Note: The Fluid Grid export script contained within this Maya shelf has been tested with Maya 2012 x64.
1. In the shelf pane, click the left hand drop down arrow and select Load Shelf.. :

2. Inside the file browser, navigate to:
[UE4Root]\Engine\Extras\MayaVelocityGridExporter\
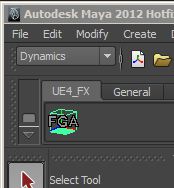
3. Once you click open, you will find a new shelf tab entitled UE4_FX which contains a single button. Clicking on this icon will bring up a dialog box along with various FGA export options.
By default the shelf contains a single button using a placeholder icon. A custom icon is located at
../UE4/Engine/Extras/FX_tools/Maya2012_x64/UE4_FX_Tools/Prefs/Icons/fgaClean.png
if you wish to use it. To install the custom icon, simply copy it to your Maya user preferences directory (e.g., `C:/Users/[User]/Documents/maya/2012-x64/prefs/icon`).
4. The tools to export Maya fluid containers to UE4's fluid grid format are now installed and ready to use.
Setting up the Maya Fluid Container
Creating vector fields in Maya requires the use of a Fluid container.
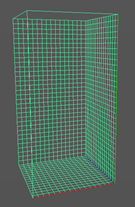
1. Switch to the dynamics major mode and then from the FluidEffects menu, select 'Create 3D Container.' This will drop a Maya fluid container in your perspective viewport. The first thing to do is to select it and then in the Attribute editor, select the 'Keep Voxels Square' checkbox.
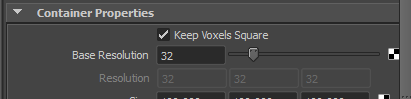
Note: Because UE4's velocity grid cascade module operates on the GPU, Maya fluid containers need to have power-of-2 Resolution values (voxel count), with the maximum voxel count in any one axis being 128.
2. Adjust the scale of the fluid container by going in its properties and changing the size setting:
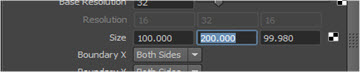
The base resolution now indicates the longest side's resolution, with the other sides resolution being scale proportionally to their relative sizes. Here is an example of a rectangular 16x32x16 grid which adheres to the power of two requirements.
3. Set all the boundary conditions of the grid to **_None_**; allowing fluid simulation to 'exit' the fluid container.
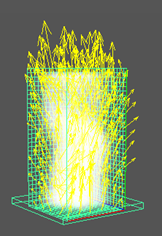
4. Finally we need to enable the display of velocity vectors so we can see the data we want to export to UE4. In the **Display** section of the fluid container, check the **Velocity Draw** checkbox.
Emitting Attributes into the Container and Simulating
An emitter must be added to the fluid container in order to emit a variety of attributes which can disturb the grid values.
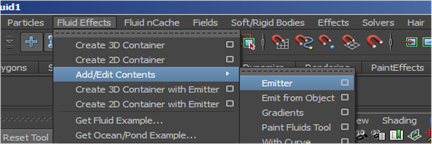
1. Select the fluid container and from the Fluid Effects menu, select add/edit contents > Emitter .
2. In the Emiter Fluid Attributes , set Heat/Voxel/Sec to `250`. This means the emitter will be emitting heat into the container. Heat will cause the density to rise.
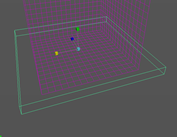
3. Now select the emitter and scale it wider and move it down towards the base of the container.
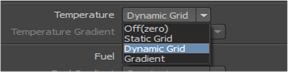
4. In order for the container grid to react to dynamic heat contributions, the Maya fluid container Temperature method must be set to Dynamic Grid . This setting is located on the container grid shape.
5. Now play back the timeline to view the simulation. You should get something similar to this. I have also added some noise to the container attributes. You can do this by changing the velocity swirl, noise and turbulence strength and frequency parameters in the 'Contents Details' section of the fluid container.
6. The result should look similar to this:
Exporting Velocity Values From Maya Fluid Containers
In this example, a single frame of the simulation is exported to use as a static velocity field in UE4.
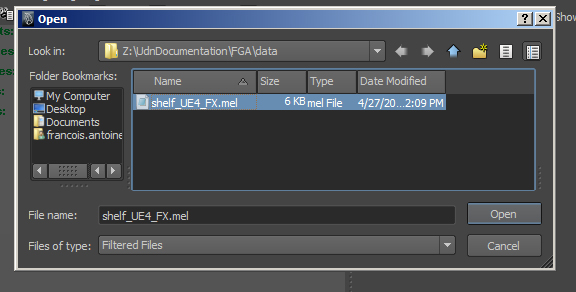
1. Select your fluid container and click on the FGA icon in the **UE4_FX** shelf. The **UE4 Velocity Grid Exporter** dialog box will appear.
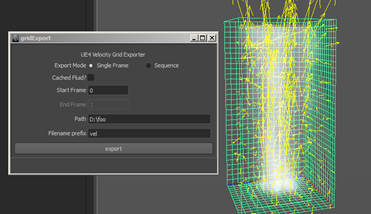
2. Set the start frame that you like, along with the destination folder.
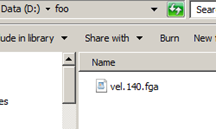
3. Hit export and you will see a file on disk. This is the file you will import into UE4.
Importing an .FGA File into UE4
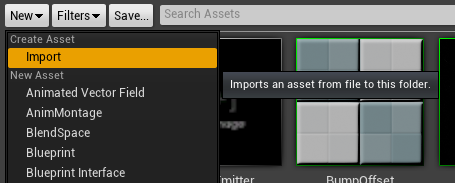
1. Launch UE4, open the Content Browser. Either click the New button and choose _Import_, or right-click and select _import_ from the contextual menu.
2. In the file browser navigate to the FGA that was saved out earlier.
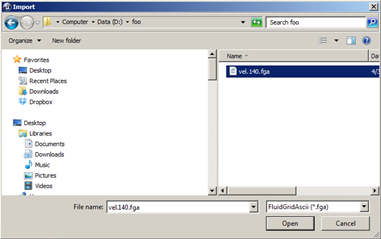
Note: If you have a lot of files in the same directory, you can set the file browser's filter to _Fluid Grid Ascii_.
3. In the Content Browser you should now see a _VectorField Static_ asset.

Setting up a particle system with a Local Vector Field
1. Create a new particle system in the content browser. Once it is created, the Cascade window will appear.
2. Right-click on the black space above the emitter's module and convert the particle system dataType to GPU Sprites .
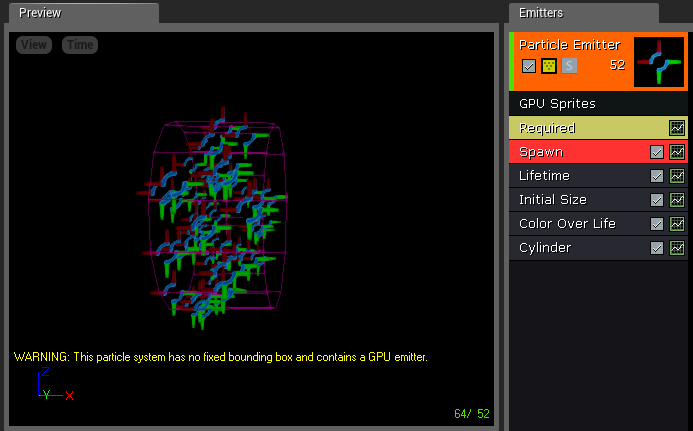
3. Next, add a Cylinder location module with its Height axis set to Y. Increase the Spawn module Rate property to around 50. Then delete the Initial Velocity as the particle motion will come from the local vector field. You should have something similar to this:
4. Right-click below the existing modules and add a local vector field module to the emitter.
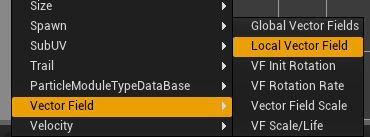
The local vector field module will influence the motion of your particles when they are physically inside the Local vector field module's bounding box.
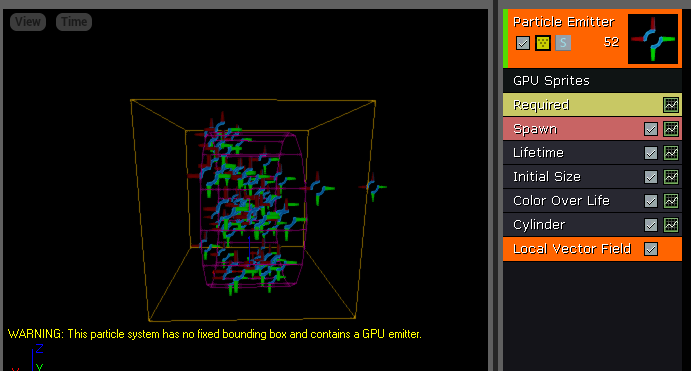
5. Assign the vector field asset to the Vector field slot in the Local vector field cascade module. You may want to visualize the vector field velocities in the viewport by selecting the **View > Vector Fields** inside Cascade's main menu.

6. In its parameters, scale the Vector Fields's relative scale to 2 2 2 and translate the grid using the vector fields gizmo which appears in the Cascade preview window when the Local vector Field module is selected.
7. You should now see the particles moving in the preview window, driven by the Vector field velocities.
Local Vector Field Module Parameters
The Local Vector Field cascade module has 2 main parameters:
Intensity : This is the strength of the Local vector field contribution to the particle's motion Tightness : How closely the particles will follow the velocities stored in the fluid grid. When set to 0, the vector field behaves as a force which adds it velocities to the particles' current velocities. When set to 1, the vector field velocities replace the particle velocities altogether.