Blueprints, Creating C++ Functions as new Blueprint Nodes
Contents
Overview
Original Author: ( )
Dear Community,
This is an explanation of the syntax for a C++ function that you want to also run from blueprints!
BlueprintCallable
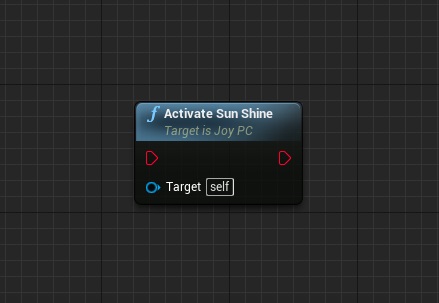
A BlueprintCallable function will have execution pins so that you can chain your C++ functions together in UE4 Blueprints.
/** Activate Fancy New Project-Specific System Created in C++! */
UFUNCTION(BlueprintCallable, Category="SunShine")
void ActivateSunShine();
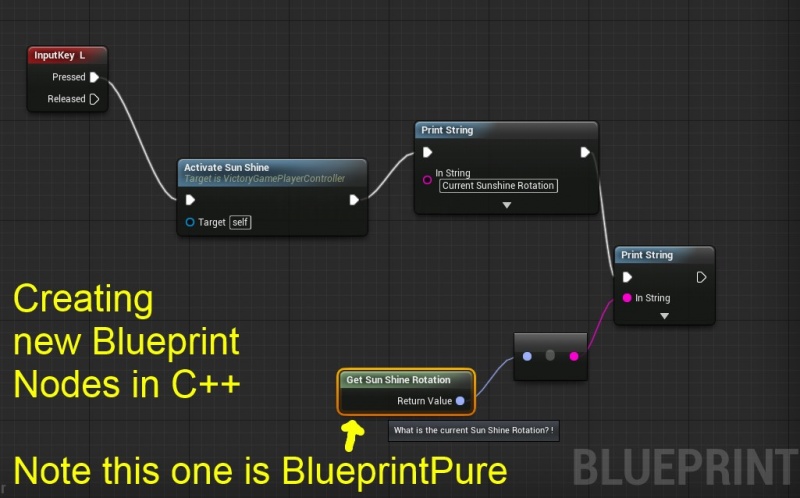
BlueprintPure
A great efficiency for blueprint users is to be able to access data from your C++ system without having to run the exec chain through it. If a function does not modify the game state, which requires a certain ordering for the rest of Blueprint logic and game logic to occurr correctly, then you can use Blueprint pure!
A simple test for BlueprintPure is to use it for accessor functions , which are not modifying any variable data at all.
So if you are wondering if you can make a function BlueprintPure, just ask yourself.
"Is this function entirely just an accessor for data, or doing calculations which have no bearing on the rest of the game state?"
/** What is the current Sun Shine Rotation? ! */
UFUNCTION(BlueprintPure, Category="SunShine")
FRotator GetSunShineRotation();
Static
If your functionality is not for a specific actor, or the functionality relates to a specific actor class but does not use member variables, then you can make the function static so that the BP node will show up anywhere in any BP graph:
/** Log sunshine status from any BP in your entire game code! */
UFUNCTION(BlueprintCallable, Category="SunShine")
static void LogSunShineStatus();
Static With World Context
If you want to use a static BP node anywhere in the game code, but your C++ function wants to modify the state of the game world by creating objects or actors, or performing an action on any instanced data within the game world, then you can pass along a world context object which is an invisible input parameter:
/** Make sure to save off the return value as a global variable in one of your BPs or else it will get garbage collected! */
UFUNCTION(BlueprintCallable, Category = "Victory BP Library", meta = (WorldContext = "WorldContextObject"))
static UPrimitiveComponent* CreatePrimitiveComponent(UObject* WorldContextObject, TSubclassOf<UPrimitiveComponent> CompClass, FName Name, FVector Location, FRotator Rotation);
UPrimitiveComponent* UVictoryBPFunctionLibrary::CreatePrimitiveComponent(
        UObject* WorldContextObject,
	TSubclassOf<UPrimitiveComponent> CompClass,
	FName Name,
	FVector Location,
	FRotator Rotation
){
	if(!CompClass)
	{
		return nullptr;
	}
	//~~~~~~~~~~~~~~~~~

	//using a context object to get the world!
        UWorld* const World = GEngine->GetWorldFromContextObject(WorldContextObject);
	if(!World)
	{
		return nullptr;
	}
	//~~~~~~~~~~~

	UPrimitiveComponent* NewComp = NewObject<UPrimitiveComponent>(World, Name);
	if(!NewComp)
	{
		return nullptr;
	}
	//~~~~~~~~~~~~~

	NewComp->SetWorldLocation(Location);
	NewComp->SetWorldRotation(Rotation);
	NewComp->RegisterComponentWithWorld(World);

	return NewComp;
}
Creating Interface for BP Users To Access New C++ Systems
This is how you can create the interface in c++ for blueprint users to access your C++ systems!
You can write all the core code in c++, and then give the rest of your team the power to access, modify, and utilize your awesome new C++ system!
Activating your new Blueprint
Just adding the code is not enough to have it show in the editor. You need to go to your main project and click on the Compile icon.
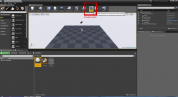
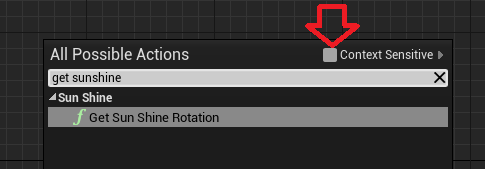
After this you can just right-click in an empty spot in any graph window and type the name of the function, it will show up!
If you don't see the function in the list be sure you have deactivated the "Context Sensitive" option.
The Power of Blueprints
This for me is the real power of blueprints, you are giving your whole team the power of robust new C++ systems, and the ability to use these new systems with the graphical convenience and fast iteration times of blueprints.
Advanced Display (How to Hide Parameters)
How to make hidden parameters:
If you want some parameters to only show if you click the arrow to expand the node (like with the UE4 print string node), then use this!
Here 2 means parameter at index 2 in a list of the function parameters that starts with 0.
UFUNCTION(BlueprintCallable, Category="Fun", meta=(AdvancedDisplay = "2"))
void PerformFunAction(FString Name, int32 Count, bool DebugMode=false);
Advanced options should generally have a proper default value as the user may never expand the node to see what the other options are. That's why I am using DebugMode =false
Enjoy!
Conclusion
Now you know how to make new blueprint nodes!
Enjoy!
( )
Advanced C++ Blueprints
This section is for those that wish to do more advanced blueprints like what are in the core engine. Our incentive for doing this was to make a custom Session set of nodes. We did this by copying the code from the core for the Create Session blueprint node and then changing it.
Of course, you need to decide if making a custom node set is even a good idea. For example a custom session node set is available at https://forums.unrealengine.com/showthread.php?69901-Advanced-Sessions-Plugin and might be more suitable for your purposes than making a custom session your self.
(You do have a copy of the core code from GitHub, right? https://www.unrealengine.com/ue4-on-github )
If you want to find where blueprint nodes are implemented in the core code you look for "CallbackProxy" and "UOnlineBlueprintCallProxyBase". If looking for the blueprint C++ implementation for CreateSession it is in UnrealEngine/Engine/Source/Runtime/Online/OnlineSubsystemUtils/Classes/CreateSessionCallbackProxy.h
- Also BlueprintAsyncActionBase is important. If you are curious about the core blueprint node code, try looking in UnrealEngine/Engine/Source/Runtime/Engine/Classes/Kismet/ and there are the files for things like KismetMathLibrary and the Sqrt blueprint node. Most of those are simple static blueprint calls. I like the headings on these as they show how to do aliases for searching and such...
- /* Returns square root of A*/
- UFUNCTION(BlueprintPure, Category="Math|Float", meta=(Keywords = "square root", CompactNodeTitle = "SQRT"))
- static float Sqrt(float A);
The previous section explained how to do static function single call nodes. Here we describe how to customize nodes that have multiple outputs (like Success and Fail) and wait for results. Network operations and disk read operations can take time and you don't want to stop the game to wait. So instead you start the operation (e.g. the Online subsystem CreateSession call) and then return immediately. Some while later the action is done or fails and you get a Callback to a function saying "hey, it's done" and then your blueprint node can return results and continue on the to the next blueprint node.
-
A Node that waits...
Sequence
The sequence in the core CreateSession code is like this...
- The node gets created when the blueprint loads into memory. UCreateSessionCallbackProxy::UCreateSessionCallbackProxy(const FObjectInitializer& ObjectInitializer)
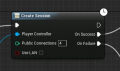
- Some time later your blueprint hits the node with a 'bead' flowing along the white line, and calls the function: CreateSession(UObject* WorldContextObject, class APlayerController* PlayerController, int32 PublicConnections, bool bUseLAN)
- Then the Activate function gets called, and kicks off the session creation. (In our case this is a call to the Online subsystem, which calls the Steam session creation.)
- Some time later Steam responds and OnCreateCompleted gets called, which starts the session
- Some time later again the start gets done and OnStartCompleted gets called.
- OnStartCompleted then decides if you had success of failure and any other data to put on the outputs of the blueprint node. If all is ok then we call OnSuccess.Broadcast(); to "fire a bead" out on the Success white line in the blueprint.
Luckily all the little details all already work in the core code so you don't have to do much.
Copying Core Code
When you copy the code out of the core code, you have to do some renaming of the .cpp and .h files and some class names.. We changed the name from CreateSession to CreateCustomSession. That change is both to the file names, and in the files to the class names. Note that the core engine divides files by Public, Private, and Classes so you have to look around a bit.
Another problem we found was that FOnlineSubsystemBPCallHelper is internal and private so you can't get at it (it is in UnrealEngine/Engine/Source/Runtime/Online/OnlineSubsystemUtils/Private/OnlineSubsystemUtilsPrivatePCH.h)
So we copied that into our project and renamed it so we can play with it.
Settings
The whole purpose of making our custom session was to add a password, currentMap and settable lobby name and some other settings. Settings in a session are a key-value pair, such as "password":"supersecret" and always have a FName key, and the value can be string, integer and several other things. We made a SetCustomSessionSetting and a GetCustomSessionSetting blueprint nodes.
In CreateSessionCallbackProxy the code looks like Settings.NumPublicConnections = NumPublicConnections; which then is converted to session setting set calls. We want to add our own so we do calls like Settings.Set(FName("password"), ourpassword, EOnlineDataAdvertisementType::ViaOnlineServer); That ViaOnlineServer is very important. It means that the session setting will get sent to all clients looking at the session.
Returning Data
Sometimes the blueprint node needs to have output, like FindSessions has an array of sessions it found.
You declare the delegate like this...
DECLARE_DYNAMIC_MULTICAST_DELEGATE_OneParam(FBlueprintFindSessionsResultDelegate, const TArray<FBlueprintSessionResult>&, Results);
and then...
In UnrealEngine/Engine/Source/Runtime/Online/OnlineSubsystemUtils/Private/FindSessionsCallbackProxy.cpp
you will see that OnComplete has return values like
       	if (bSuccess && SearchObject.IsValid())
	{
		for (auto& Result : SearchObject->SearchResults)
		{
			FBlueprintSessionResult BPResult;
			BPResult.OnlineResult = Result;
			Results.Add(BPResult);
		}

		OnSuccess.Broadcast(Results);
	}
	else
	{
		OnFailure.Broadcast(Results);
	}
(
) 20:04, 7 June 2016 (UTC) (Advanced C++ Blueprints Section)
( ) (Initial Article and Basic Blueprints Section)