Basic Level Design BSP (Unreal Tournament)
Introduction
This tutorial will cover the very basics of level design; how to create walls, floors, ceilings and windows using only BSP.
What is BSP?
Binary Space Partitioning, or BSP for short, is a simple and quick way of laying out space in your level; defining what's solid and what's not. Designers place BSP Brushes to create Geometry which is what forms the foundation of a level. You may hear people talking about BSP shells, Brushwork, or Geometry; all these mean the same thing, that being the layout of BSP Brushes used to create the level.
Why is BSP important?
BSP is both very fast to work with, and can be edited easily within the editor, it allows designers to quickly prototype and modify levels which is crucial in the early stages of both the level's development, and the game's. It's also very basic and easy to work with once you understand the basic rules and how to avoid pitfalls. Most level designers will start off a level with BSP, test, edit and test again until they are happy with it, or till they run out of time. learning BSP is the first step to creating levels, without it you'll likely end up with a confused mess.
What are meshes then?
At this point meshes are used to make things pretty, they're a lot more malleable and efficient, but need to be created outside of the editor in a modelling program and take a longer to make and edit. If you're just starting a level, or level designing in general, just stick to BSP, ignore meshes unless you know you need them (I'll expand on this near the end).
Adding brushes to your level
BSP brushes can be found under the place mode under BSP From here you can drag any brush shape you'd like into your level. While dragging you will see a red outline of the brush, when you let go the brush will be placed into the level.
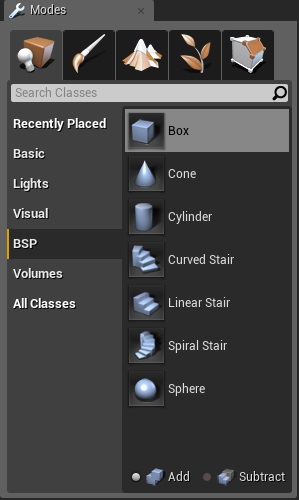
Brush size and shape
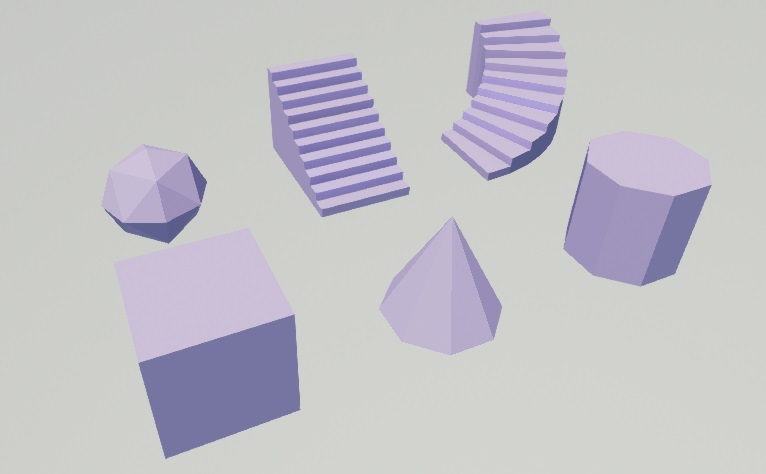
BSP brushes come in a variety of shapes and sizes, they can be then edited further to create almost any shaped you desire.
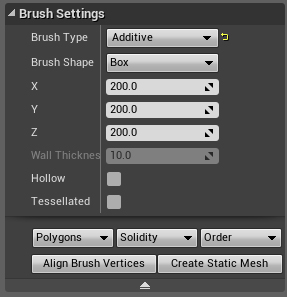
You can use the details panel to set the size of your brushes and their type as well as more complex options, some of which are hidden under the drop down arrow.
Brushs and the grid
One of the downsides to BSP is that it's quite prone to breaking, and one of the fastest ways to break it is by working off the snap to grid. If you work with grid snapping off, you're gonna have a bad time. Any grid setting over 10 is fine. If you find yourself with brushes floating in space you can save them by pressing the Align Brush Vertices and this will place the brushes back on the grid for you.
The only exceptions to this rule are cylinders and spheres. The centre (or origin) of the brush should be on the grid, but the vertices often will not be.
Rotating Brushes
Long story short, don't rotate brushes at anything other than 90 degree increments. If you, for example, wanted a diamond shape or a diagonal walkway, it is much better to edit a brush to fit that shape than simply rotate it to fit. This simply ensures the vertices are on the grid and that everything matches up nicely. If you need to rotate a complex mesh and want to avoid rebuilding it entirely at 45 degrees you can use the Align Brush Vertices tool; the engine will move vertices to their nearest grid point and won't care about modifying the shape of the brush, so it's not foolproof.
There are some times when you need to have a brush rotated at an odd angle, or rotate it in more that 2 axis. This is a really good place to use a simple mesh! there are a few basic ones provided in the editor, like cubes.
Building Geometry
In order to turn brushes into something the player can move around in, the engine must first Build Geometry . This is a fairly complex mathematical process in which the engine breaks down the brushes into parts which it can render and display to the player. By default, the UE4 will build your geometry for you as you make changes. However, from time to time it can miss an update or, on larger maps, this behaviour can get irritating. You can turn off this default in the Editor Preferences under Level Editor -> Miscellaneous -> Update BSP Automatically.
You may also manually build geometry by selecting Build Geometry under the Build menu, or simply press build (this will build everything and thus may take a long time). Personally, I have made a custom keybind for build geometry to save time.
You will want to build whenever you make a change to a BSP brush, including deleting one. If you delete a brush and it doesn't seem to disappear, rebuild. Change a brush's size? rebuild. Something doesn't match up with the wireframe? rebuild.
Additive and Subtractive Brushes
BSP brushes are all about creating and carving solid space to create a level. All levels start empty, filled with "air" or "void," so in order to create a level we must add solid areas for the players to move around. These areas can then be carved into, further editing the space. To facilitate this BSP brushes come in two types:
- Additive brushes - Add solid space to the level. If you wanted to make a wall you'd need to add solid space your level.
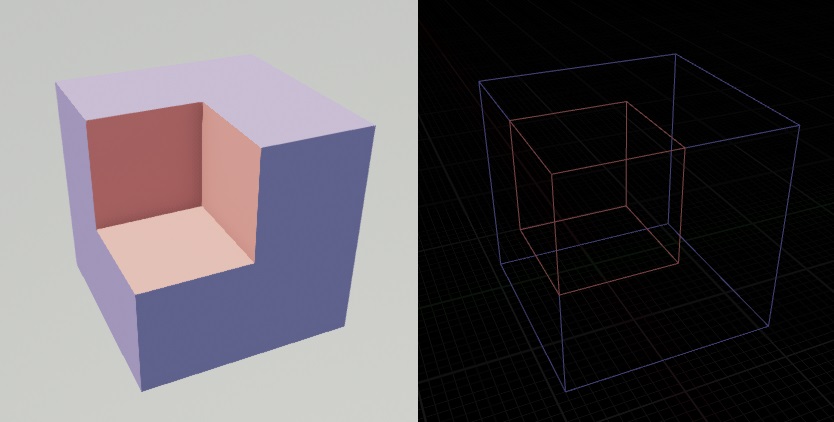
- Subtractive brushes - Subtracts solid space from the level. If you wanted to make a window in said wall, you'd want to subtract space to create a hole.
BSP Order
When the engine builds geometry it processes each brush in a particular order, designers can manipulate this order to get the desired effect. For instance, building a frame inside a window might require the designers to place Additive Brushes inside a Subtractive Brush. The order in which these instructions are processed defines how the end result will appear. You can change the order of brushes from the details panel, hidden under the drop down arrow. There are however only two options. To First and To Last.
I like to think of this as a stack of instructions written on paper, when you want something done first you put it on top, when you want it done last you put it on the bottom. You can move groups of instructions to the top or bottom but they stay in the same order as a group.

Geometry Mode
Geometry mode allows you to modify brushes into interesting and useful shapes. You can select Geometry mode from the Modes tab. It's at the end and looks like a cube with the end chopped off. It can look a little intimidating but it's actually really simple.
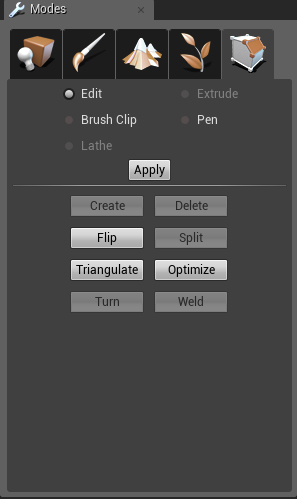
The most important feature of geometry mode is the ability to select individual parts of a brush and move them around, similar to how you might do so in a modelling program like 3DSmax, Maya, or Blender. You can select vertices, edges, and faces independently. Then you can use the standard transform tools to move them around and create the desired shape. The majority of the time, I work in geometry mode and stretch and pull brushes to fit the size I need rather than using the details panel to set them to a particular size.

Extrude Tool
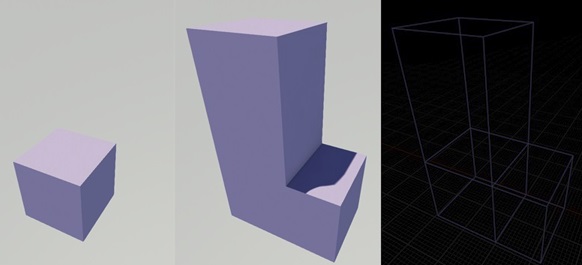
Sometimes you need to create more complex shapes than simply moving faces and vertices around will allow. The extrude tool allows you to take a face and pull it out from the brush, creating new edges and faces as you go. This can be useful when adding more detail, or when you want to avoid making multiple brushes when you don't need to. In order to activate the extrude tool select a face, then select extrude from the geometry mode toolbar. You may see a message warning you that extrude only works in local space. This isn't anything to worry about.
There are two ways to extrude. The first is to use the transform widget to move the face, the second is to enter a length value in the geometry mode toolbar. You can also define a segment number, if you use this make sure your segments remain on the grid.
Brush Clip Tool
Almost the inverse of the Extrude tool, the Brush Clip Tool allows you remove part of your brush and fill in the gap left behind. This can be useful when you want to get odd angles, or would otherwise not be able to create the desired shape easily.
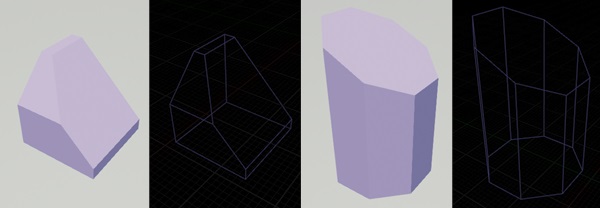
The brush clip tool is a little trickier to use and only works in the orthographic views (Top, Side, Front). First select the brush you wish to clip and the brush clip from the geometry mode toolbar. This should give you a small square that follows your cursor around the grid. By pressing space you can start and end a line to cut along. Once you're happy with your cut line, you can press "apply" to cut it.
You will also see a line running perpendicular to the cut line, this defines what part will be deleted. You can flip this by selecting Flip Normal. The split option doesn't delete any part, but creates a new brush from the part removed.

Pen Tool
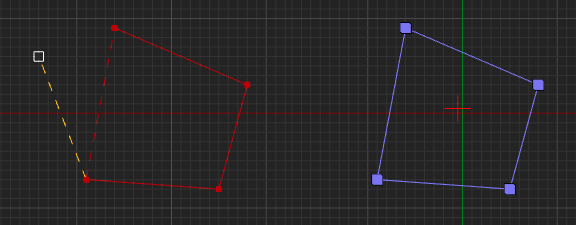
The pen tool allows you to draw a shape from vertices, and then extrude it into a complete brush. Drawing a new brush functions in a similar way to the clip tool; it only works in the orthographic views, using space to place vertices. Each vertex placed links directly to the one you just placed. After placing your third vertex you will see a dotted line appear between the first vertex, and the last placed vertex. This shows you the edge that would be drawn if you were to finish drawing the shape there in order to create a valid brush. You can complete a shape at any time by pressing "enter" or by placing a vertex over the first one. "Escape" will incrementally remove vertices in the order they were placed, which is very useful if you make a mistake. The only option you need to know about is Extrude Depth , which sets the depth to which the engine will automatically extrude the brush too. Like the extrude tool, make sure your extrude depth will keep you on the grid.
Issues and Fixes
BSP holes
While BSP is quite robust, you can run into a few issues. The most problematic being BSP Holes. Holes appear when the engine gets confused with brushes and doesn't know what to do, so it does nothing.
Editing or clipping brushes can sometimes cause faces to get collapsed together or deleted entirely. This is probably the main cause of holes, and it's fairly easy to fix by using the create tool. To do this, select every vertex around the hole in a clockwise motion, then select "create." This will make a new face across the selected vertices. Selecting the vertices counter-clockwise will create a face that points inwards, selecting in a random order will create a very messed up face, which may cause the engine crash so be careful.
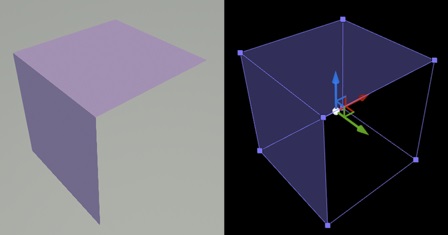
In some cases a face will be pointing the wrong way. You can test this by moving the camera inside the brush with it selected. If you see a shaded face where you wouldn't expect it, select it and press "flip" to reorientate the face. Brushes with a single face can also cause major holes.

Triangulation and Planar faces
Brushes must have planar (flat) faces. This means that the engine must be able to draw a flat surface between all the vertices of any face. In some cases you may move a vertex of a face and cause it to become non planar; this will cause the engine to automatically create a new edge, and thus a new face, in order to keep everything planar. This can cause a few issues.
Firstly, there are multiple ways to split a 4 or more sided face, and the engine won't necessarily do what you expect. You can, however, use the Turn tool to change between the options quickly. You can also delete the faces and use the create tool to form new faces as you see fit.
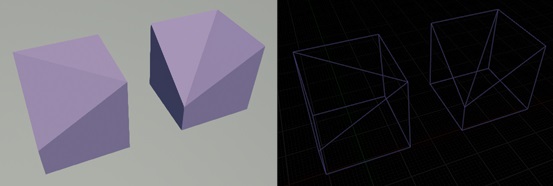
Secondly, when these triangular faces intersect with other brushes they can cause holes, or just flat crazy behaviour in general. One fix is to use the Triangulate tool , followed by the Optimize tool. This forces the engine to turn all of the brush's faces into triangles, then it will attempt to simplify the brush.

However, there is an issue with this trick. The optimize tool can render more complex brushes uneditable by removing supporting vertices and edges. Most of the time you'll want to try your best to keep faces planar. A good tip for this is to use the clip tool or, with square faces, always move edges rather than vertices.
Getting caught on BSP
BSP collision isn't perfect. Sometimes, players will get caught on a floor or wall and be unable to move without any obvious reason. This often happens at brush seams , areas where two or more brushes meet. If this happens, you can try a few things to fix it:
- Simplify the brushes in the area to remove unnecessary seams.
- Change the order of brushes. I try to make it so that effected brushes are processed as early as possible, and avoid layering addition and subtraction too much.
- Use the triangulate & optimize trick as mentioned above.
If these fail to resolve the issue, it may be necessary to make some minor changes to the design, or entirely rebuild the area using a different brush approach.
Working Methods
There's no wrong way to work with BSP as long as you're not creating holes or snagging players. However, there are a few basic things to watch out for. Firstly, always try to use as few brushes as possible, but also try to keep brushes fairly simple. This is a balancing act. It would be theoretically possible to create an entire level from one BSP brush, but it wouldn't be advisable, as the geometry can become overly complex. Editing the brushes may become difficult as vertices may develop unexpected attachments to other parts of the brush. However, the more brushes you add, the longer it will take to build geometry, as there will be more pages of instructions.
For example, there are two ways to build a room from BSP. The first is to create a large additive cube with a smaller subtractive brush inside; this gives you a room with only 2 brushes. The other way is to use additive brushes to form each wall, followed by the floor and ceiling; this method would use 6 brushes rather than 2. In cases where you know you want a room of that size and shape it would be more efficient, and less risky to use the 2 brush method.
Personally, I like to work with additive brushes. I find it gives me more fine control over the level and makes editing easier, it fits the way I design; you may be different. Don't be afraid of trying things. BSP is quite resilient when you stick to the grid no matter what method you use.
Go make some BSP
I have not covered everything here, but this should see you though the majority of maps you're likely to create early on. If you have any questions, or need help, you can reply to this thread, send me a forum PM, or find me in the #UnrealTournament irc channel.
For more on BSP see the Official Unreal Engine Documentation!