Basic DM Setup (Unreal Tournament)
Contents
Introduction
This tutorial will guide you though setting up a basic DM map, including weapon pickups, ammo and bot paths. This isn't a tutorial about the details of level design, but simply a quick start for new people to start working with UT.
Initial Setup
There are a few housekeeping steps to do before you start throwing together a level. The first is your file and folder structure. It's important to correctly set up your folder structure so that any extra asset files are easy to find, and to make things as easy as possible for server admins.
The best method I've found is to create a folder with the same name as your map in the Content/Maps folder and store all your stuff in there. That way everything is together and it all makes sense. For this example I'm going to name my map DM-Tutorial so to start with I'm going to create a folder named DM-Tutorial in the content browser. You can create a new folder by right clicking on the Maps folder itself.
N.B. Epic currently places all their maps in Content\RestrictedAssets\Maps\WIP. Since all their assets are provided with the project they don't need to worry about missing assets like community maps do. I would strongly advise not putting anything you've made in RestrictedAssets, or any sub folder.
The next thing to create is the level file itself. If you select New level from the file menu it will give you the option of a completely empty level, or a default level with some lighting and environment already set up. I would advise starting with a blank map, that way you know what you've added, and what settings you've changed. Once the level has opened, you want to save it immediately using the same name as the folder.
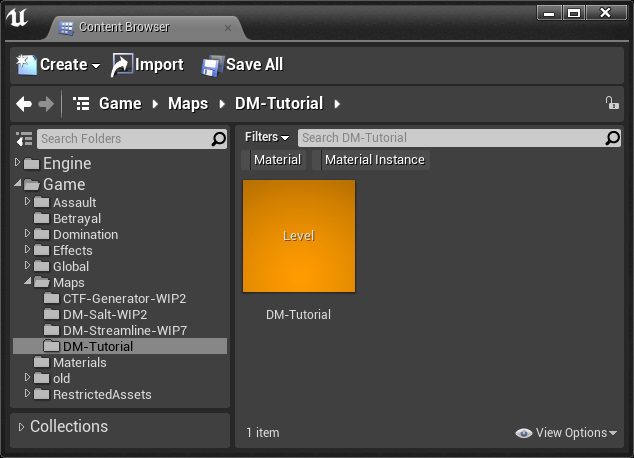
It's worth noting here that the folder structure seen in the content browser matches that in windows explorer.

Basic Environment
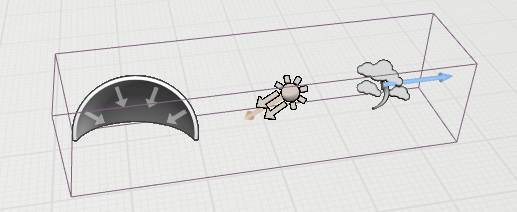
Now you should be looking at an blank viewport with nothing in it. Now we need a basic environment to start working in; by this I mean global lighting and post processing. This can be quite complex, however epic have been really nice and provided a default set up that you can copy and paste into new maps. This level can be found in Content\RestrictedAssets\Maps and is called Post And Lighting Example. Take a quick look at the different actors and how they're set up. From this you want to select the Post Process Volume, Skylight, Directional Light, and Atmospheric Fog; then copy these, open up your map, and paste them in. You should then see your level come to life a bit more with a nice blue hue. At this point I like to move these actors closer together, normally into the bounds of the Post Process Volume. This doesn't change anything but makes things easier to find when you need to.
Geometry
Now you are ready to create your level proper. If you've never used BSP before take a look at my Otherwise create some cool and interesting geometry. Try to think about where you want weapons and health pickups as you work.
Basic Lighting
With some geometry in place you'll want to add some basic lighting to help brighten up your level, especially if your level is entirely enclosed. The simplest way to do this is with point lights which are available on the Basic tab of Place Mode. Light settings are quite basic and straightforward. The main settings you need to worry about are;
- Intensity: How bright a light is.
- Light colour: Sets the colour.
- Attenuation Radius: How far the light reaches, this isn't effected by Intensity allowing you to have very bright lights over a short area, or very low level light over a very large area.
However lighting can be quite complex and it's easy to run into some confusing messages and issues. Firstly lights have 3 possible modes; Static, Stationary and Moveable. While both Static and Stationary lights cannot move Stationary lights can change colour and brightness where as Static lights can't. Moveable lights are entirely dynamic and can move and change colour at will, but take a lot of resources to render. You should always try to use the most basic light you can. It's worth pointing out that the engine will by default give you Stationary light as a middle of the road option.
There is however an issue with using entirely Stationary lights; you may only ever have 4 Stationary lights (inducing the sun light) overlapping (as in within each others Attenuation Radius) with one another. Doing so will flag one of the lights with a red X letting you know there's an issue. Lights marked with X's will calculate as Dynamic rather than Static to preserve any dynamic settings already set up. If this happens it's not the end of the world, it's just messy and unnecessary. You can enable a special view mode called Stationary Light Overlap which will shade overlapping areas in red, allowing for easy debugging.

There is however also an issue with Static lights. Highly coloured static lights may occasionally appear washed out since they rely upon reflection capture to help fill in information that more dynamic lights use by default.
Lightmass Importance Volume
Like geometry the engine needs to calculate lighting from time to time. This is not as critical as building geometry after each change, since that can crash the editor, however it is advisable to do so fairly frequently. To help the engine focus on the level rather than the entire map it's very good practice to add a Lightmass Importance Volume which encompasses the entire play space. Building lighting without this will pop a warning prompting you to add one.
Reflection Capture
Once you've added lighting you may find your map is looking a little lacklustre in the lighting department. UE4 uses a powerful material system which is highly effected by reflections. To accommodate this you need to help the engine gather information, and to do this you need to add Reflection Capture Actors to your level. The most basic and advisable of these is the Sphere Reflection Capture. When you drop one of these in your level you should see everything change as the engine automatically applies corrected reflection to the materials.
In general you should have one of these per major area. You can change the size using the Influence Radius setting; try to keep them relatively small (the default size of 3000 is a good starting point for entire rooms). Something to watch out for however is colour bleeding. If you have nearby rooms with very different colour textures or lighting take care to restrict capture actors to each area, otherwise you may start seeing colours where you don't want them.
These can feel like "Make my map look good now" actors, but take care not to add them too liberally; they can bloat file sizes more than you would expect!
Movement
Lifts
Lifts are fairly important to UT movement. Epic have provided a customisable generic lift blueprint and a few optional meshes for people to use. To add one to your level search for Generic_Lift in Place Mode. Alternatively open the content browser and make sure you have Game selected in the folders section, then simply search for lift. This will show you all the assets with lift in the name. If you hover over each asset you can see exactly where it's located in case you want to navigate to it directly. Look for Generic_Lift and drag it into the level like you would a BPS brush.
There are a few noteworthy settings here, the most important being Mesh Scale and Lift Destination. Mesh Scale allows you to scale the lift to the desired size, this is preferable than using the general transform scale as it won't multiply the Lift Destination, it can also confuse AI.
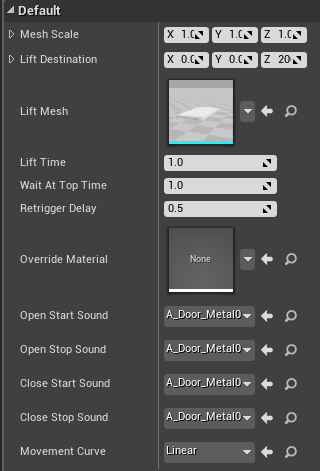
Lift Destination controls how far you want the lift to travel when activated. You should see a slightly transparent 'ghost' lift sitting just above your actual lift. This shows you where the lift will move to when activated.Lift Mesh, this simply selects which lift mesh you want to use. Pressing the eyeglass next to the entry will take you to the folder containing not only the default mesh, but also a selection of other available meshes.
Lift time defines how long the lift takes to reach it's final location. This is the transit time rather than a movement rate so it's very dependent on how far the lift has to travel. A value of 1 on a small lift might seem very slow, but on a long lift it might be too fast. It's important to play with this value when creating lift jumps, making sure players are able to complete the move easily (or not so easily if you prefer). Wait At Top Time and Retrigger Delay can be left at default unless you specifically want to alter them.
The sound entries at the bottom of the section allow you to override the default sounds with alternative sounds.
Jump Pads
If your level calls for jump pads they can be added in a similar way to lifts. In this case you are looking for BaseJumpPad and not just UTJump Pad. Simply drag it into your level as desired. The most important setting here is JumpTarget. There are two ways to set this. The first is by moving the JumpTarget marker in the viewport, the second is via the details panel. The only other important settings with the jump pad is the Jump Time, found in the detail panel under Jump Pad. This defines how long it takes for the player to move from the base to the target. Setting this very high or very low can cause unwanted and dangerous behaviour, like slamming people into ceilings or punting them into the sky to fall to their death.
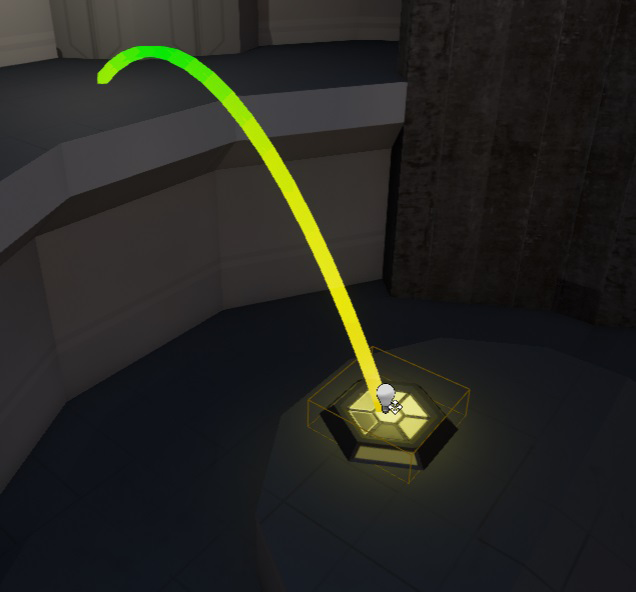
You can also change the Colour and Jump Sound in the details panel to match the theme of your map.
Pickups
Weapons
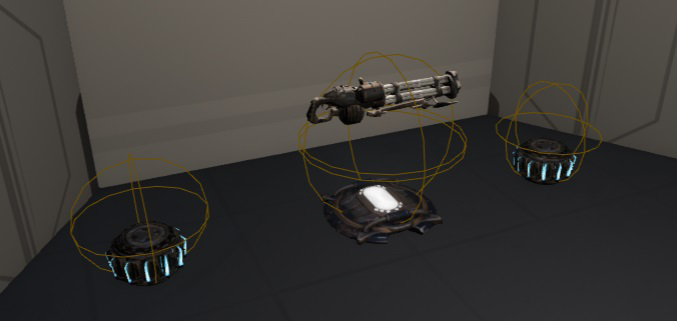
Once you have your extra movement sorted it's time to get down to business and add the features that makes this a Deathmatch. First off weapon pickups. By now you should have a good feeling of how to add things to the level. Look up WeaponBase and pull it into your level like you would a light, lift, jump pad or brush. Unfortunately due to the way the bases are currently set up it will start off in the ground, make sure you pull it up so the base sits neatly on the floor (you may have to lower your grid spacing for this). The only crucial setting you will need to modify is Weapon Type, this is a drop down menu in the details panel. Simply select the weapon of your choice and hey presto you have a gun.
Ammo
Ammo is again added in the same way, however instead of being a particular setting on one actor each ammo type has it's own actor. Serch for ammo, find the type you want, and drag it in your level. Once again it will appear underground and you'll need to pull it back up into place. A good top for this is the End key, this will move actors down until they collide with something, effectively putting them on the floor.
Health, Armor, and Other Pickups
Once more, same method. Search for health in Place Mode. You should see a Large, Medium and Small entry. Large refers to the Keg-o-Health, Small are Health Vials. Medium is the standard size health pickup. Armour however works more like weapons, having a single base actor which is set to an armour type. Pickups like Udamage can be found on the PowerupBase.
Player Starts
Levels need somewhere for players to start, hence the Player Start. Again same search for and drag over method works here. As a general rule try to make sure you have one player start for each player with a minimum of 8 player starts. So if you have a very large map you might have 16, on a dual map you likely want at least 8.
So far everything is looking great for a multiplayer session. To enable bot support we need to add a NavMesh to our level. Nav meshes tell the AI where it can and can't go. In the past this was done by placing individual nodes that the engine would link together to form a network of paths. NavMeshes are a lot easier to set up and are a lot more robust. Add a Nav Mesh Bounds Volume to the level and in a similar fashion to the Lightmass Importance Volume encompass the level with it.
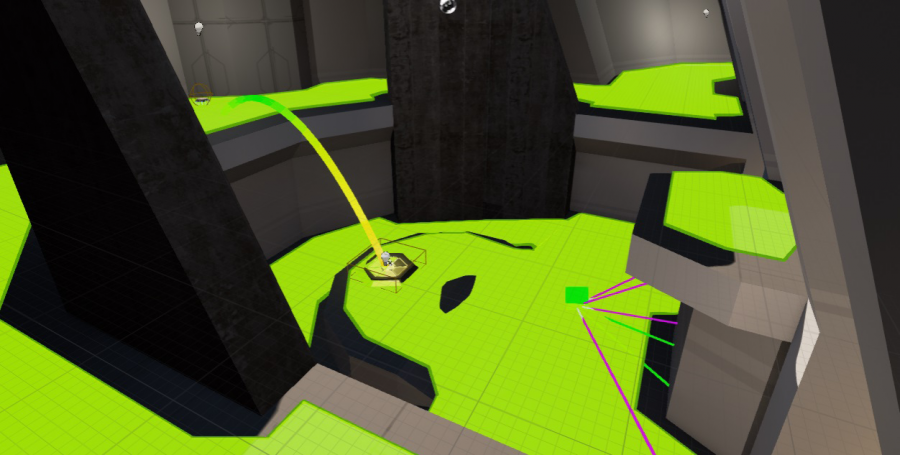
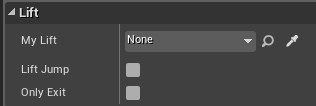
Since NavMeshes are a generic UE4 tool they don't allow for the extra UT movement we want our bots to be able to do, for example lifts. To make lifts work properly you'll need to add UTLift Exit actors at the exists to your lifts, including lift jumps. Each exit actor has a few settings, most importantly a My Lift setting which needs to point to the lift in question. Easiest way to do this is to use the dropper tool to select the lift. You may also want to flag the exit as Only Exit to stop bots trying to fall back down lift shafts. Similarly Lift Jump notifies the bot that they must execute a lift jump to get to that exit.
Distribution
Once you're happy with your map it's time to make it ready for release. The first place to look is the World Settings (found under settings) from here you can set your Level Summary. This includes suggested player counts, an author name, and a description. Next make sure you fully build your map. Then save it. Finally press Publish and select Publish this level. The engine will then Cook and Pak your map ready for play. It should prompt you if you want to share your map (currently does nothing) and if you want to navigate to it's windows location. You should also now see your map in the build.
A Note About Backups
Do it. Have several backups if you can. There's nothing worse than working on a map for weeks only to have it mess up and have no backups. So do it!